How To's

Sunday, 27 March 2022

Saturday Playtime

We are house sitting for my Grandmother at the moment which has been really lovely! With Baby Dotty due to arrive in the next couple of weeks it's been so nice just to spend some time with my lovely other half (as we're currently living with my parents) and has been a really relaxed place to start my maternity leave. 

Of course I brought projects with me to do - the hoop containing the Bluebell and By the Ocean ATCs, a couple of books to read and some Dotty Textiles website projects to work on but I hadn't planned on what I would do once I'd done all of the above! I had no back up fabrics for the next project and was wandering around at a bit of a loose end yesterday morning - until I remembered that actually, I have a studio at the back of my Grandmother's house (a rather grandly named room in her garden shed) which has lots of fabrics in! What a numpty I am. Blame the baby brain for that one!

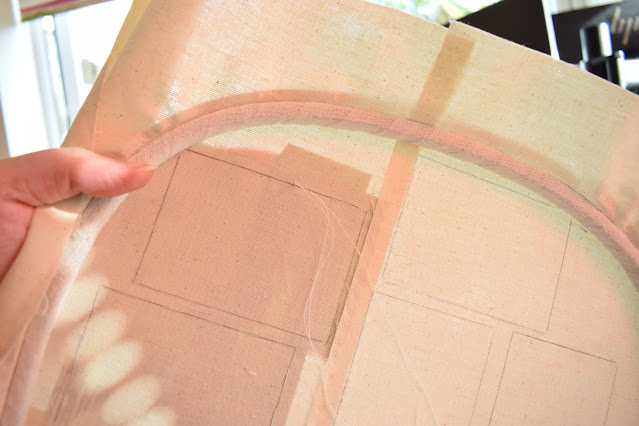
It's where I house a lot of the items I take to my workshops so I have my scrap baskets, bolts and rolls for potential kits that don't fit in my house, threads, hoops etc... I don't have large pieces of my backing fabric (calico) but I did find some of the cut up squares I use for workshops, once painstakingly cut into squares ready to go which I then had to stitch back together again to fit in the hoop I wanted to use.

I just about managed to get eight ATC shapes drawn in around the seam lines, I don't particularly want the extra chunky layers of calico so I'm having to work around them but it should be ok. A couple of corners are slightly lost in the edge of the inner hoop but I don't think I'll be stitching quite that close anyway until I come to add on the card backings. 

I did have a little bundle of fat quarters and a gorgeous batik pack with me that I'd brought to start of the previous ATCs, and then I was able to combine that with some of the scraps from my scrap basket. The theme for the next set of cards is Summer Meadow and I researched for a little while online trying to come up with something. My vague idea was to do some close up daisies, as if you were lying in the meadow so that you were right alongside the flowers, and then try to make it appear like they were fading off into the distance, possibly by detached chain stitch flowers or even french knots getting smaller. 

It was all starting off very green for the background as well but I couldn't make my scraps work as the shades didn't gel together nicely - until I found the blue/green batik print in the bottom left corner of the below picture. Suddenly certain scraps fell into place with it which is just a brilliant moment!

It was so hot sitting at the kitchen table yesterday with the sun beaming in through the open back door! I ended up having to close the door and blind and open windows instead to try and prevent getting sunburnt! Incredible weather and absolutely perfect to be creating summer meadows in. 

My technique for laying down the first lot of fabrics can be a tad fiddlesome. Unless I've got a specific shape the background layers are just wiggle cut at about the right depth and width and then layered up on the front, whilst I'm holding the hoop up to the light looking at it from the back to make sure the template edges are covered. The fabrics are then stitched in the same way, with a running stitch worked around the box, following the lines and me flicking the hoop back and forward to make sure that the layers are getting stitched nicely, holding on to the fabrics at the front so that they don't fall off. Once one of the long sides is stitched then I can gently tug the fabrics across the shape so that they are lying flat to remove crinkles.

This then leaves the centre of the fabrics open if I were to slide more fabrics between the layers (like with the trees and beach huts) and means that I can see where my edges are whilst I am embroidering later on. 


I did consider using a fusible film for my petals, but that I definitely didn't have in the studio and I was having too much fun to stop so instead I used the palest batik from the pack I had with me to cut some daisy petal shapes. Batik print fabric tends to be a much closer weave so is less likely to fray than your average quilters cotton. I love the little splashes of blue that are in these petals actually, they go really nicely with the slight blueish tint that's happening with the backing fabrics. 

My plan is to have two white daisies with a fabric backing, with stems in this lovely contrasting green felt, and I've added extra stems which can either be just leaves, or I could perhaps add some pink Fox Glove type flowers (not that you necessarily find them in a summer meadow) for some colour contrast? The daisies themselves will be based on those ones which have the yellow centres as like little cones in the middle? Or are those not daisies after all? Whatever they are, the yellow will pop really nicely with the colours I've got already to add some summery colours to these ATCs. 

I've tacked each petal on with one stitch down the middle, and also tacked on full length grassy strips which I will cut out the centre of where they cross over the flowers. This is much easier than trying to match up shapes either side of the flowers and means that the direction flows nicely and that I've got the tapering right. It looks a bit odd to start though! I've left most of the cards like this until I come to stitch each one down properly with embroidery threads so that the felt doesn't move or go too fluffy. 


I'm wondering whether it would be too bulky to add those sort of Fox Glove/Lupin type flower head shapes in a white felt and then cover them in satin stitch to give them a padded look? Or if just satin stitches will work on their own - or even if I've left enough space! I might just end up with the smaller stitches in pinks and greens and keep the daisy flowers as the main focus. (Even when I actually draw a rough plan I'm still not all that likely to stick to it!! I definitely prefer going with the flow.)

My evening fun was to start adding proper stitches to hold down the felt strips where I'd cut them on the first piece, and also to start protecting the edges of the daisy petals. Each stem has got a line of single strand back stitch up the centre to completely hold the stem down, and then long random straight stitches working their way around the blank felt to add texture. So far it's all been done in one colour but I might go back and add another colour of green to give some depth - maybe a darker colour?

The daisies presented me with a conundrum - I love the ethereal look of just the petals but I also love the splashes of blue and didn't want to cover those up with thread, although the edges do need securing. I settled on two strand blanket stitch going around each petal and actually I really love the look! It leaves all of the colours and the centres of the flowers free and open so keeps quite a delicate appearance. Once the yellow centres have been added (french knots obviously!) I'm hoping they'll look really good. 

Now I just have to keep playing with needle and thread - what hardship!


Saturday, 26 March 2022

By The Ocean ATCs


I think I may be addicted to making these little cards - at the rate I'm going I'll have done the entire year's worth of themes in a couple of months and then I'll be twiddling my thumbs in Autumn trying to think of other ones to make! They are just so much fun to do and present a whole different set of challenges being on a smaller scale. You have to think a little bit more about composition and the scale of your stitches or trimmings or beads that you are using and, for me, I like to also think of ways to make each one individual whilst all looking relatively the same.

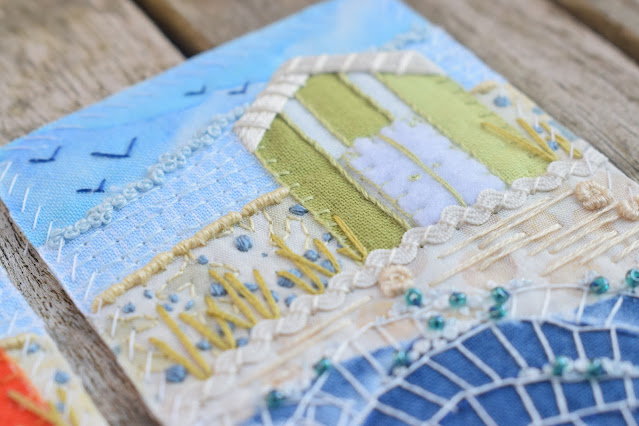
This set of cards is for the June swap, the theme of which is By/Under the Ocean. I've gone more for By the Ocean as, whilst rifling through my stash, I came across my 'beach hut stripe' fabric which is a fat quarter I bought several years ago that has four colour sets of stripes across it. Each colour stripe is separated by a white stripe, and they are in sets of three shades; orange in three shades, yellow, green and brown. Almost like a striped ombre. The scale of these stripes was brilliant because it meant I could use all three shades in one hut without it being oversized and they look pleasingly regular too, if you know what I mean?

I knew I wanted to use the different colours on each card, but I'm not keen on brown beach huts so I asked my lovely other half which his favourite colour set was and he chose the orange one which is why there are two of those.


I've tried not to overcomplicate these. The beach in my mind is serene, sandy, with the odd shell or sand worm cast, slight scrubby grasses toward the edge where it turns into a more rocky, grassy area, and with the waves lapping in and out with that delightful whoosh whoosh noise as they swap sea treasures with the sand. 
The top blue fabric is one that already has a slight cloudy look to it and I haven't done any stitching to that, save for the single strand fly stitch birds that are passing by. 
The light blue fabric underneath is a Makower Linea print and I've just highlighted the horizontal stripes with a single strand of back stitch to add texture, and some french knots on top. 


Underneath that I've got a gorgeous batik fabric which has blue dots on and some strange little leaf shapes every now and then. I like in particular how this fabric has differed in each card. One of the cards has no leaf shapes at all but lots of dots, which I've gone over in a rough sort of satin stitch to bring out a 'bobble' texture. Others have less blue dots but more shapes in, which I've gone around in a single strand of back stitch - mainly to help hold this fabric down where there are so few bobbles. This has been edged in bullion knots. 


The beach huts themselves were worked on first if I recall rightly because I was slightly concerned with them fraying (they are just cut and tacked down - not glued or anything with fusible films). I have worked back stitch up each of the inner stripes and then whip stitched over the top to give a chunky texture. In my mind I was thinking of weather-beaten boards that were slightly out of place from each other with obvious gaps between them and a rustic charm. 
The outer edge of the hut has been edged with trusty blanket stitch to stop any frays and then I was left with the conundrum of what to do with the roof and door! In previous little huts I've either used another fabric for these or stitched them on but I didn't know what colours to do them so in the end I plumped for using white felt for the door, initially stitched straight down the middle to hold it in place whilst I blanket stitched around those edges to match. Little tiny french knots have made door handles which I think look really sweet. 
The roofs are entirely stitched and I've used an off white here to try and give them a more salty/sun bleached look? I've used long straight stitches which are worked from the outside edges of the fabric up toward the top of the point and then, to help hold them, I've done little stitches perpendicularly across these to sort of look like slats but, more practically, to stop the stitches moving and revealing the beach hut colours underneath. I was careful to angle each side so that it matches the slope of the opposite roof angle. 


The sandy layer beneath has been edged with a sweet baby ric-ric trimming I found in the-stitchery in Lewes when I went to restock them with Stitchscape kits. I tend to try and stitch over ric-rac rather than through it because it can be fairly tough to do! I've ignored the big circle pattern on the fabric print itself and just worked random horizontal straight stitches to kind of emulate those ripples you get on the sand, and added some shell looking things with bullion knots. 
Above the ric-rac I've added some scrub plants with a two strand fly stitch, kind of blending the beach huts into their surroundings to look like they've been part of the scenery for a while. 


I love the fabric I've used for the sea. It had a print which looked like big scales, or waves coming in and I've kept these shapes as the base for my wave shapes - you can still see the print where the lines are whiter and more of a faded blue which reminded me of the little light ripples, or sea horses dancing in to the shore. 
Last year I came up with a technique of using blanket stitch to make wave-like features and I wanted to use that here. The blanket stitches themselves are worked off rows of back stitch which help to keep things regular and in shape so firstly I've followed the lines of the print with a single strand of back stitch in a dark blue to match the fabric colour. 
The blanket stitches then start at the sand line (you have to consider whether you want your water to be going in or out and this will dictate which side you start with because the stitches will sit on top of each other) and the upside-down 'L' shapes worked into the join of each back stitch, but the length of the blanket stitches can vary and be angled differently to give a more organic look. The rows underneath them are worked over the top and can layer over, or keep gaps between the rows to fill with knots. 
Waves were angled in from the side as the different sections are layered up, and the last blanket stitch rows to go in are at the bottom of the card so that they look like they are about to roll over those nearer the beach. I hope that sort of makes sense?


I've filled any gaps in the blanket stitch waves, or odd edges on the sand with french knots, firstly in white in different sizes (three, two or one twists), then in a light metallic blue for a touch of light sparkle, and finally with some little beads because I found them in my sewing box and the water wasn't quite sparkly enough!

There are obviously so many ways I could have approached the water, with lots of french knots (for lots of spray) rough satin stitches to build up texture, rows and rows of whipped running stitch to create more linear waves... but I'm pretty pleased with my more abstract interpretation. 


Because the huts are slightly different colours, they also work really well together in a row don't you think? If I wasn't swapping them I could frame them in one long frame as a set!
I'm so looking forward to seeing how everyone else interprets this theme - it's a pretty open one as you could look at coral reefs, rockpools, the beach, the open sea, different sea creatures, cliff faces, ocean sports.... Maybe I could just keep re-doing this theme actually in my bid to make as many artist trading cards as possible. I do love them so!

Friday, 25 March 2022

Bluebell ATCs


There is such a sense of satisfaction when these completed cards are cut from their hoop and separated into their individual selves. The images suddenly become sharper and clearer, and the subtle differences more obvious. Although the overall design is the same - same number of trees, same order of fabrics, same colours used and techniques used in each section; the shapes aren't cut the same and the patterns in each section are different which leads to slightly different elements or emphasis within the embroidery. 

These Bluebell colours just make my heart sing, don't they you? I have so many happy memories of walking through woodlands crammed full of these delicate purple/blue flowers with their discreet scent that you can only smell whilst in that magical place. I am endlessly trying to capture the true colours of Bluebells in my photos - in real life they are more purple than blue - but the lens cannot capture what the eye can see. Or I'm just not a very good photographer. In these embroidered versions I'm not necessarily going for a true likeness but more a feeling that captures what I feel when in a Bluebell woodland.


You can't really tell but the top fabric layer is actually a print with leaves and little birdies on. Sadly most of the birds ended up disappearing between the trees rather than being visible, although you can just see one peeping out in the above photo. I've used a single strand of green to pop a few straight stitches in the leaves, with a whipped running stitch for any long curving stems.

I love the space dyed fabric underneath though, it has yellow tones and darker green tones which reminded me of the dappled light you get through the trees if you visit during the golden hour. I've tried to keep this idea by using a single strand each of a green and a yellow for the seed stitch, I'm not sure you can tell in this photo though, the colours are fairly subtle. 


I ended up with three different blue fabrics to create my blue haze background, the bottom most one contained some yellow to try and match with the sunshine further up. The top blue fabric which is 'deepest in the wood' is the darkest one to try and imply some shadow and then I've got a nice mid-tone blue between them. 
For the dark blue I've kept things simple and where there's been a shape (it's a batik fabric) I've gone around it with back stitches but these have ended up completely random within each card. The rest of the fabric has just been textured with some simple rows of running stitch and I've edged both this layer and the layer below with french knots to kind of hint at the bobbly texture you get in the woodland with so many flower heads clustered together. 


I decided not to add any stitches to the middle layer - other than the edging- because I wanted my Bluebell bullion knots to go up into it so there would have been too much going on. I probably would have added stitches if this were a bigger piece, you know me, I get a bit carried away, but in a small piece like this it would just have been too heavy. So instead I skipped this layer and went straight into adding my stems on the bottom floral fabric. 
I'm not sure if you can tell now but there are two phases of colour in these Bluebells. For the stems there is a higher 'back' row of straight stitches along the top of this fabric in a darker green and only using two strands so that they appear further away and more in shadow. Beneath these, at the 'front' is a lighter green set of stems using three strands so they seem closer to the viewer. It's really subtle but I like to think that it makes a discreet difference that helps to bring these pieces to life. 


Similarly I have done the same with the Bluebells - the back flowers are in two shades of darker blue and only use two strands, and the front flowers are in two shades of lighter blue with three strands. So in total there are four different shades of blue used here. 
They did look a little lost just as stems and flowers, floating in the foreground so I've gone in again and added a single strand long fly stitch to some of the more floater-y(?) back Bluebells using a variegated green thread which goes from light to dark and again picks out some sunshine feels. The front floating Bluebells have had the same treatment but with a dual combination of a single strand of dark green and metallic gold so that they really glow like they've been caught in a sunbeam. It's amazing how much of an impact a touch of metallic or sparkle can make to these little pieces!


I do like my little trees. They are a fantastic fabric which is already printed with a kind of light woodgrain type stripe so I have gone along each line with stem stitch and then edged the trees by couching on a full six strands of a slightly lighter beige colour using a single strand of the stem stitch thread - apart from on the middle back tree which has been edged all in the same colour to cast some shadow onto that tree. 
The leaves are my favourite trick of using a couple of strands of Stylecraft Special DK acrylic yarn. There are three strands to this yarn and I've taken it down to two on the front trees for ease of pulling the yarn through the fabric layers (it gets a bit tough on the old thumbs trying to pull such a thick thread through tightly woven cotton fabrics). The stitches are just french knots at either a three or two twist but they create a wonderful bobbly texture. 
For my shaded back tree I've used a darker acrylic yarn with only one strand. This can be tricky as once you've started to deconstruct the yarn as a whole you have to remember to re-twist the fibres otherwise they just pull apart like felting roving. These knots are slightly smaller too, either one or two twist. 


To help bring the whole thing together I've added some little french knots in the metallic gold thread just within the lighter leaves on the trees to kind of act like a dappled sun spot lighting up the odd leaf.
I'm really pleased with how these turned out and I hope whoever gets one in the swap gets all of the memories and feels that I had when stitching it!

Thursday, 24 March 2022

Sheffield Park


I am very much enjoying being on holiday/maternity leave at the moment. Walking is not really my friend at the minute but a slow meander around Sheffield Park to feed the ducks in the sunshine this week was definitely a kind of medicine! 
This National Trust park looks amazing no matter what the weather or time of year, there's always something new to find or look at, although it's probably most renowned for its Autumn outfit which is reflected in the most beautiful way in the different ornamental ponds. Quite often in October you will be tripping over keen artists and photographers as they all try and capture the amazing colours. 


The house is no longer part of the grounds and has been converted into private flats but it must have been absolutely splendid in its day! I would dearly love to have a nose around the building as it currently is - but as the flats sell for several million each, it's unlikely that I'll ever get to have a peek!
 

Our main reason for visiting was specifically to feed the ducks as requested by my nephew. The Mother often takes him out duck feeding and we have a huge tub of special duck/swan pellets which are easy to throw for a nearly-two year old. He's not talking in sentences yet but when he manages to lug this great heavy bucket from one side of the house to the other, dumping it in front of you and quacking....you get the message!! 
We didn't walk very far and stayed mainly around the top pond, visiting the little tea shack for a hot chocolate and then later on the cafe for a cheese scone (delicious!). 


As with many of these beautiful gardens, much of the focus is on viewpoints through the garden. Little vistas that lead you on to other areas, like secret rooms that are hidden from view until you reach that one window that reveals the wonders beyond. The ponds here are staggered down the hill and eventually lead to a huge lake with massive carp fish in it!


If you're in the area and get a chance to visit I would definitely recommend it. This is our closest National Trust property and, as we are all members, we visit often throughout the year. Sometimes it's packed with visitors and other times it's like you have the place to yourself!


At the moment it's stuffed full of Daffodils of all different kinds which are just so beautiful! In a few weeks the Rhododendrons will also all flower - there are many varieties grown here, cultivated by a past owner and it's stunning when they are all in bloom. 
This is very definitely one of my happy places. 


Wednesday, 23 March 2022

House Sitting


We've been house sitting for the past week and a half for my Grandmother. She's off on a cruise around Spain and wherever else they end up (a three part Italian section of the journey was cancelled just before they left as the Italian ports have been closed due to increased COVID-19). Oddly enough, the last time we house sat for her was the two weeks before the initial lockdown in March 2020. She was on a different cruise which ended a day early and then a couple of days after her return we went into immediate lockdown for several months so we're hoping that things don't repeat themselves as she's got a week to go on her trip and COVID cases are sneaking up again now so many restrictions have been lifted. 

I am really enjoying house sitting though, especially because at the moment my partner and I are in the process of buying a house and living with my parents so, with a new baby due in the next two weeks, it's nice to have some time just to ourselves! Now I'm on holiday/maternity leave I've also got more time to sit and enjoy her garden (in the glorious unseasonal sunshine we've had so much of recently) and sit and stitch!


I am working several months ahead of the Stitchscape swap I'm hosting, mainly because I'm concerned I won't have time with a new baby - or I just won't feel like it because I'll be in a baby bubble and exhausted - so I'm trying to future proof myself for any stress. I'm not worried about being the host, I love seeing the cards come in the post (I've had a gorgeous one for the March swap in already!) and it's easy to swap them around and send them out, but actually embroidering them can be quite time consuming and I don't want to do a rubbish job on one. Plus I'm making extra in case there are any issues with the swaps so that I have back ups. 

This afternoon I finished off the June, By or Under the Ocean, cards - other than stitching the backs on. I've gone with more of a by-the-ocean theme with my little beach huts as I have the most perfect striped fabric which screams beach hut! The fabric itself has several sets of colour stripes so all of these huts came from the one piece of fabric, isn't that brilliant? I'll go into more details about how each month's design has been made when they are all cut out and properly photographed, I just love seeing them all in the hoop together like this. 

It's much easier to have several in one hoop at a time. It's less fiddly than holding a small hoop and less wasteful too as I can draw around the cards closer together and not waste so much backing fabric. I admit those middle ATCs can be tricky to stitch though - especially with a huge baby bump at the moment, it keeps getting in the way so I have struggled slightly to reach in places and it's been a bit awkward. 

I keep trying to remind myself not to get too carried away as well - and that they've got to fit in a regular letter with a standard stamp so can't be too bulky. I've spent so much time recently making my stitches and designs come out from the hoop in as many different sticky-out techniques as I can think of, that trying to keep things as flat as possible is almost as much of a challenge now as making things three dimensional! Even the beads I use can't be too bulky, and I'm not sure about the big french knots I've made on the Bluebell cards as they are thick-ish through the use of knitting yarn. 

Luckily I've got a nifty gadget which I use for my orders which tells me whether something can fit as a regular letter or if it has to go as a large letter. If they are too thick I guess I'll just have to re-make them! I have plenty of time after all. Or up the postage on the envelopes that mine get swapped out in.


I'm already thinking up themes I could use potentially if there's interest in a 2023 ATC swap - as we go through the months now there are lots of ideas that we could use - Blossom is one I sort of wish I'd gone for but trying to think of varied themes in dull, dismal February wasn't very inspiring. Now the sun is out and the flowers are all bursting with life I've got lots of ideas for themes! Just looking around the garden gives several ideas - Blossom Trees (as mentioned), Tulips, Morning Chorus (listening to the birds in the garden is something I'm really enjoying - especially now it's warm enough to have the back door open all day), Morning Dew or Morning Frosts....

I was wandering around the garden with my camera a couple of days ago and snapped some quick photos of the variety of floral life in the garden. It was a bit windy though so many of the flowers didn't stand still enough to have their photos taken - there are also Cyclamen, Crocuses, Magnolias, several varieties of Daffodil and even more that I don't know the names of. We've even been harvesting some purple sprouting broccoli from the vegetable patch! 

Do you have lots of flowers bursting forth in your gardens?