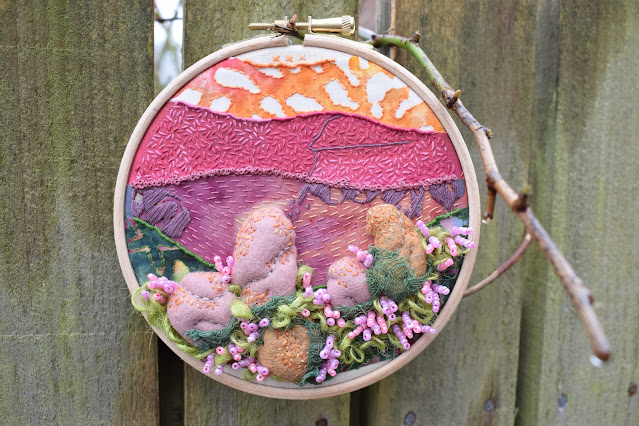
I had such fun with this Stitchscape! (Which now I realise is almost exactly what I said at the start of my last blog post about the first rock piece. I'm really enjoying making these.) It is the second piece of my mini series featuring the lovely felt rocks and I'm so chuffed with how they are going. For me these are all about the texture of the rocks at the bottom so I tend to not concentrate so much on a complicated sky but in this case, the colours are just so beautiful anything massively complicated would have spoilt it anyway.
As before, the rocks were all stitched down as part of preparing the hoop so I started by stitching just a single strand of back stitch around all visible batik shapes in the green print at the bottom which the rocks are mostly standing on. Although you can't see most of it now, I had no idea what I was going to fill these little gaps with at the time so it's a layering process that needs to happen even if I can't see it by the time I've finished.
The next layer up sort of evolved as it went along with different bits being added. I started with the purple running stitch and then decided that where the fabric colour was more peachy, it would look really nice if there was a peach thread colour over the top of that instead of purple. I followed the line above the green bullion knot edging as well as the edging of the fabric so it ended up with a slightly swirly situation happening in the middle.
This particular batik fabric also has dark splodges in it which I thought would be good covered with rough satin stitch so the running stitches were worked around these splotchy areas before adding the satin stitch. French knots have been used to cover up the rough fabric edge.
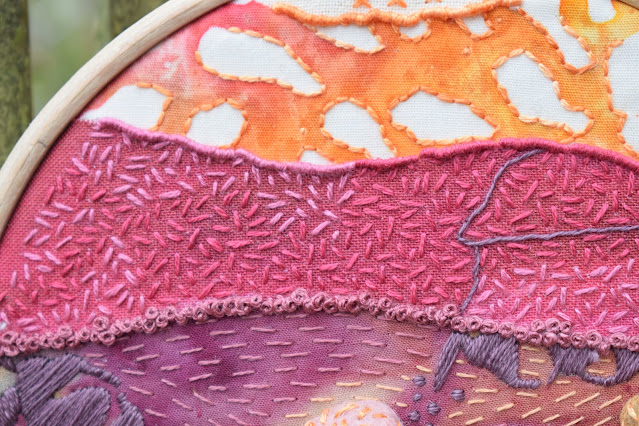
Above that layer is this sort of gradient/ombre fabric (which I think is a Moda design?) and there was a dark 'crack' in the print which I've covered with a single strand of whipped back stitch, although I don't know that I'd do this again - I'm not sure if I like it? What do you think?
The darker pink seed stitches were put over the darker areas of the print and I was going to leave the lighter sections uncovered but as a last minute twist filled these gaps in with a lighter pink to match the pink of the rocks and help to colour balance that out.
The bullion knots on this layer have also been matched to whatever colour seed stitch happened to cover the fabric edge at that time, a technique I like doing because it carries the colour off the layer if you see what I mean?
For the batik fabric above I've gone around each obvious white section with a two strand back stitch using a variegated orange thread which gives lovely subtle colour variations throughout the layer, mirroring the shading happening in the fabric dye. The same thread was used for the bullions knots and crosses at the top of the layer.
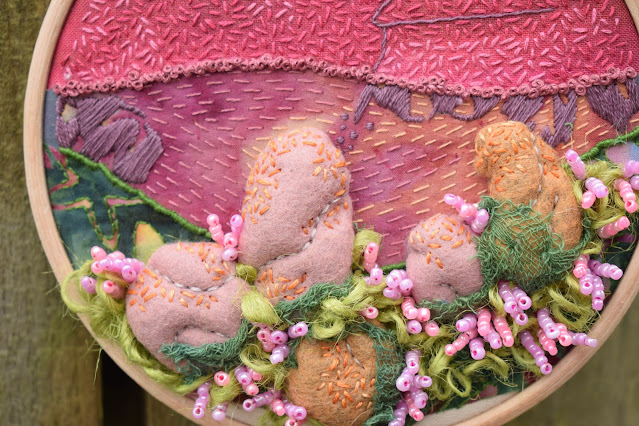
The bottom of the hoop is an absolute riot! I wasn't sure what to do with it as, much like my Seascape Stitchscapes, I want to use different things and different techniques on each of the hoops in this series. I raided my stash of stuff and came across a bag containing hand dyed scrim and random bits of coloured strings and loose woven netting stuff - one of those exciting bags that thrills you when you come across it again in the draw. For this piece sections of the scrim matched beautifully with the darker green fabric at the bottom so I cut up little squares and stitched those to the bottom of the rocks, twisting and pulling it in different shapes. The frayed edges are wonderful for giving a loose natural blend into whatever it is covering and it's easy to create thin or thick bits by stretching or layering up.
Over the top of the pieces of scrim I started playing around with some jute string I bought years ago which was originally advertised for papermaking. The thickness had to be reduced as the full three strands was just too much so I stripped it down to a single strand and started couching it in loops going in all different directions around or between the rocks. There was no forward planning on this, the string just went where it looked like there was a gap requiring some string! What's nice is that it is also different thicknesses so some bits are chunkier than others.
The beads was such a fun idea!! I've been thinking about playing with stacking beads like this for a while but didn't have a Stitchscape to go with it. The beads themselves came from a mixed bag of different colours and originally I was mixing up the colours (clear beads with coloured bits in, matte baby pink beads, clear solid beads, orange beads....) but it didn't look right so I tried keeping the colours the same on one 'stick' and ended up with two different coloured 'sticks' of beads to add a bit of variety. There are six beads in each strand and they are attached by putting all six onto your needle and pulling the thread through, then inserting your needle back down through the line of beads starting at the second bead down from the top. So the top bead acts as a stopper and the taught threads through the middle keep the beads upright.


No comments:
Post a Comment