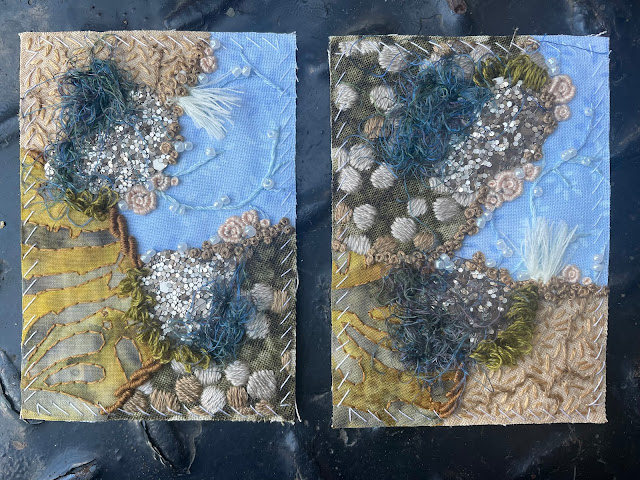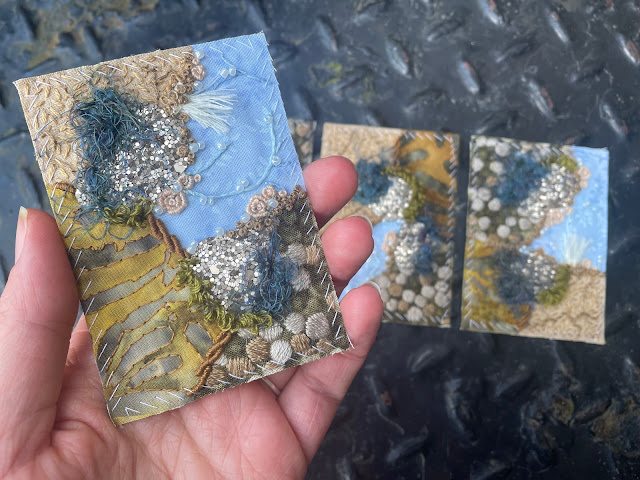
As usually happens, I didn't get time to write up about these cards when I'd actually finished them - and now we're nearly a month on and I should be writing about the next theme set! Even though I'm late, I still would like to mark the passing of the months for my Stitchscape swap and talk a little bit about how I made these cards.
The theme for September was 'Rockpooling' and I wanted my cards to be viewed from up high, a mass of texture and seaweed and greenery. I wasn't brave enough to add any little creatures in but there were bead bubbles so that would hint at something living at the bottom of my pool, right?
I thought the backs of the cards were quite interesting as well this time around - totally filled with stitches apart from the sections of stuck sequin tape. As always they took longer than expected and ended up coming on the bus with me a few times so that I could finish them off. On Tuesdays I get the bus in to my part-time job really early because it means I avoid the college kids and I end up with an hour or so sitting in a coffee shop eating breakfast, topping up my caffeine levels, stitching and eavesdropping on the coffee shop conversations. It's amazing how much can be achieved in that hour!
There's a lot more colour on the front of the cards than the backs, and I like to think that there are different levels going on. Each card has been overlapped slightly differently, and the pieces cut to completely random shapes. The constant is that the blue layer (the water) is always at the bottom but other than that the rock fabrics vary quite a bit, creating different shapes and tiers.
The fabrics have all been treated the same way though so they are consistent in that. The beautiful pebble looking fabric with the circles on is a great print that is just a mass of what could be bubbles or pebbles or circles in shades of brown. These I have picked out the most prominent shapes and covered them in different colours using three strands of floss to create a satin stitch which gives a slight padded texture that feels really nice. I've made sure to vary the directions of the circles though so that they catch the light differently and look more of a jumble - had I done them all in the same direction it would have looked strange and too uniform. Mixing it up adds a sense of movement and that they are wiggling around, potentially a slippery surface to stand on.
The beige, sandy coloured fabric has been given quite a craggy look by covering it with seed stitch, and then going over it again with whip stitch. The whip stitch adds cracks and bumps into the texture, and turns an otherwise plain fabric into a really interesting one!
Finally, the last fabric rock surface is much smoother, with just discreet lines of single strand back stitch going over the lovely batik pattern. There's less going on in this layer so it looks a bit quieter and safer to stand on - out of the three, this is the one that wouldn't be hard going on the feet.
Sparkle has been added by using a really lovely stuck sequin tape. It's a woven tape on the bottom but has lots of layers of teeny tiny solid hexagon sequins glued over the top. I haven't stitched too much through this ribbon as the little sequins can ping off so it's easier to find areas where you can sort of see the tape through the glitter to stitch through. It's so nice though, like finding a piece of shiny quartz on the beach.
Further texture has been added by adding some rolled up furnishing fringing to the watery edge (a sea anemone perhaps?), blue silk throwsters waste has been stab stitched on around the edges of the glittery tape for a little injection of some deeper colour and some soft wavy touchy-feely stuff.
I've used french knots to edge any raw edges of the brown circle and plain sandy fabrics, and locked together bullion knots to edge the brown batik. Usually when using bullion knots to edge a fabric I would just use them as one single line so I've experimented here with using them at an angle to create a thicker line but also a different texture. What do you think of it?
Small bullion knot barnacles have been added on the water's edge, and I've used some leftover green thread from a different project to make moss stitch which stands up in loops (basically it's normal straight stitches but the thread hasn't been pulled all of the way through the fabric to lie flat, and has been deliberately left to form a loop on the surface). The little pop of green really changed it for me, funny how the beach still needs some green in it!
The water I've left fairly blank. It's not a running pool of water and, without lots of animals jumping around in there, the surface would be quite smooth and still so I've quietly added some stem stitch in a matching colour along any lines of the print (which was a leafy swirl type pattern), and added some little beads along the length to give it some shine and shimmer. I could have also done this with metallic threads but I didn't want that to be glittery really.
So there we have it! My interpretation of a rock pool. I really like these cards - perhaps if I did them again I would add something else to the water to give it a slight shimmer, a layer of chiffon or organza or something but, overall these really appeal to me and I like how I've made them so textural but in a flat way so that they will hopefully still be ok to post as a letter!
The stitch run down for these cards is; seed stitch, whip stitch, bullion knots, back stitch, satin stitch, french knots, stem stitch, beading and moss stitch.


No comments:
Post a Comment