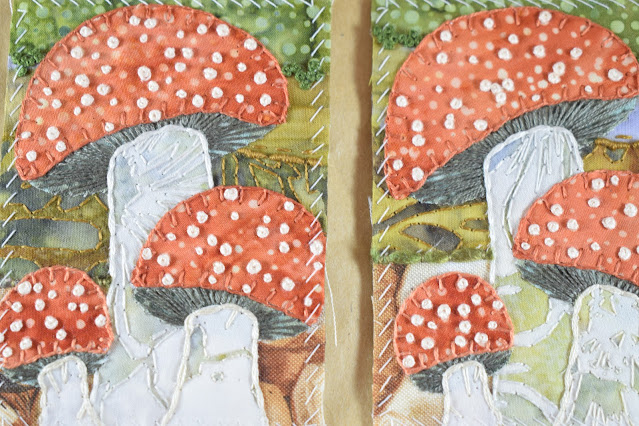
I've been waiting all year for this theme. It had to be in the right month though to fit in with my other themes and October seems a good time to start toadstool/mushroom hunting. I've got some tiny little brown mushrooms growing in my balcony pots outside, not that they are as impressive as the big red and white spotted Amanita Muscaria!
I'm not sure when it started, I've always liked hunting for different types of fungi (fungus?) when we go out, but one year someone bought me a decorative toadstool and then pretty much for every birthday and Christmas since then my collection has grown. I now have various types and colour of ornament toadstools made from wood, glass and ceramics, I have outdoor solar powered mushroom lights in my garden which make the balcony look like a magical fairy garden, and I even have a stylised toadstool bedside light in blue from John Lewis that I was given for my birthday this year. Baby F was purchased mushroom themed t-shirts because I would like them (they are very sweet designs and he wears them a lot!).
It's become "my thing" I suppose.
I bought the fabric to use at the Ardingly Quilt Show waaaaay back in January!! At the show I came across this fantastic red and white spotted batik, with some lovely complimentary browns and a grey floral batik which I thought would work for the stem.
From my stash I have used an actual mushroom print fabric (this is the first opportunity I've had to use it, one of those purchases because you can't leave it, but with no project in mind), a green batik and a strange small squiggle print which you can't see much of because I've used it for the frills and then stitched over it.
I did draw out some templates for the caps and stems so each card is pretty much the same on the mushroom front. It took far longer than expected to cut them out and tack them down!
The background fabrics were just hand cut wiggled strips tacked down around the outside of the shape to hold them in place. There are four fabrics making up the background - the lovely spotty green, a wishy washy space dyed browny/blue, a brown splodge batik and the mushroom print. I haven't stitched much on them really, just french knots to edge the green layer, bullion knots and a thin running stitch on the next layer down, a single strand of back stitch around the splodges on the brown batik and couched a lovely yarn on top of the mushrooms where there was space.

Most of the stitching effort has gone into the toadstools themselves. The top of the cap is blanket stitched to keep the edges nice and neat, and I've picked out some of the spots with french knots that are actually in a light pink colour to match the pinkish off-white spots. The gills have been stitched with two strand long straight stitches in grey (not the colour you would see in real life but has more definition here) and I did these in sections to keep them going in the right direction, marking out the centre line, then adding dividing lines between and filling those gaps in. Similar to how you would work the rays of a sun.
For the stalks I have stitched over what was there in the pattern, or added some extra stitches in to imitate other parts if there was no pattern. I've just used a single strand and either worked back stitch or straight stitches. I'm not sure if you can really tell but the large toadstool has been worked in a slightly more silvery grey thread and the two front ones in a warmer, creamier coloured thread. The same colour embroidery thread as used on the stalks has then been couched around the edges to give them a neat finish.
I'm really pleased with these, I think they look quite lifelike (aside from the grey gills) and I love the texture on the caps. It is a real case of finding exactly the right fabric to inspire your work!!
The total stitch run down for these is; french knots, blanket stitch, straight stitch, bullion knots, running stitch, back stitch and couching. Not a lot in these ones this time!! They still seemed to take forever to make (possibly because I was late starting it the pressure was on).


No comments:
Post a Comment