This Stitchscape has been waiting a little white to be finished because I couldn't seem to remember to rummage through my stash and find the right colour threads to take out with me to complete the bottom section. It has just been travelling around with me and a sheepy Stitchscape pal, rolling its hoop eyes whenever I unzipped the travel pouch and thought "blast, I didn't bring that thread with me again!"
Eventually, I did think about it before I travelled and came across a really lovely little dark navy coton a broder thread and the absolute, most perfect, purple and pink and black variegated stranded cotton!! Could those colours below be any more perfect to bring together all of the colours appearing in the top half of the hoop?


This one was inspired, if you'll recall, by the Aurora Borealis phenomenon which happened in the South of England a couple of weeks ago and the photos that I was able to take from my back door step of the most amazing streaky pink starry sky. (If you've forgotten, or you missed it, you can see my photos and inspiration
here.) I immediately set to putting this vision into a hoop and this is what has appeared out of it! I used fairly streaky looking fabrics for my cloud of light, flanked on both sides by a more starry blue - and I was especially chuffed with the blue ombre fabric, it looks exactly like a night sky. Rather than houses at the bottom of my hoop I have gone with little plants instead just because they felt right to do.


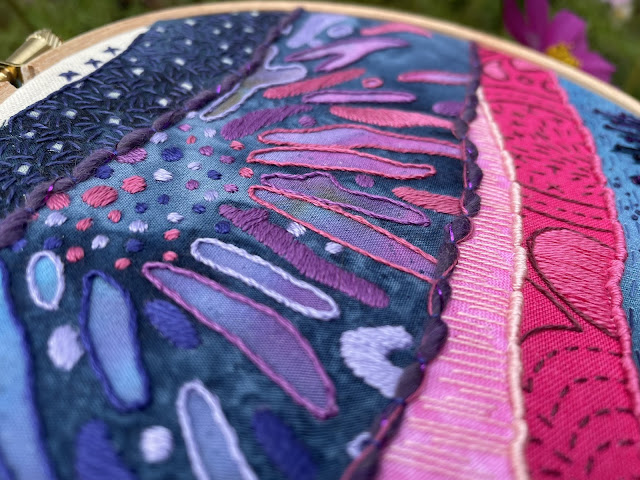
I started my embroidery on the batik pink/purple layer, working around some of the shapes with whipped back stitch, and then filling in other shapes with satin stitch, trying to merge together different colours moving across the fabric layer where the colour in the pattern itself changes slightly. Because this fabric layer was the last to go on, so it is layered on top of all of the other fabrics, I've had to edge both sides of it and I've kept them almost the same using the same glittery hand dyed yarn blend, except on the bottom line I've also twisted in a couple of strands of one of the pink embroidery flosses I've used within the layer just to give it a slight tweak of difference and help to blend into those bottom pink layers.

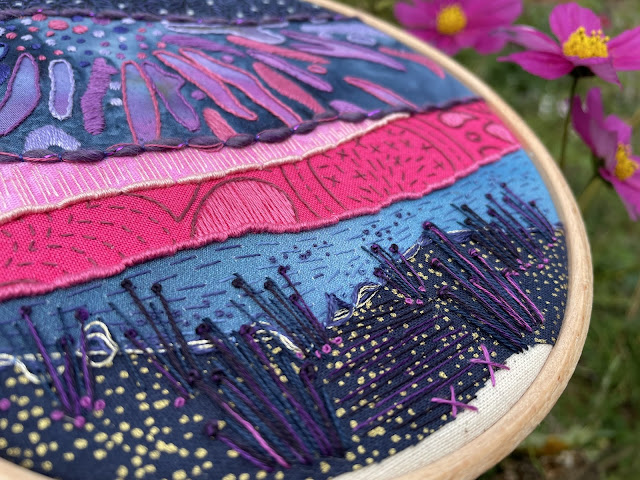
The light pink fabric is a kind of mottled blender, so pretty much a plain fabric, that I've worked uneven straight stitches across vertically to help represent the vertical ripples that you can see in the Aurora photos. (Just using a single strand to keep it quite light.) The darker pink fabric underneath I have followed the existing lines of the pattern with a single strand of stem stitch, and running or straight stitches where needed. To bring back that hint of a vertical line, some of the solid shapes I've then filled in again with vertical straight stitches but this time slightly closer together and using two strands for a more bold look. Both of these fabrics have been edged with matching bullion knots to keep things nice and even.

For the ombre blue fabric I've worked rows of single strand running stitch but where the colours start to change slightly, I have also changed my thread colour; working a darker blue thread on the shadowed left side, and a lighter blue thread on the lighter right side. I've added little tiny single strand one or two twist french knots in scatters between these rows to give another hint of starriness as we are back to the night sky on this layer.
The top layer - sneaking back up there - I have worked back stitch around the white spots and seed stitched between them so they stand out in relief almost. Because I've taken my seed stitches (single strand ones) over the raw edge of the fabric I could also work a whipped back stitch just along this edge to keep a very simple line there, plus of course my little cross stitch kisses on the top.
The final layer at the bottom I actually edged first, which I don't always do but I found a glittery gold thread strand lurking all by itself in my stitching go-bag which wouldn't do - I don't like to waste threads, so I folded it up with some of the darker blue thread I'd used in the running stitch layer and couched it on, pulling it out between the couching stitches so that it bobbled and went in funny directions which looked really interesting.
I wasn't quite sure what I wanted on the bottom layer so I was very pleased to find those two threads I mentioned earlier because they gave me a kind of inkling as to what I could do, and I had the thought of creating little plant silhouettes against the lighter blue.
Straight stitch stems were worked first in the coton a broder navy, then the variegated thread I used two strands (topped and tailed) to make pistil stitches between those straight stitch stem clumps. There is a row of single strand navy and two strand variegated clumps along the 'back' - placed along the top edge of the fabric - and then at the 'front', there are two strands of navy and three strands of variegated to make the stitches so they are subtly thicker in their weight of line and therefore physically look closer to you. I've also made the pistil knots bigger with two twists at the back and four at the front. It's these tiny little details which can help give some perspective to a landscape hoop without looking too obvious.


With my leftover ends of the variegated thread I added some horizontal lines in the gap through the middle which had somehow appeared, and now seems like an inviting pathway to the crest of a hill to see the light show. Crosses were added to the bottom in a scrap of the pink thread used further above to help hold that down, and then tiny two strand, one twist french knots scattered across the bottom of the further away clumps to give them a little bit of ground to stand on.
I'm really pleased with how this turned out. It doesn't exactly look like the view from my back door but it will always remind me of that, and I think if you saw it for the first time you would know where I was coming from. Wouldn't you?
The final stitch run down for this hoop is; seed stitch, whipped back stitch, back stitch, couching, satin stitch, bullion knots, straight stitch, running stitch, stem stitch, french knots and pistil stitch.


Nice details and great art.
ReplyDelete