Wednesday 26 October 2011

An Army Of Hamsters!!

So recently I have taken up my needle again to create some friends for my previous little hamsters.


 (The bottom left hamster is called Lopsided Lenny, you can probably see why!!)


I also tried out some little adaptions on the existing pattern, making some little hamster pirates!!


Arrrrr!!!

If you also want to make some little hamsters, then head on over to the Mollie Makes website to get the template!

Saturday 22 October 2011

Knitting on a Machine!

Apparently I have machine knitting in my family tree as my Nan used to have one and would knit fabrics to sell to a lady who made them into dresses- this however, doesn't make these machines any easier to use although I think I have sort of cracked the easier stuff.
Bearing in mind that I have only had an hour and a half of using these machines and in that time I have had to remember all the processes of putting the yarns in the right place and moving lots of buttons and knobs to make different patterns...eurgh, so much to remember!
As with the weaving experiments, these intitial ones have been done in relatively neutral colours so that they can go in my sketchbook (I think my colour paletter will include quite a lot of neutral tones anyway which is good).


Now these photos are just close ups of a remarkably long piece of knitting I have done, but they both feature many different kinds of techniques. In the left image you have eyelets at the top which are made by moving stitches over to the right on the machine (very difficult to explain if you haven't done machine knitting before so I apologise if it doesn't make sense!), and ladders which were made by moving the needle pushers back and out of the way so that when you are pushing the carriage with the yarn in over the top, it skips the removed needle pusher and makes a bigger gap. To stop a ladder, simply push the needle pusher back into line with the others. I did of course make some impromptu ladders which weren't wanted and will probably go all the way along my knitting without stopping but never mind.
In the right hand image, I have played around with striping, which literally means using more than one colour and creating a striped pattern. I have also used the two colours together at the same time which creates a kind of mottled effect. Tension is a big thing in knitting, and you can only put up to a certain thickness of yarn into the machine before it jams, so I have also played with the tension- the lower the number on the dial the wider the knit, depending of course on the thickness of the yarn.

Anywa, enough of confusing jargon, here are some very clever knitters!!

Ruth Lee


A very clever knitter who comes up with the most wonderful creations. I really like this interview with her on the V & A website, and I absolutely adore her book, Contemporary Knitting for Textile Artists. She has also written two other books which are both on Amazon if you are interested in knitting.

Jane Ward

 
 I am new to Jane's work, but she has quite a nice website and her pieces are quite cute or texturally interesting which I definitely like. The above piece reminds me of my samples in its experimental nature and neutral. It looks quite beachy, or a landscape in the winter time.


The next and final artist just made me gasp for joy when I saw her work. It is utterly fabulous!! Great colours, lovely little ideas, please take a look!! Her name is Arline Fisch and she knits really very funky structured 'jewellery' which often appears to be inspired by sea creatures. They are generally made from wire which makes you wonder whether they are actually meant to be worn or are more of a boundary pushing statement. They are quite delicate and wispy and really magical.


Weaving on the Loom

We have finally started using the weaving looms!! (Although not the massive foot controlled ones- we are using the baby table top looms, which are still quite hefty!)
It is very exciting, and much more physically challenging than I thought- you have to push buttons to select the shaft (with the heddles in) that you want lifted, then pull a lever down to actually lift the shafts, move your shuttle across, release the lever, release all the buttons, reselect your buttons and shafts and away you go again! Lots of shoulder exercise!!
Still, it is looking really good and you can kind of get into a rhythm, especially if you are doing a plain weave and I was going quite fast at one point. It is the harder patterns that get me a bit because you have to kind of count and remember which bit of the pattern you are on. Here are a few of my samples so far!

 
 In the left hand image I have experimented with plain stitch in three different yarns, and also tried a hopsack weave which is almost just a bigger version of the plain weave. The right hand image has lots of different weaves in, several variations of the hopsack, a twill, a zig-zag twill, a barley corn weave, my own experiment of random buttons etc. It is really good fun to see the pattern emerging, I think my favourite was the zig-zag twill which looked really pretty.

 
In these experiments I have kept to neutral colours as I haven't really decided on my colour palette yet and I will want to put these samples in my sketchbook without them standing out as blatant first attempts.
The most annoying thing about weaving here is that you have to wait for the warp thread (the one going the length of the weave, the weft thread is the yarn going the width of the weave and the one I have been inputting) to run out, which is why it has my name all over it so no one pinches it!!

Of course, doing this weaving project has made me think about other artists who work with weave, and the history of weaving.
Weaving comes from all over the world and can be found in all kinds of textiles! A nice website I have come across which has different woven items featured in it is the Weaving Art Museum.  As it says in it's opening paragraph it was 'established to promote increased appreciation for the historic weaving art of indigenous weaving cultures located in the Eastern Mediterranean and the adjacent areas'. So well worth a sneaky peek at.

I have of course sourced some interesting artists for you (all this dedication!) and have come across Margo Selby who has won many awards for her woven textiles.


I particularly like her wall panels which are huge and gorgeous and spotty!

Muriel Beckett specialises in hand woven wall hangings and rugs, with colours often inspired by the sea and mountains. They are quite clean, simple and soothing and I really like her work.


Friday 21 October 2011

Toilet Roll Art

I can't quite remember what made me look on Google for toilet roll art, but I'm glad I did. It is amazing what you can do with the humble 'bog roll', from wall art to silhouette art, you can transform this recyclable piece of rubbish into something beautiful!

I myself have had a go at making some wall art from my toilet rolls (it's surprising how fast toilet paper gets used up in a flat of 10 girls!), by cutting the roll into strips to form smaller circles and sticking them together with magic tape to form a flower shape. You can comfortably get one flower out of each toilet roll, or if you cut the strips thinner then probably two. Here is my creation so far....


The trouble is, once you get started making these it is mildly addictive as they are so easy and quick to make. These are still quite plain, so when I get the time I think I will either paint or decoupage over them to make them pretty!

There are a few artists also finding the toilet roll quite an inspirational media to work with. Junior Fritz Jacquet makes fantastically humorous little faces (or masks) from folding and crumpling the roll. In this way he can create all sorts of expressions  which, once finished, are coated with shellac and different pigments.


Anastassia Elias makes beautiful little silhouette cut outs in the middle of the toilet roll tube; what is amazing is the intricacy of her scenes, all of which are cut out without disturbing the outside of the roll.


Yuken Teruya also turns the toilet roll into a magical artwork by cutting highly delicate tree shapes into the tube. They are then hung as installations and provide a negative and positive view of the tree. Imagine a whole bunch of them together creating a cardboard forest!


When lit up, the shadows cast on the walls are also really lovely.


Here are a few other ideas for your left over rolls...


Have a play, see what you can come up with!!!

......................................................................................................................................................................

Edit to add: As requested there is now a full photo tutorial of the toilet roll flowers! Click here to have a look and get started.

Friday 14 October 2011

Paper Technique Experiments Part Two

So continuing from yesterdays post, here are some more paper techniques you could use to make papers really interesting.

Cut Work
Literally the technique is in the title- you can cut the paper with a scalpel or a pair of scissors (remember when you use to make the paper snowflakes??) and create really intricate patterns. In industry, or on a larger scale you can use laser cutting to get a really precise cut.
An example of some really beautiful cut work would be Bovey Lee who uses Chinese rice paper on silk. Her website is lovely and I recommend a look!


I haven't really done much of this yet so haven't any examples of my own work to show you. Bovey Lee's is better though so not much of a loss there!!

Bleaching
Bored of cleaning? Fancy doing something fun? Take your bottle of bleach, an old paint brush, some colour paper and start doodling!! Obviously you need to take safety precautions and make sure to experiment in a well ventilated area and wash the bleach off immediately if it gets on your skin etc etc- you know all this already! Some papers will bleach better than others but that's just part of the experiment! Try inking up some paper and bleaching back into it, or enhancing a drawing with a few bleach lines.

 
 A few experiments with bleach on still wet ink and then holding the paper up to make it run.

 
 I have found that this blue wrapping paper works really well with bleach, no inking or other media needed. The left hand side image is just using stick and bleach, and the right hand side image is a bleach print, made from a cardboard cut out that I covered in bleach and pressed onto the paper. I quite like where the print is fuzzy and not completely blocked in as it highlights the existing lines in the paper.

Frottage
Frottage literally seems to mean taking a rubbing of something, so a brass rubbing of a cast image or a wax crayon rubbing of an interesting wall are both types of frottage.
Naturally at university we are supposed to create our own interesting textures to take rubbings of, and not to just go for the obvious, like tree bark. I have used acrylic paint to create a few textures as once dried, the acrylic goes rock hard so is easy to take a rubbing of.

 Deep grooves made by the end of a paintbrush

 Sponged on quite thickly (looks a bit like plastered ceilings)
 
Deep squiggles, again made by the end of a paintbrush
 
Overlapping circles made by a Pritt stick lid

Here are the results!! All done with a wax crayons, although an idea would be to try different forms of media- oil pastels, graphite sticks, charcoal, pencils etc which would give different weights, moods, tetures etc


And of course you can layer the different textures, use different medias in the one piece, rub sections out to create a negative...possibilities are endless!!

Thursday 13 October 2011

Paper Technique Experiments Part One

This week at university we have been experimenting with paper decorating techniques and ways of creating interesting marks or textures on the paper (which could later be transferred into fabric prints or types of fabric etc). Some of the techniques are completely new to me so I thought it would be nice if I shared some with you!! It is in two parts because some of the techniques I am still working on so have no photos for.

First up we have the Gouache Wash Off which uses gouache paint and a permanent or water resistant ink (black Indian ink is good for this).
The idea is to paint your paper (which could have a patterned, plain, painted (acrylic paint comes out really nicely!) or any kind of background) with the gouache paint. Remember that the areas you cover with the paint are the areas that you will see later on so if it is patterned, think about the composition and where your design is placed.

 
 So for my background, I have glued down a photocopy of some doilies and then painted the whole thing with viridian ink. Once dry my design was then transferred with the gouache paint.

Once the gouache is dry (don't rush this step, the gouache has to be bone dry and feel about room temperature to the touch- if it feels cool it is probably not quite dry yet) cover the whole thing in the black Indian ink and leave to dry (or dry with a hairdryer).

Next up is where the magic happens!! Carefully but firmly run your paper under the tap, rubbing at where the gouache pattern is hidden. The gouache and the ink above it start to wash off, leaving the pattern or colour of the paper beneath revealed! Keep rubbing at the gouache until the water runs clear over the piece. Hang up and leave to dry!!

You can experiment with the colours underneath your gouache. Below is an example of what happens when you paint acrylic underneath. I think it has worked really well as the colours are vibrant and work well together. What is also quite nice is where the ink hasn't completely come off, contrasting between soft and hard edges.


This is another example of an acrylic under surface, but here it hasn't worked so well as I have used viridian coloured ink rather than black ink. The colours below are stronger than the top layer of ink so it has given a weathered painted door effect which is also quite nice.


The next technique is Monoprinting. This is quite a popular technique as it is easy and quite kid friendly. If you don't want to get completely messy then there is the oil pastel print.

Take an oil pastel and scribble a block of colour onto your paper, try mixing a few different colours to create different coloured lines.

 
 Put a piece of paper with the wrong side facing you and draw your design on. Think about different ways of making a make- sometimes just pressing against the paper with your finger will give you a fuzzy mark on the finished drawing. You could use a rubber for a thick line or the end of a paintbrush, how about stabbing the paper with a Biro point for small sharp dots?
When you have finished your design, turn the paper over and check out your drawing!! For more colour you could go over it again with different colour pastels underneath, or just turn the drawing to another section of the pastel block. You can reuse the block lots of times and it doesn't dry out!


Another, more messy way, is to use the printing ink and your roller. On a cleanable surface (ceramic tile, glass or perspex sheet or even a sheet of acetate), put a little bit of the ink- remember, a little goes a long way and you can always add a bit more if there isn't enough- on the surface, rolling it out to make a nice even covering. A good tip I was told is to listen to the sound the roller makes, when it sounds sticky but not squelchy, then it is a nice, even consistency! Lay your paper gently over the ink and start to draw your design.
Remember that this technique is more likely to pick up even small pressures so don't lean on the paper whilst you are drawing (unless it is the effect you are going for). Try and use lots of different implements for different mark making techniques.

 
 If you find that your drawings are coming out very splodgy and there isn't much line definition, do not fear!! Before making your first print, gently blot some of the ink onto another bit of paper or kitchen towel (put this to one side and keep it, you never know when it will come in handy as a background for something else!). You could also wait until it is dry and go over again with a different colour.

 
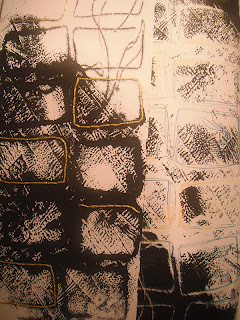
 Here are some examples of my work. On the left hand side is a drawing of some paving stones. In some areas it came out quite splodgy so I have defined the bricks with some stitching (also, on the right hand side of this image is a reverse colour photocopy of the piece which I have worked back into with the oil pastel printing technique to add a splash of colour). On the right hand side is an example of a negative print where I have removed the ink from the surface and then pressed my paper on top to pick up all the ink. Spoons are very good for scooping up big quantities of ink and forks make lovely little grooves!

Finally for this part, there is the Resists.
You could try wax resist using a candle or a wax crayon (or even an oil pastel) to draw your design onto your surface. Once the design is completed then brush over the whole thing with ink, or watercolour. The design should stay intact and look beautiful on the page. An interesting idea would be to build up your colours and ink washes by adding layer after layer of wax design and wash.
For fabrics, this technique is called Batik, and is used to create many intricate patterns on fabric for clothing, scarfs, bags etc.

 Works by Kay Shaffer

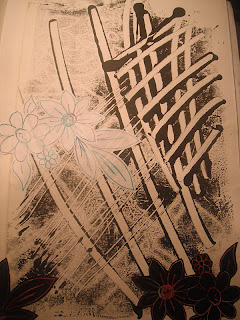
I have also been experimenting using masking fluid, which is a kind of liquid latex. Paint the masking fluid over the page in your design, let dry, paint over with the paint or ink, and then when dry, rub off the masking fluid with your finger. It completely comes off and leaves the paper underneath startlingly intact.
I experimented for the first time with this technique today, and enjoy it simply because of it's textural qualities.


 I did try taking the masking fluid off, however thought that the blue underneath was too striking and overpowering so painted the flower with the fluid again to keep in the textures.