Monday 22 March 2021

Ice Flame Flower Stitchscape

It's quite a pretentious name for such a little hoop - Ice Flame Flower - but it's the one that's stuck in my head so that's what it will be. This is a bonus hoop if you like because I came across the fabrics all tucked together in my stash whilst I was putting together a different hoop. Stash fabrics generally get put into the drawers any which way (I had started out all organised and colour coded but it swiftly gets out of control so I've given up) but these ones had been put all together and yellow and blue is such a smashing colour combination, don't you think? 

I had a spare 10cm hoop lying around, as you do, so I quickly cut and stitched the fabrics down which was literally the work of five minutes and meant I had a spare hoop for a rainy day. Something this size is also great for travelling with, not that we're going anywhere at the moment, because you can just slip it into a bag with a couple of skeins of thread, a needle and your scissors and have a project to work on wherever you end up! I quite enjoy going somewhere with a lovely view, parking up, pouring a coffee from a Thermos and settling back for some relaxing stitching, maybe followed by a walk. 

We've been very restrained though and barely used the car at all other than for hospital visits and the odd back up food shop so no gorgeous views for me! Lockdown in Winter is much harder than lockdown in Summer - you can't get outside as much, the light is generally poor even in the middle of the day and the trees are all asleep with not much colour outside the window to look at. 

Maybe that's why my Stitchscapes are getting even more colourful, as a way to combat the grey outside! Although, saying that, we went for a walk around the town at the weekend and marvelled at the Daffodils, early Hyacinths, Crocuses, Grape Hyacinths, Celandines and green buds coming on the trees. It was the Spring Equinox on Saturday so we are well on our way to colour and the outside now! There's even a tentative countdown to the end of lockdown too which is marvellous!

I hadn't originally intended to use the smooth purl pieces on this Stitchscape as they arrived well after I'd tacked the fabrics down, but a couple of the colours I'd purchased went so brilliantly with the blues that I just had to use them. The pieces cut were much smaller than in the Tourmaline Peak Stitchscape so they are tighter and more compact and actually I'm really pleased that I had these because otherwise this piece could have been quite boring! 


The top layers are really simply treated, seed stitches cover the top blue layer with bullions on the fabric edge, a single strand of split stitch follows the horizontal lines on the striped yellow fabric below and a neat-ish row of french knots top the edge. 

I've used a slightly brighter yellow to work two strands of straight stitch between the dots on the yellow underneath, which is actually a polka dot print, to create a grid like appearance, with french knots in a contrasting blue at the point where the stitches meet on the dots. 

The statement flower at the bottom had initially had all obvious lines in the batik print drawn round with a single strand of back stitch in a matching blue colour. The centre of the flower had some little sections in it which were also gone around with back stitch and the smooth purl worked in the larger areas around those circled sections. It looked a little bit bare in the centre where the holes were so I went back and filled in those sections with lovely oily blue beads which has worked really nicely because it adds a different sort of shine to the centre. 

It doesn't always show up well on camera but in person you can really see the stripes of the coils the smooth purl is made up of and they have a soft edge to them where the light reflects - it's a tricky thing to try and explain and I'm probably not doing a very good job! Can you sort of see it below?

I was thinking of leaving it there, other than edging this layer, but it looked a little naked so I decided to try little french knots in the petals matching the colour underneath. I love that the colour gradients and changes around the flower, very much like the flames it's named after! I started with the yellow that's almost heading into green and worked two strand, one twist french knot all around the edge and in the centre of the spikes into the centre, filling in areas of the body of the petal and switching to two twist french knots in sections to cover more ground. As the colours change around the flower I've changed my colours to a much warmer yellow and a rosy orange, to a dark green, a purplish brown and even a really light zesty green - although that one matches the bright yellow a little too well so you can't really see it. 

The edge of this layer was then finished with a contrasting single strand of running stitch just along the edge of the fabric to help hold it down and prevent any fraying or movement (and provide the opposite contrast to the polka dot layer above), and then two full pieces of 6 stranded floss twisted and couched down using a single strand of the same colour. 

I really like the composition of this piece with the smooth purl and happy shininess at the bottom. The extra colours in the flower just lift the piece slightly from being dull and boring but the general combination of colours is warm and happy so I'm very chuffed with my bonus Stitchscape!

The stitches used in total are; seed stitch, bullion knots, french knots, split stitch, straight stitch, running stitch, couching and beading. Nice and simple!

I will probably back this piece with white felt and then add it to my Etsy shop at some point where it can hang out with all of my other original pieces so if you are interested, keep your eyes peeled. 


Sunday 21 March 2021

Rockscapes!


I thought I'd give a bit more background on the felted rock Stitchscapes I recently finished as they came about so quickly and they are such fun to make you might want to have a go yourself!
The first piece I made with the felt rocks was actually the larger Heather Valley Stitchscape and they worked really well in that piece because the hoop was a larger scale, at 22cm, so having chunky pieces of padded felt at the bottom really grounded it and brought it to life. I am increasingly loving Stitchscapes with a lot of texture coming out of the hoop and finding new ways to make them stand out loud and proud from the wall - to the point where if I stitch a 'flat' piece, it looks odd!


These pictures are mostly phone/Instagram snaps I'm afraid so they aren't the best but hopefully they'll give you a clear enough image. 
After the Heather Valley piece I still had quite a bit of the wool felt from the-stitchery left over and I pondered over the colours and how different colour combinations with the fabrics beneath the rocks could create new colour palettes and landscapes. Sometimes all you have to do is to change one background colour and the entire hoop completely changes so could the same be said for the rocks?


It was one of those - I must do it IMMEDIATELY! - ideas and I disappeared up to my bedroom where the stash is kept intending really to only make one other hoop to see how I could make it different. Instead I ended up putting together three 12cm hoops because I found them all in a pile and it seemed rude not to use them all. The fabric choices were sort of based around the felt colours; the pink felt seemed like the rocks would be tinged that way during a sunset maybe and the grey felt represented more of a gloomy, dull and mysterious valley somewhere. There are a lot of batik fabrics used in this little collection and I'm not sure I can explain why that is exactly, it just seemed like the right way to go. 


The rocks are all created individually. A shape is roughly cut out of the felt (much bigger than the final intended size) and a running stitch stitched around the edge; a little bit of toy stuffing is added to the centre (as shown in the top picture) and then the running stitches drawn up. The tighter you draw these stitches the smaller the rock gets to you have to sort of feel for where you want to go - the stitches need to be tight enough to keep the wadding in and a nice rockish shape, but not too tight that it becomes super small with a hard bunched edge. 
Once my rocks were all made I tried to 'organically throw them' at the hoops so they didn't have a regimented appearance. It needed to feel like natural rock formations which is much harder than it looks! When happy with their positioning, I took photos to make sure I could remember how they sat and then you basically stitch the rocks on by coming up underneath the rocks, through the fabric, with your needle and grabbing the edges so that all of the edge is tucked under, sweeping in any tufty toy stuffing that may be making its escape. You can also use this to position odd little dips and shapes into the side. To further stitch them down and to add texture and definition, I worked random lines of back stitch completely through the rocks to add a sort of quilted texture and stop them being so smooth and pebble-ish. 


Of course, working on these in the garden, in the sunshine, in March, was a bit of a treat! It was one of those rare days when it was warm enough for your body to be fooled into thinking summer was on the way, and no wind to add a chill factor. I even got a little burnt sitting outside!


I've used lots of techniques in these hoops that I am dying to try again. I had originally said that I was sticking with three of these rockscapes and then moving on to something else, and if you follow my Instagram you'll have seen the crazy new pile of Stitchscapes I've just layered up with fabrics and have on my to do list, as well as a new hoop full of Stitchscape Pebbles that I started yesterday (and a partially designed kit I'm determinedly ignoring). But I've also just found myself ordering a sample pack of 60 different shades of wool felt pieces and a wool felt shade card from Billow Fabrics.....it would seem more felt rock Stitchscapes are on my horizon! Maybe I can combine some of them with the hoops I've layered fabrics into - every hoop can only be improved with a couple of rocks in, right?


The techniques I'd like to try and revisit include the combination of shiny beads and french knots dug into the rocks. The difference between the completely matte felt and shiny beads is a match made in heaven, and I love the way the beads dimple into the felt where I've pulled them a little tighter. I also like the addition of seed stitches to add texture to the rocks, and I'd definitely like to do the sticks of beads again - they are just so much fun to look at and feel under your fingers!


My least favourite rock technique is the cross-hatched stitches. I don't know whether it was the colours used or just the harsh crossed lines but the softness of the beads and seed stitches is much nicer I think. I'd like to use the smooth purl wire coils too but maybe with a slightly more restrained colour palette than the one I've used here. I also want to try using straight sticks of the smooth purl with a bead on the end, combining these two to make new types of bead stick!!
This is exactly what I love about Stitchscaping, sometimes you try one new idea and it just creates a massive flow of new ideas and combinations.... Who knows where this could go?


Tuesday 9 March 2021

Tourmaline Peak Stitchscape


The last little Stitchscape in my set of three featuring felt rocks is finished! It completely flipped from when I first put the fabrics together as my initial thoughts were that it would be a kind of soft, misty morning piece with pale greens and lilacs. However, before I started this one I'd gone down a rabbit hole of discovering goldwork purl pieces (long lengths of tightly coiled wire in various widths and colours which can be trimmed to length and are hollow) which ended up with several different colours of 1mm smooth purl lengths in my Etsy basket!

The metallic colours are a bit darker than my original vision but I was very excited to have a play around and see what I could create. I had started the top layers whilst waiting for the purl pieces to arrive, but as soon as the parcel hit the doormat, I was snipping little pieces off and threading them to make fun loops around the rocks! You can make these pieces as big or small as you like, just cut them to size and thread a needle (I used a beading needle) through the whole length. Depending where you put your needle back through the fabric you can keep these as flat pieces (which I think is more traditional for goldwork) or as I've done, make fun loops that interlock and go in all different directions. 

The top layer is a beautiful fabric print made to look like a sunrise/sunset with silhouetted birds. I haven't used the birds in this piece as they would be too large but the colour of the sunrise clouds is really pretty with cream and purple blended together. I've just worked a single strand of back stitch around the more obvious colour changes or cloud lines and used a variegated thread to try and match a little bit of the blending of colours. The same thread has been used to make bullion knots at the top of the fabric although it's come out quite blue there. 

The next layer down is a pretty floral piece and I wanted to keep as much of the texture of the flower as I could. The print itself was slightly blurry so I had to guess or go over some of the details but where there were obvious petal lines I worked a single strand of whipped back stitch, again with a variegated thread so there are some differences in colour where I've whipped over the original back stitches. Between those lines I worked single strand straight stitches to try and show the direction of the petals and add more texture. At the centre of the flower I've made two strand, one twist french knots in that orange/coral colour to help start balancing some of the smooth purl in the same colour at the bottom. 

The minty leaves in the centre were worked with fly stitch using two strands so they stand out a bit more, and the same minty colour was couched to the top of the whole layer as a contrast. 

The blue/green batik layer under that has had all of the green leaf patterns covered with satin stitch, although I've tried to vary the direction of the satin stitch as I prefer the way it looks rather than having everything going in the same direction. Where I could I went with the length of each leaf and worked outwards along the stems. 

Not all of the blue edge was covered by satin stitches so before working another line of couched thread along the fabric edge I've done a discreet running stitch just a couple of millimetres in from the edge. This is a great technique to keep those edges neat where your stitches actually in the layer may not be protecting the edge. If you are doing the same thing you want to work your running stitch far enough in from the edge that it doesn't fray. 


Back on my crazy bottom layer I started to cover every spot on the batik print with some rough satin stitches. I could have done this before I started putting the cotton scrim and smooth purl down to build up texture but I was so excited about playing with the purl that I decided to forgo that bit and just filled in any gaps later on. 
I also found some beads in similar colours to the metallic strands and stitched these underneath the bendy lengths to fill in some of the gaps and make it look more like a ground surface. I think this has really helped to bring it all together - especially when some of the beads were then stitched onto the rocks as well. 


I was a bit worried that the colours weren't gelling together fully so I've taken more of the variegated purple that I used for the flower and added french knots on the rocks around those beads to add some texture and bring the purple down through the hoop. I was equally as concerned about that orangey colour so used straight stitches to work cross hatched patches on the rocks as well which clash rather interestingly with the purple. 


There is quite a lot going on at the bottom of the piece in terms of colour and texture, matte and shine and I think I'm on the fence a little bit about my colour combinations. I'd be interested to try using the smooth purl again but restricting the colours within a piece or making the loops smaller. It's definitely something I'd like to play more with as an alternative to sequins - as I've said before I love a bit of shine in a Stitchscape to help lift the generally dull appearance of the cotton fabrics and threads. 


It feels great to run your fingers over though, all springy and bouncy! I'll have to write a separate post about all three of these pieces together and maybe with the original Heather Valley piece that inspired this little trio.
The stitches that have been used in this piece are; straight stitch, bullion knots, back stitch, couching, whipped back stitch, french knots, satin stitch, beading, fly stitch, running stitch and smooth purling I guess! (I don't think that last one is a stitch but I'm not sure what to call the stitches in the purl loops.)


Thursday 4 March 2021

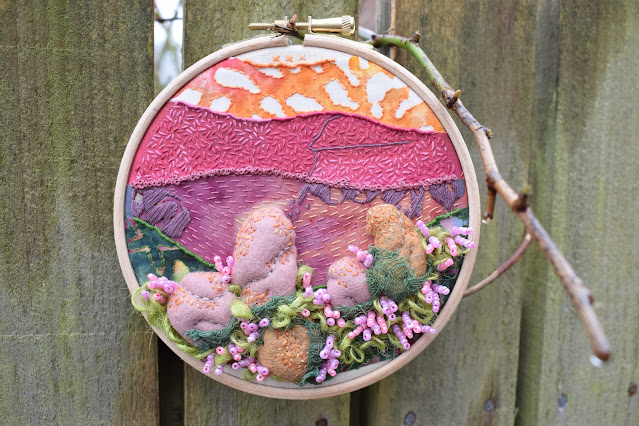
Rhodonite Rocks Stitchscape


I had such fun with this Stitchscape! (Which now I realise is almost exactly what I said at the start of my last blog post about the first rock piece. I'm really enjoying making these.) It is the second piece of my mini series featuring the lovely felt rocks and I'm so chuffed with how they are going. For me these are all about the texture of the rocks at the bottom so I tend to not concentrate so much on a complicated sky but in this case, the colours are just so beautiful anything massively complicated would have spoilt it anyway.

As before, the rocks were all stitched down as part of preparing the hoop so I started by stitching just a single strand of back stitch around all visible batik shapes in the green print at the bottom which the rocks are mostly standing on. Although you can't see most of it now, I had no idea what I was going to fill these little gaps with at the time so it's a layering process that needs to happen even if I can't see it by the time I've finished. 

The next layer up sort of evolved as it went along with different bits being added. I started with the purple running stitch and then decided that where the fabric colour was more peachy, it would look really nice if there was a peach thread colour over the top of that instead of purple. I followed the line above the green bullion knot edging as well as the edging of the fabric so it ended up with a slightly swirly situation happening in the middle. 

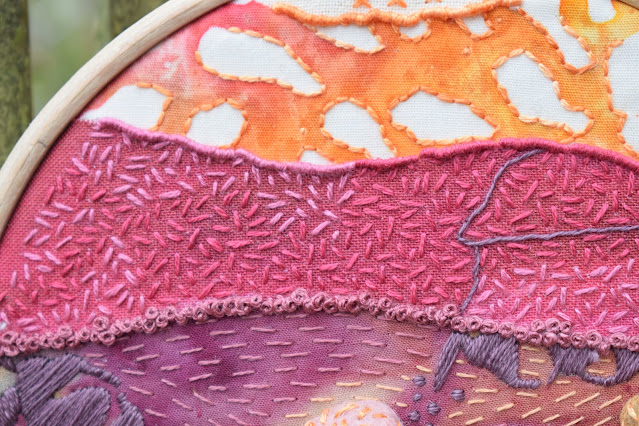
This particular batik fabric also has dark splodges in it which I thought would be good covered with rough satin stitch so the running stitches were worked around these splotchy areas before adding the satin stitch. French knots have been used to cover up the rough fabric edge. 

Above that layer is this sort of gradient/ombre fabric (which I think is a Moda design?) and there was a dark 'crack' in the print which I've covered with a single strand of whipped back stitch, although I don't know that I'd do this again - I'm not sure if I like it? What do you think?

The darker pink seed stitches were put over the darker areas of the print and I was going to leave the lighter sections uncovered but as a last minute twist filled these gaps in with a lighter pink to match the pink of the rocks and help to colour balance that out. 

The bullion knots on this layer have also been matched to whatever colour seed stitch happened to cover the fabric edge at that time, a technique I like doing because it carries the colour off the layer if you see what I mean? 

For the batik fabric above I've gone around each obvious white section with a two strand back stitch using a variegated orange thread which gives lovely subtle colour variations throughout the layer, mirroring the shading happening in the fabric dye. The same thread was used for the bullions knots and crosses at the top of the layer.

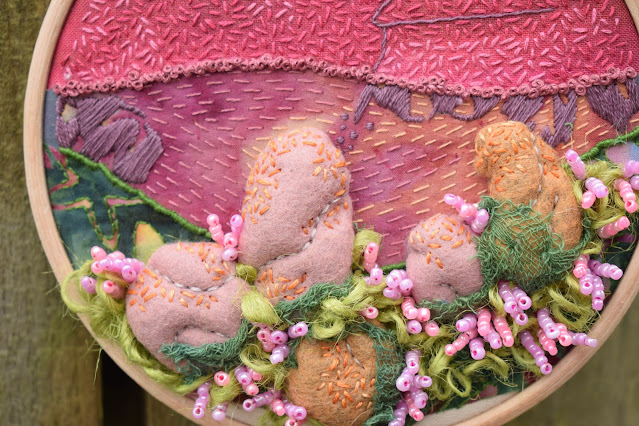
The bottom of the hoop is an absolute riot! I wasn't sure what to do with it as, much like my Seascape Stitchscapes, I want to use different things and different techniques on each of the hoops in this series. I raided my stash of stuff and came across a bag containing hand dyed scrim and random bits of coloured strings and loose woven netting stuff - one of those exciting bags that thrills you when you come across it again in the draw. For this piece sections of the scrim matched beautifully with the darker green fabric at the bottom so I cut up little squares and stitched those to the bottom of the rocks, twisting and pulling it in different shapes. The frayed edges are wonderful for giving a loose natural blend into whatever it is covering and it's easy to create thin or thick bits by stretching or layering up. 

Over the top of the pieces of scrim I started playing around with some jute string I bought years ago which was originally advertised for papermaking. The thickness had to be reduced as the full three strands was just too much so I stripped it down to a single strand and started couching it in loops going in all different directions around or between the rocks. There was no forward planning on this, the string just went where it looked like there was a gap requiring some string! What's nice is that it is also different thicknesses so some bits are chunkier than others. 

The beads was such a fun idea!! I've been thinking about playing with stacking beads like this for a while but didn't have a Stitchscape to go with it. The beads themselves came from a mixed bag of different colours and originally I was mixing up the colours (clear beads with coloured bits in, matte baby pink beads, clear solid beads, orange beads....) but it didn't look right so I tried keeping the colours the same on one 'stick' and ended up with two different coloured 'sticks' of beads to add a bit of variety. There are six beads in each strand and they are attached by putting all six onto your needle and pulling the thread through, then inserting your needle back down through the line of beads starting at the second bead down from the top. So the top bead acts as a stopper and the taught threads through the middle keep the beads upright. 


I tried to keep the clusters in odd numbers because that tends to look slightly better than even clumps and they are such fun! They move when you run your fingers over them and they're shiny but not too shiny and they just work so well. Once I'd started putting them on I couldn't stop! Definitely a technique to use again, what else can I make with them?


The flowers really remind me of little strands of Heather where the flower buds are aligned up a spiky stem. Do they remind you of any particular flowers?

I wasn't going to do anything else with the rocks themselves but they looked a bit sad and texture-less and I realised that I hadn't really colour balanced the orange of the sky so I used the same variegated thread from the top layer for little seed stitches on the upper side of the rocks, just where the final sun's rays might rest and make the rocks glow. 


So, there's one more little rock piece to finish up and I've just ordered something that I'm really excited about which I'm hoping to use as texture around the final set of rocks. I won't tell you what it is though until they've arrived - not giving away any spoilers!

The stitch round up for this little 12cm hoop is; straight stitch, bullion knots, back stitch, seed stitch, french knots, running stitch, satin stitch, couching, beading and whipped back stitch. Nice and easy!