Monday 30 October 2023

Making a Rockpool


I have been inspired! I enjoyed making my rockpool ATCs so much that I really wanted to make a little hoop with the same techniques. Plus, I came across a fantastic way to display embroidered hoops which I hadn't really seen before. A British company called Barton Studios makes frames which you can put your embroidery hoops into which means they stay nice and taut in the hoop, and the whole thing pops in with little peg screws that you tighten with an allen key so that the hoop fits snuggly into a specially made frame. 
I purchased one of the frames whilst on the bus on the way home one evening, and then immediately started creating the hoop when I got home. I thought it would be nice to sit out on the balcony in the sunshine before it gets too cold to do so but it was a pain really - the wind blew my fabrics off the balcony into the carpark below twice!! I had to dash down our stairs to fetch them in my Christmas socks. (Although I'm always wearing Christmas socks so it wasn't that really, more picking through the carpark with no shoes on.)


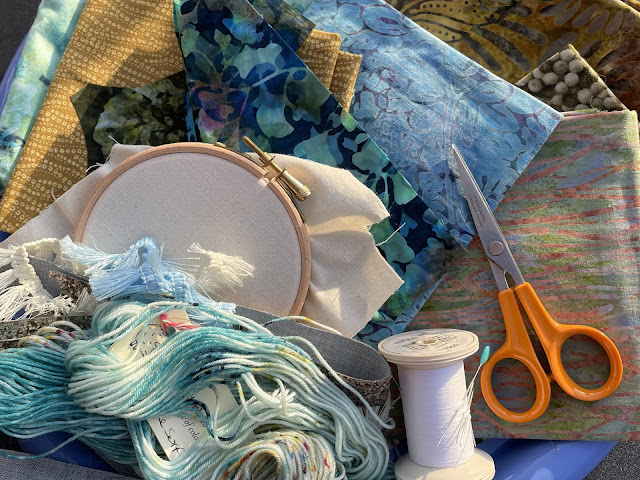
Some of the fabrics I have kept the same as the ones used in the ATCs and some were different ones I pulled out of my stash. There's a lot of batik patterns going on!! They are definitely one of my all time favourite types of pattern to work with. The fabric itself is always nice because the weave is so close that it doesn't fray when you cut it - although layers of the stuff can be tricky to stitch through for that very same reason. 
I didn't have any kind of plans for this really, it was mostly a spur of the moment make and the viewpoint is different from my usual landscape scenes too. There is no calico (backing fabric) showing through and it is a birds-eye-view kind of scene with lots of rocks either side of a watery channel. 


It was a relief to get the fabrics tacked down because I was determined to sit outside and the wind was just as determined to steal my fabric pieces! I didn't stay outside for much longer afterward though I must admit. 


The first thing to do was to make it textured! I really want it to pop from the frame (which has since arrived and I was so excited I've framed something else in there for now). The same glittery tape has been stitched down as used in the cards, and I've twisted together white and blue fringing to make these fun sea anemones. They will need a haircut but I should have added them on after the texture stitching really (I got too excited) so it's easier to hold their hair back if they are longer. 
 

Stitching around them can be a bit challenging!! I would like to add lots more texture to this piece though and it'll be interesting to see where it takes me. And what it will look like bursting out of the frame! Watch this space. 

September Rockpool ATC Swap


This was a quiet little swap for September. Sadly we had several regular members decide that they weren't able to carry on anymore - all for very good reasons - so it was smaller than it has been in past months. If you sign up to the swap you don't have to do it regularly, there is no obligation sworn in blood to send a card in for every month but it was sad for me to see these ladies go, especially as one has been joining in since the start. Hopefully they might be back again next year!
The cards that were sent in though were the usual high standard of quality interpretations and executions. Again there's such an interesting mixture of realistic portrayals and the slightly more abstract pieces. I love the two focused on a particular creature, the detail in both of them is stunning. 


I thought Suzi's one (above) was particularly sweet with the toe dipping in and the red polished toe nails. I would never have thought of that! Do you think the crab is just about to give the person's foot a pinch? I'd like to think so!!

Veronica's card (below) focuses more on Holiday Memories and has some beautiful Northern Light inspired fabric at the back with, I think, rocks and even snow interpreted in Hardanger. I haven't had much experience with this particular embroidery technique but as I understand it you make the blocks of satin stitch (usually always in a geometric pattern) and then you can cut sections of the fabric away to reveal a lacy pattern. It's really very effective!!


Jenni's lovely card I would assume has been made with free machine embroidery on a water soluble fabric for the green seaweed, then the fabric dissolved and the seaweed stitched over this wonderfully textured thread background. I don't know whether the background has also been stitched in the same way? I love the little embroidered starfish!

Liz's wonderful sea anemone looks like it's been made with some very close together stem stitches to form the body of the anemone, with long stitches and french knots for the wavy top. Isn't the pink wonderful against the dark blue background? It really pops. 
(I'd just like to point out that this is how I think everyone has made their pieces, it doesn't actually say anywhere how they have been created but I like to try and decipher the techniques. Do correct me if I'm wrong or you have a different thought!)


I'm not sure how Jacquie has made the purple seaweed in the background of her card. It looks like a heavy vilene (interfacing) that has been painted and ironed on? I think pretty papers or painted fabrics have been glued or stitched at the bottom, then feather stitch used to make the green seaweed and wonderful chain stitch fishes. 

I love Abi's starfish, look at the detail stitched onto the arms! Is it arms for a starfish? Or are they legs? It was padded slightly too which was nice because it did really look like the starfish was just plopped on there and could almost be picked up from the pool. 


Such a wonderful little collection all laid out in the golden evening sunshine! Do you have a favourite? 


Sunday 29 October 2023

Piggington Stitchscape


Huzzah! Piggington is complete! I can't find the original post about setting this hoop up - but it was several years ago now. The pig fabric was purchased from Kelly at The Stitching Post during her open day when she first set up her beautiful converted stables now creative studio and fabric shop, and I believe it's a Makower print from a Village Life collection. At the time it was a fat quarter in an end-of-line section so I don't know if there's any left anywhere, certainly there isn't enough for me to make a kit from I'm afraid. 

The pigs are so sweet though and I love the mix of Old Spot, Saddleback and Whites (or maybe a Tamworth?). I also hope you are impressed by my pig knowledge! It has been cultivated through years of attending country shows....although I did Google to check that my original theories were correct. 

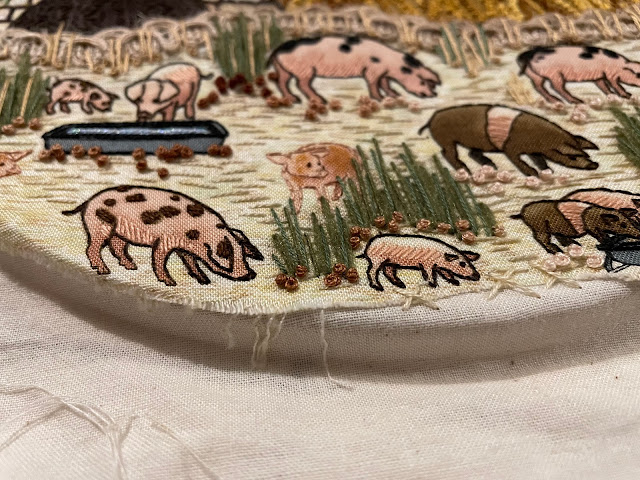
Each pig has been drawn around again with a single strand of back stitch. Where there are darker lines I have just tried to match the lines of colour in the print already so I haven't made them deliberately darker. The spots on the spotted pigs have been covered in satin stitch, and I've added some areas of texture to any gaps with single strands of straight stitch, either following the line of a shadow or filling in a section on the saddlebacks, just to make them slightly hairy and more interesting looking. The eyes are single strand, one twist french knots. 
The water and food troughs are part of the print and I've gone around the edges with single strand straight stitches to give them some texture. For the water though I've used metallic thread in blue to give it just a little bit of sparkle, stitching long lines straight across the trough and then couching them in a little at the middle to make sure it doesn't spill over. 

Texture has been given to the ground with scrappy single strand straight stitches following lines of the print, and I've used some Stylecraft DK acrylic yarn (stripped down) to make the tall grasses, going over them again with some other long stitches to give other colours, trying to blend in greens and beiges to colour balance the piece. French knots using a variegated yarn have been added in as well to try and give an idea of mud piles around each pig where they might be rooting through the ground. 


I'm not 100% happy with the top of the pig layer where the trimming is, and I think it is pretty much down to my fussy cutting around the top pig you see in the above image, and then moving the trim over the edge to hold it down. It looks odd to have a fence go over the pig and, in hindsight, what I should have done would be to cut the fabric closer to the pig and make it look more as if the fence is behind rather than sitting on top of - it has upset the sense of perspective there. 
I have no issue with my hessian looped fence though, it's a really gorgeous fancy trimming and I've blended this in with some scattered french knots and more straight stitch grasses. 


The pig sties are all different and have actually been glued on with bondaweb, something I rarely do as it makes it so difficult to stitch through the layers. The middles have all been seed stitched just to give some texture and then the brick walls have been made by back stitching around the bricks on the largest pigsty, using a single strand of black and brown in the same needle for some variation; for the second pigsty it is again back stitch but using a single strand of a matching colour, and the third pigsty is long straight stitches woven together (so the long vertical stitches were made first, then horizontal stitches woven through as they were being made). All of the inner edges have been whip stitched, then the outer edges are couched with embroidery thread to give a neat finish, with a darker discreet single strand back stitch just tucking underneath to add shadow and definition. 

They popped out slightly too much though so I've also added feather stitch vines growing over the top to blend them in and make them look a little bit aged. 


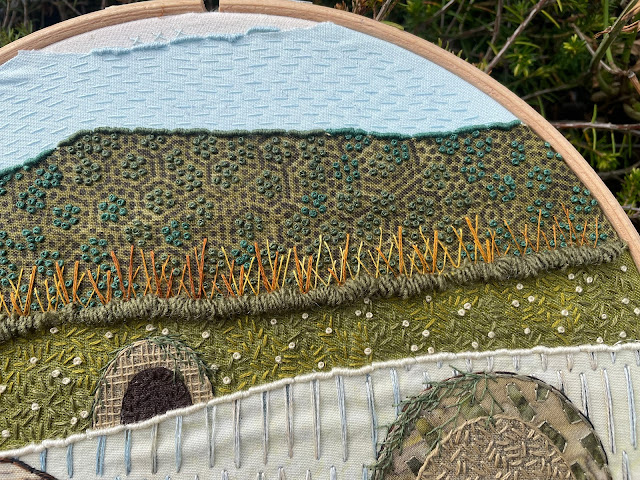
Working upwards from the pigs, one of my favourite bits is definitely this field of gold. It took for---ever to do and was totally worth it in my opinion. The pattern of the french knots is the same as the pattern printed on the fabric, lots of wavy lines of spots in varying sizes. I've used a variegated thread to get the different colours and create some movement, and worked different sizes of knot (more or less twists around the needle) depending on the size of the line I was covering. The tiny knots have been made with two strands and one twist, and the biggest knots are two strands, four twist. 

I've edged this layer with several lengths of a lovely hand dyed yarn from Lamington Lass Yarns I picked up a while ago, which has the exact shades of mustard, ochre, khaki and brown that I was looking for. The beautiful variegation has worked well with my folding lengths together and it has given a nice puffiness to the top of the layer. 


Above this was a lovely striped batik and I've not done much to this at all, simply following the spikey lines with two stranded straight stitch. The thread looks variegated here but actually it's a blue that was light damaged so I got it much cheaper - the light has bleached away some of the blue to give a dirty parchment colour that matched really nicely, and I've edged the layer with cream bullion knots. 


One of my other favourite layers is the green seed stitch strip. The fabric has a quiet mottled texture printed on it but I've enhanced this by using two different colours of green to make my seed stitch, working them in distinctive patches. The little creamy french knot daisies were added later in an attempt to colour balance the piece out as it was light and creamy on the bottom but mostly green on the top and it didn't work. 
I often don't work chronologically through a piece and go back to add more on each layer as the scene builds up. In this case adding more green to the bottom with the acrylic yarn, more white to the top with french knot flowers and more gold/ochre with fly stitch stems further up. It has definitely helped!

I've used the acrylic yarn again to edge this layer, using a technique which a student of mine came up with many years ago when trying to recreate a vineyard. Because the DK yarn has four strands to it, if you just carefully pull on one, the rest of the strands bunch up and make a wonderful texture. I've used it before with my Water Lily Lagoon Stitchscape and thought it would work really well again here. 
The second problem I have with this piece though is that it is very linear and has strong horizontal lines at the top without much to break it up so this is almost a dividing line between the top and bottom and I'm not sure it has worked as well as I'd hoped. I like the texture, but perhaps it's too bold too far up the hoop?


I've used another Makower fabric above this with the lovely spots, picking out some of the pattern and working two strand, two twist french knots. I've again used two colours here to try and make it look more natural and break up the layer a little bit. As I mentioned earlier, I also needed to bring up more of that strong gold colour so I've used the same variegated yarn and made a row of single strand fly stitches, then gone back over with another length in two strands to build up the colour. The top edge has been neatened with bullion knots. 

Finally, the top blue layer has just been given a quick going over with single strand running stitch rows. I did at one point at in some fly stitch birds but there is just so much going on with this piece, it didn't add anything to it so they came out again. (More isn't always good!)


I feel like there were lessons learned here which is good. It's a nice piece as it is, and I won't make it again as it took so long and I try not to repeat exactly anyway, but next time the pigs crop up I'll try and remember what worked and what didn't!

The stitch round up for this piece is; straight stitch, running stitch, back stitch, french knots, couching, seed stitch, feather stitch, fly stitch, whip stitch, bullion knots and satin stitch.

Interestingly, you can see the same image on the back as you do on the front!


Rockpool ATCs


As usually happens, I didn't get time to write up about these cards when I'd actually finished them - and now we're nearly a month on and I should be writing about the next theme set! Even though I'm late, I still would like to mark the passing of the months for my Stitchscape swap and talk a little bit about how I made these cards. 


The theme for September was 'Rockpooling' and I wanted my cards to be viewed from up high, a mass of texture and seaweed and greenery. I wasn't brave enough to add any little creatures in but there were bead bubbles so that would hint at something living at the bottom of my pool, right?
I thought the backs of the cards were quite interesting as well this time around - totally filled with stitches apart from the sections of stuck sequin tape. As always they took longer than expected and ended up coming on the bus with me a few times so that I could finish them off. On Tuesdays I get the bus in to my part-time job really early because it means I avoid the college kids and I end up with an hour or so sitting in a coffee shop eating breakfast, topping up my caffeine levels, stitching and eavesdropping on the coffee shop conversations. It's amazing how much can be achieved in that hour!


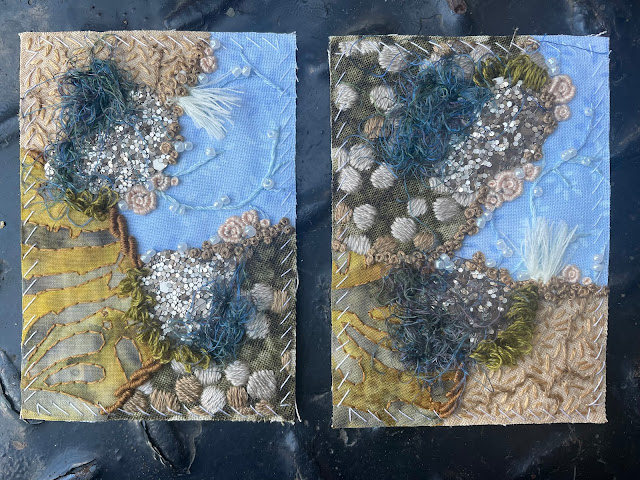
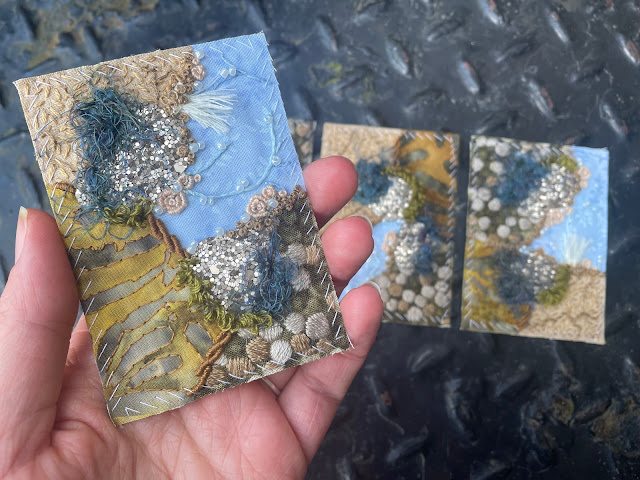
There's a lot more colour on the front of the cards than the backs, and I like to think that there are different levels going on. Each card has been overlapped slightly differently, and the pieces cut to completely random shapes. The constant is that the blue layer (the water) is always at the bottom but other than that the rock fabrics vary quite a bit, creating different shapes and tiers. 


The fabrics have all been treated the same way though so they are consistent in that. The beautiful pebble looking fabric with the circles on is a great print that is just a mass of what could be bubbles or pebbles or circles in shades of brown. These I have picked out the most prominent shapes and covered them in different colours using three strands of floss to create a satin stitch which gives a slight padded texture that feels really nice. I've made sure to vary the directions of the circles though so that they catch the light differently and look more of a jumble - had I done them all in the same direction it would have looked strange and too uniform. Mixing it up adds a sense of movement and that they are wiggling around, potentially a slippery surface to stand on. 


The beige, sandy coloured fabric has been given quite a craggy look by covering it with seed stitch, and then going over it again with whip stitch. The whip stitch adds cracks and bumps into the texture, and turns an otherwise plain fabric into a really interesting one! 
Finally, the last fabric rock surface is much smoother, with just discreet lines of single strand back stitch going over the lovely batik pattern. There's less going on in this layer so it looks a bit quieter and safer to stand on - out of the three, this is the one that wouldn't be hard going on the feet. 


Sparkle has been added by using a really lovely stuck sequin tape. It's a woven tape on the bottom but has lots of layers of teeny tiny solid hexagon sequins glued over the top. I haven't stitched too much through this ribbon as the little sequins can ping off so it's easier to find areas where you can sort of see the tape through the glitter to stitch through. It's so nice though, like finding a piece of shiny quartz on the beach. 
Further texture has been added by adding some rolled up furnishing fringing to the watery edge (a sea anemone perhaps?), blue silk throwsters waste has been stab stitched on around the edges of the glittery tape for a little injection of some deeper colour and some soft wavy touchy-feely stuff. 


I've used french knots to edge any raw edges of the brown circle and plain sandy fabrics, and locked together bullion knots to edge the brown batik. Usually when using bullion knots to edge a fabric I would just use them as one single line so I've experimented here with using them at an angle to create a thicker line but also a different texture. What do you think of it?
Small bullion knot barnacles have been added on the water's edge, and I've used some leftover green thread from a different project to make moss stitch which stands up in loops (basically it's normal straight stitches but the thread hasn't been pulled all of the way through the fabric to lie flat, and has been deliberately left to form a loop on the surface). The little pop of green really changed it for me, funny how the beach still needs some green in it!


The water I've left fairly blank. It's not a running pool of water and, without lots of animals jumping around in there, the surface would be quite smooth and still so I've quietly added some stem stitch in a matching colour along any lines of the print (which was a leafy swirl type pattern), and added some little beads along the length to give it some shine and shimmer. I could have also done this with metallic threads but I didn't want that to be glittery really. 


So there we have it! My interpretation of a rock pool. I really like these cards - perhaps if I did them again I would add something else to the water to give it a slight shimmer, a layer of chiffon or organza or something but, overall these really appeal to me and I like how I've made them so textural but in a flat way so that they will hopefully still be ok to post as a letter! 


The stitch run down for these cards is; seed stitch, whip stitch, bullion knots, back stitch, satin stitch, french knots, stem stitch, beading and moss stitch.


Friday 27 October 2023

Talks & Craft Fairs


I've met lots of really lovely people lately. September was quite a busy time for me with several talks and a craft event to get ready for. 

These photos were from the North Kent Embroiderers in Southfleet - which is a bit of a distance from me but actually we seemed to fly there down the motorway! Reece and I have quite a good set up going (well I think so, he just kind of shrugs about it); I go in for first contact and start shifting things in, he brings in Baby F to charm anyone who has already arrived and to polish the floors with his bottom shuffling, then I set up the display table and Reece gets the sales table going. 
When it's all done and beautiful, he whisks off Baby F until I've talked and chatted myself out and have started packing up, then we say thank you and goodbye and go home! 


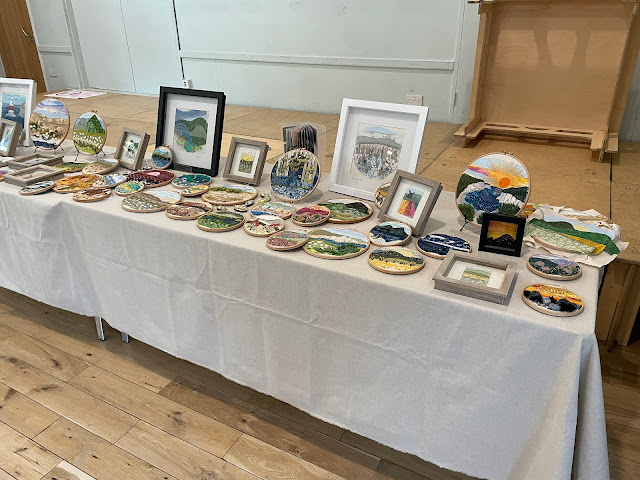
I try to take as many examples as I can to these events. You never know what will spark up a question or conversation and it makes it much easier to describe a stitch or a technique if you can pass round examples of what you are referring to. The table may start out full of pieces and looking lovely but by the end it has been ransacked and there are hoops in piles all over the place!

It's not a formal set up, I don't have a presentation on a power point or a fun video or anything, it is just me chatting in front of a group of ladies (usually, no men yet). I do have a written down spiel, but to be honest the minute I start speaking I totally forget about it and the next 40 minutes or so are a bit of a blur! Eventually I run out of things to say in cohesive sentences and ask for questions from the audience which then spark off new ideas and discussions. It doesn't sound particularly slick when I put it like that, but usually I get requests for workshops or further talks so presumably it's not all bad. 
When I think of the me 5 years ago, I would never have considered standing up in front of a (often quite large) group of people on my own and be able to actually speak!! I think I've learned to speak up and also slow down so that it actually comes out in English rather than garbled speech and I'm quite proud of myself really for being brave enough. I suppose it helps if you are really passionate and enthusiastic about it. 


I don't take huge amounts for sale at these talks, usually a selection of kits, books and any other bits that are packed in one of my boxes. Kits are the big sellers anyway and what most people ask for when I go. 

For craft fairs it's a whole different type of packing! I try to have lots of different things on offer and lots of different price points ranging from cards to little stitched daisy pendants, postcard packs, rockpool magnets, kits and original pieces. To be honest I very rarely sell an original piece but they are good at drawing people in to come and have a look so they are a nice advertisement to what I actually do. 


This was at Lindfield Craft Market a few weeks ago. I'd never been here before but had been approached by the organisers who spotted me at the Heathfield Show and took my details. 
It wasn't a huge event and the footfall wasn't amazing but actually I did rather well! And I was next to a local perfume lady so we smelt lovely too. The quality of the sellers was very high with lots of beautiful creations so it was amazing to see and be a part of. 


I don't always mind it so much if the events are a little bit quieter as I can sit down and concentrate on a stitching project all day (a slight luxury these days!!).  For this event I'd brought my pig Stitchscape to work on and I managed to mostly finish it off which was brilliant. 

You can also see my super cool new card machine in the below photo, it's very snazzy on its stand there and connects to my phone brilliantly. 


This is an interesting piece, possibly because I genuinely can't remember what I was thinking when I first put it together years ago. I'm sure I had lots of plans of where to take it but I feel a little bit like I lost my way with this one. It's very busy, there's lots going on and nowhere really for your eyes to rest or be specifically drawn to. I don't know that I'm entirely happy with the pig section or the really solid green section at the back, but other bits of it I really like so I suppose it balances out. 


There's definitely a lot of stitching in this one though!!


I did try to finish it off completely at the Lindfield market but I thought I'd try adding some fly stitch birds at the top there in the blue sky layer and I didn't have the right colour so it ended up coming back home. The birds were a bad idea anyway as that's one of the only areas not stuffed to the gills with various stitches so they quickly got pulled out. 
I also couldn't get it to frame in the hoop properly because of the way I'd cut the bottom layer which was by then fraying and bobbly so I had to trim it down and tidy it up. Because the piece had been in the hoop for so long, when I took it out it stayed with the little crease all of the way around, standing tall and proud on the ironing board. It didn't entirely iron out but wasn't an issue because it was going straight back into the hoop. 
Exciting to finally get this finished though!


I also gave a talk to Heffle Quilters which was really lovely. They found me at the Heathfield Show as well and what's so nice is that they meet in the same hall that my Godfather had his wedding reception in so I know the location quite well! It's lovely and bright and airy in there which is great for stitching and giving talks so you can really see the detail in the hoops. 
Very kindly they also produced some toys for Baby F to play with whilst we set up. He was absolutely over the moon with them (although it did cause some tears when leaving as he didn't want to leave a certain fire engine behind - don't worry, there's a playground outside and he soon forgot all about it!). 


It does take a while to set up the table and make it look pretty. I still find it slightly amazing that I've produced so many pieces - can you imagine the number of hours represented on these tables? I haven't even tried to count! Tidying it away is usually a bit quicker as I just stack all of the same sized hoops on top of each other and make sure they get put away into their box carefully - all of these fit into one big box (including the framed ones). 
Whilst setting up the pop up shop on the other side of the hall, Reece found the advertisement for my talk and I honestly could not have been more chuffed - what a lovely thing to say!! It is the best kind of review, and before I'd even done anything for them!!

I have been booked to go back to both the North Kent Embroiderers and Heffle Quilters to run workshops with them and I'm looking forward to seeing what my next few talks bring.