Tuesday 22 August 2023

The Allotment Garden ATCs


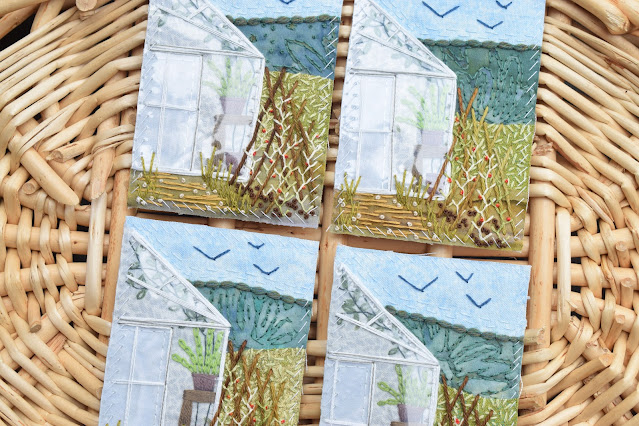
These cards were a little bit experimental as I wanted to create an actual greenhouse in my allotment but wasn't entirely sure how to make them. I've documented my creative thinking for these in several previous blog posts so hopefully you can follow along but to summarise, I stitched my plants 'inside the greenhouse' onto the fabric layer and then cut out an identical shape from a plastic strawberry punnet and stitched that on top, adding additional details of the framework and door in long stitches which has really added a 3D element to the building. And I'm really pleased with it!


The plastic wasn't the easiest to stitch through, and I had to be really careful about punching too many accidental holes into it as they were then really obvious. It was fairly thick so you had a little bit of time to bring your needle up through the fabric and see where it was before going through the plastic layer, but most of my holes were created either beforehand or on the downward direction. The nicest thing, I think, is that shadows are cast by the threads lying on the top which makes it actually quite lifelike.


Thanks to my ever changing schedule, I'd noticed on previous collections where I was trying to fit two month's worth in one hoop that I was getting slightly stressed about finishing them on time. It was great then being more than a month ahead but it could get a little bit tight and squeaky on the first deadline so for this one I've just made the allotment cards in a smaller hoop and that has worked out well. I'm still making four cards rather than two so that I have a couple of back ups in case anything should go wrong with the post or someone joins in too late for the theme but still wants to join in. 
I like the backs of these cards, you can still make out the greenhouse shape and the plants in the pots - it's a really abstract, linear drawing (the kind my college teachers would be loving and I'd have to photocopy the back of for my sketchbook). 


Stitching the card backs on was a little bit tricky. I pre-punch the holes in the cards anyway to try and keep my stitches regular, but this time round I also had to pre-punch holes in the plastic as well. My method was to stitch at least two other sides as normal so that the card was in position, and then punch straight through my card holes (and the space outside of the card that I would need to stitch through) through the plastic with a pin, then I had a smooth and neat journey down that card side. The only thing I didn't like was that the plastic became slightly prickly but I think we can live with that. 


It doesn't take that long to stitch the backs onto the cards which is handy as I can usually get some done whilst Baby F naps, or in the evenings when he's in bed. If it's a nap then the house is in chaos, toys everywhere, I'm probably still in my pyjamas and quietly inhaling as much coffee as possible. 


So, working down through each layer, my top sky layer has got a couple of rows of single strand running stitch following the edge of the layer below just for some texture, and three fly stitch birds coming to eat my pea shoots. The dark green fabric has been covered in single strand back stitch around every line of the pattern where I could see it - it's a batik so some of the lines were a bit wishy washy - and edged with couched yarn. 
The layer underneath has a gold metallic sparkle to it already and I've slightly covered that in a green, two strand, seed stitch; not bothering to edge it separately as the stitches have been taken over the edge to stop any fraying and I wanted a flat surface for my bean poles to sit on. 
The brownish/green fabric at the bottom hasn't really had any texture stitches added because they're all stitches for the image. 


My allotment garden is based around the greenhouse and rows of canes with beans on. The poles themselves have been stitched with a lovely hand dyed yarn that I've wiggled through the fabric layers. Because of the nature of the dye, the poles are all different colours which I thought was nice, although some are perhaps slightly too green and light? Not sure. 
The beans have been made with two strands of a variegated yarn in feather stitch, and the little flowers made with mixed strands of orange and red as french knots. 


Brown soil has been added to the bottom as brown french knots scattered in any spaces, grasses added to the pathway up to the greenhouse just with tall fly stitches, then horizontal stitches added to create that path, and pebbles as french knots. 


The fabric for the greenhouse was stitched down initially with blanket stitch and a door added in a different fabric stitched with just that single row of back stitch you can see through the 'glass'. When I stitched down the plastic I went over those blanket stitches in my thicker thread which I then wove long stitches through and over to give the outer frame and to hide the plastic edge. Repeated long stitches were used to build up the impression of the door (over the edge of the fabric underneath) and framework. 

The table and plant pots were added before the plastic and for those I freehand stitched a satin stitch table and two plant pots, adding a couple of long stitches across the top of the pots to hide my stitched edges. The plant on the table reminds me a bit of a Christmas Cactus and has been made with chain stitch - these were also freehand branches so some of them look slightly strange I think at odd angles. The big vine plant had a single strand, back stitch, vine framework stitched first as I wanted it to look like it was getting wrapped around the greenhouse frame, then detached chain stitch leaves worked along for the leaves. 


I have been asked to draw up a little pattern for this greenhouse so I will do my best to come up with something that will just be a little PDF download on my website to get templates I think. Not sure when I'll get round to that though!


So, for these cards the stitch roundup is; fly stitch, running stitch, couching, back stitch, french knots, seed stitch, feather stitch, detached chain stitch, chain stitch, satin stitch, straight stitch and blanket stitch (although that's now hidden). Not one single bullion knot!! That's very unlike me. 


Wednesday 16 August 2023

Patchwork Fields / A Bird's Eye View July ATC Swap


It was a bit of a mad rush to get these cards photographed, swapped around and posted back out. The last card came in just a day or two before we went on holiday so the house was in chaos with suitcases and half packed bags everywhere - never underestimate how much stuff you have to take with you when you have a 16 month old baby! I sweet talked my other half into bathing and putting the baby to bed one evening and was crouched on the floor frantically photographing cards for multiple blog posts (assuming I would have time on the holiday to actually type up some blurb to go with them!), then swapping and cross referencing against my spreadsheet to make sure I wasn't sending art by someone to someone else who already had some of their work, and packaging them all up in the envelopes ready to go out the following morning. 
I was at work the following day so only had time in the evening to get the photos for the website up and running and completely forgot to put out a big generic photo to let everyone know I had posted the returns! Total scatterbrain. 

Anyway, they should all have arrived by now and I hope that everyone had a little heart-skippy moment to see their own handwriting on the front door mat. It heralds the arrival of the returned Stitchscape cards!

I thought this swap was particularly interesting. For those that took on the challenge of the Bird's Eye View element, it is very different thinking about what an item looks like from up above it and trying to make those things look like what they are to someone else. If that makes sense? There's an interesting clash of using the printed fabrics and the patterns on them but changing the context to looking down from above, as well as a slight clash of scales and perspective which is rather fun. 


There's a lot of very neat work here - some very talented hand stitchers! We had a new lady enter into this month too which is wonderful, it's so nice to welcome new members and to see what they come up with. 

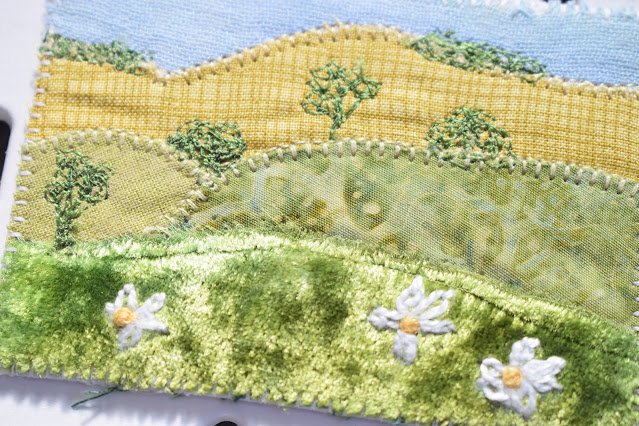
As always, it's a fabulous mix of drawing, painting, dyeing, stitching, patchworking, machining, collaging.... anything goes really as long as there is fabric and stitching somewhere. Interestingly there was only one card which took the Patchwork Fields theme more literally I think with layered patterned fabrics stitched on top of each other like a patchwork and then a nice contrasting back stitch flower/plant/tree(?) over the top.


The sheep one makes me chuckle. It reminds me of a postcard where you have the birds eye view part as the main body of the card and then a humorous overlay of a single sheep in the corner. I wonder if it was based off a postcard?

All in all, a beautiful swap, with lots of different colours in which is slightly a surprise. I was thinking it would be more green with maybe some yellows and browns for fields at different times of the harvest year but actually it is very colourful! Do you have a favourite from this swap?

Monday 14 August 2023

The Halfway Point


I am very behind on this post!! It should have come out at the beginning of July when the waterlily cards had been swapped around but I kept forgetting to photograph them and then I temporarily misplaced my ATC book after a talk so couldn't photograph them, and then I finally managed to get photos...and went on holiday to Wales for a week. So here we are, finally getting around to it and celebrating the halfway point of the 2023 Stitchscape Swap!!
It feels like no time at all has passed even though it's a whole six months in and I've already released the themes for next year. I hope that you are enjoying keeping up with the swap if you are following along, and enjoying making your cards for those participating. 


Interestingly there seem to be a lot more horizontally orientated cards this year. Looking back at my halfway point collection from 2022 (you can see it here if you'd like) I didn't have any horizontal cards - I think I ended up with one in the second half of the year, but this time around I have three already! And pleasingly it has worked out nicely for this photoshoot with them stacking on top of each other. So satisfying. 
I'm really chuffed with my little family of cards. It's nice to have a piece you have made yourself to keep, just to remind you later down the line how you interpreted the theme, and perhaps what was going on in the month that you made it. Real life events could sneak in. I remember last year we had a card in for the Autumn Blaze theme which had included Queen Elizabeth II and Paddington because it was made just after she had passed away (and Paddington had been to the palace for tea for the Jubilee just a few months prior) which made a touching memento. 
Or it could be that you attended a workshop on a technique that year and used some new found knowledge - only you can look at your cards and see exactly what the thoughts and feelings behind it were. But, in passing a version to someone else in the swap, they will have their own interpretation of it. Not many of the participants of the swap have met each other, and probably most of them never will. Each one has their own lives and getting your card through the post box could be exactly what they needed to bring a smile on their faces - each one I get through as a theme entry definitely brings a smile to my face, and usually a little tippy tappy dance to my toes. 

January: Frosted Dew Drops

February: Snowdrop Carpet

March: Morning Chorus

April: Butterfly House

May: On the Cliff Edge

June: Waterlily Pond


The above image I find really interesting. It is all of the cards I have received in the swap, so all made by other people. Each one is also a different person and you can see the different styles. Some of the participants have a very recognisable style, or way of finishing, and after so many months of seeing their work I'm quite confident in recognising whose card was made by who just by looking at the front. It doesn't always work of course, the swap can be used for trying a new technique every month on a small scale so then the style is never really the same and I'm kept on my toes but it's nice to recognise a fingerprint of someone and see how they have made the theme their own in their own way. 

I like to think that I have got a recognisable style or fingerprint. You'll have to tell me!

So we are already a month and a half into the next half of the year and I'm really looking forward to seeing what the next few months bring!! It's still as exciting to me as the first swap in February 2022 and I'm sure it will continue to be as long as we can keep the swap going. 


For anyone who is interested in participating in 2024, the proposed swap themes are below for you and I'll be popping inspirational tips onto my website at some point as we get nearer to the time to give anyone who needs it a head start. Just pop me an email at sales@dottytextiles.com and I can send you further details on how to join - it's free to enter and there's no obligation to do every single month, but you will need to send a self addressed and stamped envelope for each month, and send a card in to receive one. 


Sunday 13 August 2023

Frittenden Sheep Stitchscape Workshop


Last week I was honoured to be asked to run a sheep themed Stitchscape workshop at a private event in Frittenden, Kent. It was a fabulous venue, where the lady in charge puts up a marquee in the garden over the summer and has all sorts of events in there with friends and family. She was one of the Rye Stitchers and asked me when I visited them in May if I would be interested in coming along if she could put together a big enough party of people to attend. 
The set up was quite similar to my usual one, and I had been asked to bring along partially pre-made packs with the fabrics already assembled for use. I tend to prepare the calico backing into the hoop ready to go and then have fun laying out different combinations of about five fabrics that fit the theme so that each hoop is different. The ladies can then have their own fun choosing a collection that inspires them, or just pick one and totally change the fabrics included - they don't have to stick to the ones given to them. 


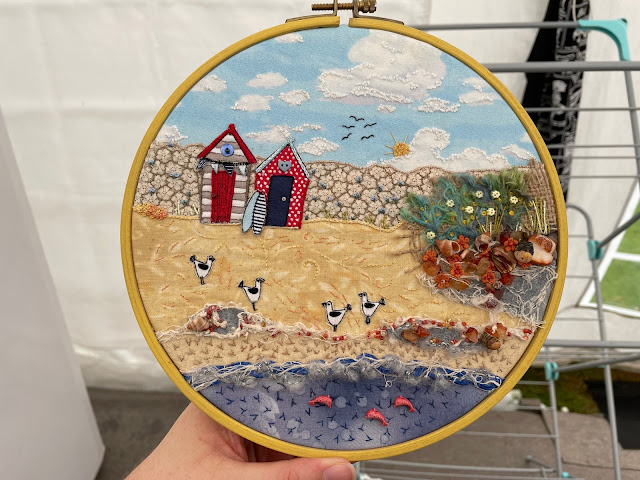
One of the nicest things about this workshop is that two of the ladies (the host included) were from the Rye Stitchers and they had both finished and brought along the hoop that was started at that workshop!! It was a seaside themed one so lots of shells and fun bits were stitched on. This one is Anita's, who apparently went home after the class and unpicked a great deal of it because she wanted to include more items from her stash which she knew she had. I love that and understand perfectly the slight frustration of knowing that you have the perfect bits to add to a piece - just not where you are! 
We had chatted during the class about the use of purl wire (usually used in Goldwork techniques) and it turns out she had a fabulous collection of them and has used them to great effect to enhance her piece, stitching them into the dark green grasses you see (using smooth purl), as well as looping a beautiful spiral variegated one up and into/over shells. It is so amazingly effective! 


The big shells have been stitched down - I love those long bullion knots tangled up over that shell fragment piece - and then the little tiny ones she has glued on (I'm saying nothing...). There are all sorts of beads stitched down, what looks like mulberry bark strands, french knots in the textured surf.... so much to look at in one area and you see something new every time you look at it. 


I also really like the character that has been put into the ocean - there's not a whole lot of stitching at the top, it's not needed to be honest and balances out everything happening on the sand to give some breathing space - but the whale tails are so much fun, as well as the big oil ships right out there on the horizon. 
I'm so pleased that she finished it and that she's pleased with the effect (as she rightly should be). It apparently hangs on display in a bathroom in her house. 


The second finished piece also hangs in a bathroom apparently and is a totally different scene (remembering that these were started in the same workshop!), looking the other way entirely. Whereas Anita's looks from the sand out to the ocean, Jackie's is standing in the ocean looking back and is a beautiful contrast. 
These hoops are like little glimpses into other people's stash collection - the beach huts and seagulls look to be carefully cut from a printed quilt fabric or panel and work really well to add a cheeky element to this scene. 
So much texture has been added with lots of beads, some of which I think were deconstructed from a necklace and have a chunky, rock look to them as you can barely see the holes to stitch through, little tiny flower buttons in yellow, individually cut lace flowers in orange, jumping fish beads, and several different types of yarn and thread. 
The stitching on this piece is also absolutely tiny, and immaculate!


Aren't the little beach huts sweet? Texture has been added to these with french knots over the polka dots and back stitch on the stripes with chain stitch rooftops. I think that the bunting has been stitched across the top of each triangle and the boards have been glued so that they stand out?
Again, the more you look at this piece the more you see in it. 
I should have photographed the back of this as well because it was so neatly done - the fabric was drawn up as I would have but rather than being backed in felt, a circle of card was cut to fit and printed cotton fabric tightly glued around it, then that was glued to the back of the hoop so it had a neat, hard backed surface. 


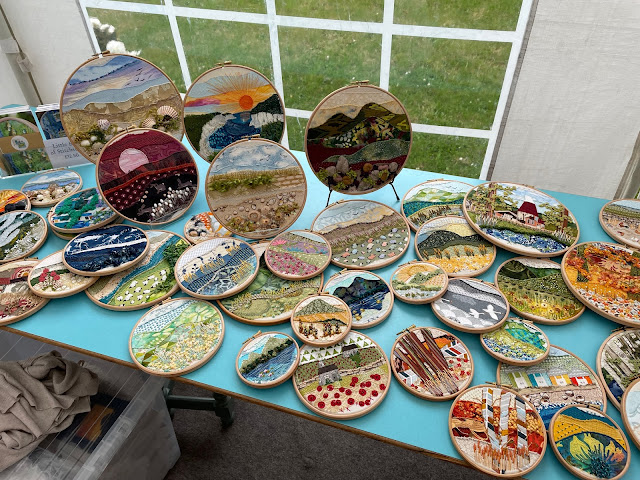
The marquee for the workshop was very posh with windows and a carpeted floor! It was also big enough to house a sofa and lots of tables, some of which had tea and cakes on, some were for the ladies to sit around and then I had a couple to set out some example hoops which I try and take to all events as it's often easier to just show people what I mean rather than try and explain it. 
It also came with a sweet resident ladybug!


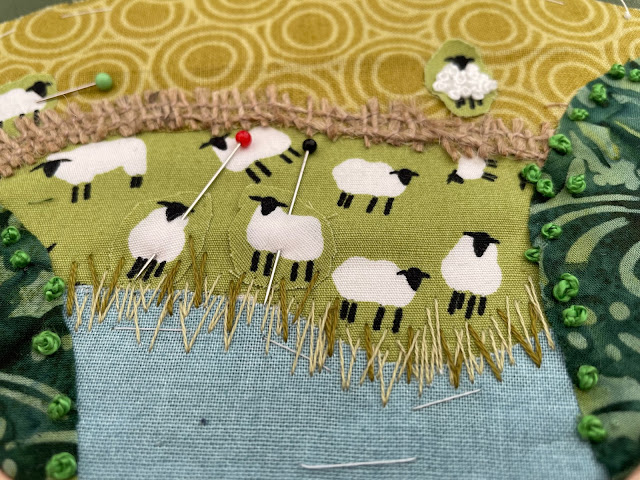
So, these are some of the hoops that were started and again, all very different! Each one included a sheep layer, and I'd split the packs so that half were the bright green sheep found in Woollydale II, and half the darker green found in Mini Woollydale. Then there were a selection of plain or patterned fabrics, and each pack had a batik fabric in as well to offer a different type of pattern. 
Not everyone wanted to use the fabrics they'd been given, and some ladies had brought bits of their own fabric so there was a lot more variety at the end. 


Day workshops are a funny thing - other mediums can promise that you'll leave a workshop with a completed item but in my workshops you've got far if you have tacked down all of your fabrics where you want them. Hand embroidery can take a long time and, if you aren't sure what you're doing or you choose a technique that is more labour intensive, it can take even longer. It's almost a two day plus workshop really, one day to lay the fabrics out and one day to really get stuck into stitching. 
We can only brush the surface of the stitching part in these workshops and focus really on stitches or combinations that are new to them or they aren't sure of (usually french or bullion knots) and, to be honest, when it's a group of friends out for a nice day with chatter and cake - finishing or getting lots done isn't a priority and that is absolutely fine. Sometimes it's just about getting something started, talking through ways to approach the layers and firing up those inspiration fingers and just letting them go at the end of the day to work through and have fun on their own. 


Interestingly, there were quite a few fussy cut sheep in this workshop - either moving them to other places like they had escaped their flock and wandered off into another field, or to hide upside-down sheep in the pattern to make them stand up. 


I had an absolute ball with this one, it was such a nice day (despite some horrible weather) with lots of laughter, and I really hope to see some finished sheep hoops in a few month's time!! Thank you to Jackie for inviting me to her lovely garden.