Sunday 24 May 2020

Waterlily Stitchscape


Last week I fell down an online fabric buying rabbit hole. In fact it was probably more of the whole warren of rabbit holes as I spent ages drooling over my laptop screen with all the loveliness that was appearing (this is what lockdown does to a fabric addict!). I was trying to find a specific Lewis & Irene pattern, although I can't remember exactly which one it was now and I'm not entirely sure I ended up actually finding it anyway! What I did find was this gorgeous Lewis & Irene Waterlily print which I totally fell in love with.
Waterlilies are up there amongst my favourite flowers, the waterlily house at Kew is the best one and I love visiting Sheffield Park during the waterlily festival - the reflections in the water are magical and they just look so serene bobbing gently atop the surface of the water.


I decided that as a treat for completing my Bluebell Garden kit, the purchase of several new and fabulous fat quarters was totally justified, as was the several full days of stitching at the end of this week. I haven't really done much other than sitting in various places around the house/garden and sewing. Utter bliss.
Before lockdown I bought a couple of 20cm embroidery hoops with the intention of making new Stitchscapes to add to a hoop wall. It's my new favourite way of framing Stitchscapes because it's light, versatile, cheap, easy and, as they are stitched within the confines of a circle, makes sense. I'd forgotten all about the hoops, tucked away in a drawer so it was a good time to rediscover them as I've been working a lot in smaller hoops lately and it's nice to go bigger once in a while.


My vague idea for this piece was to create a pond; waterlilies at the front leading to deeper waters further in, off to a nice little decorative fence or sand back type situation and then maybe a field of blue iris flower type things and a few hills. The clear part in my mind was the pond and after that it all got a bit hazy so I just had to find fabrics from my stash that complemented the water in terms of colour.
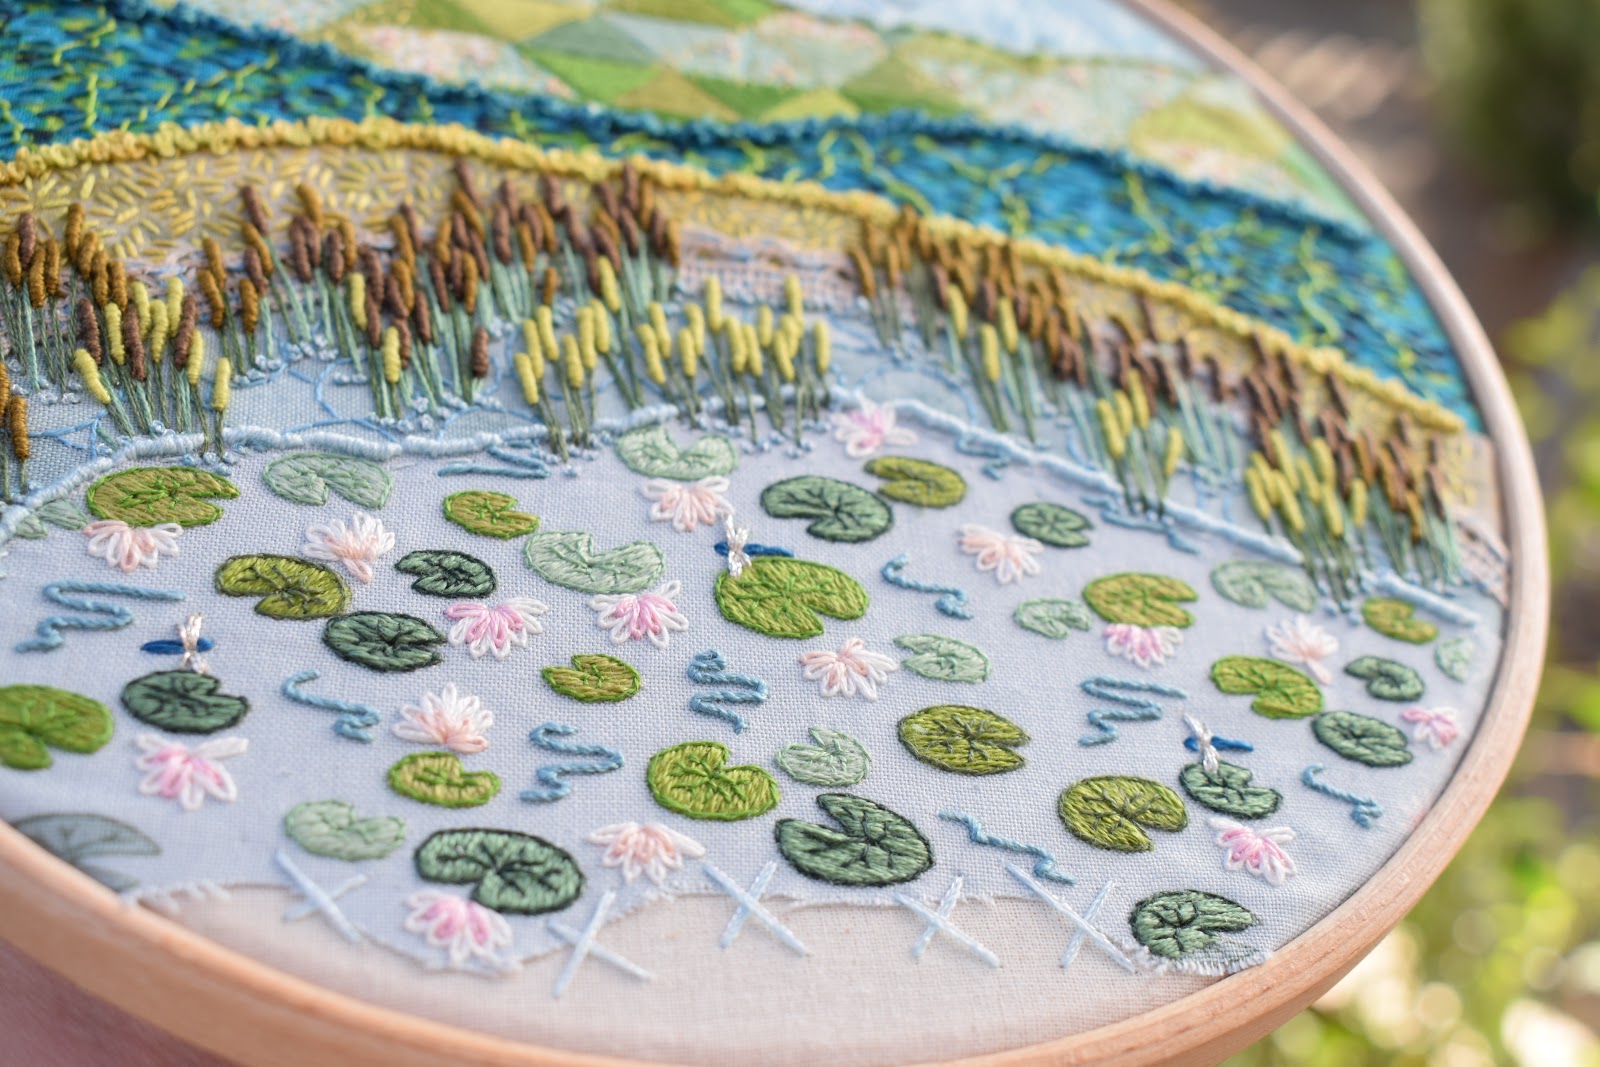
The trick with choosing fabrics for Stitchscapes is to look beyond what is physically printed in front of you. The highly geometric fabric is one I love but it is very at odds with the soft waterlily print when you first look at the original fabrics, however, if you look closer the balance of colours is correct. There are tones of green that are shared between the triangles and the lily pads, the blue is reflected in the sky and in the water and the white is in the lily flowers. It's all nicely balanced and if you have sections which aren't quite as co-ordinated, these can be covered with embroidery threads to help even things out. In this case, some of the brighter greens were brought down into the lily pads which have seven different greens in would you believe?


I filled in all of the slightly more wishy-washy lilypads which are in the original print so all of them are solid shapes and some are slightly brighter as well to make the bottom near-match the zestiness of the top. (It's not often you get to say that in a sentence!!)
The flowers were also given two tones of pink to make them appear more naturalistic.


These cute little dragonflies were the last things to be embroidered, following an excellent suggestion by The Mother. They have been made with a couple of lines of straight stitch for the body, three closely stitched straight stitches for the head and some stitches in metallic silver for the wings. Nothing complicated but just enough to give the appearance.


The lovely bright blue layer was the most complicated one and I just couldn't think what to do with it so it was left until last. I knew I wanted a chunky seed stitch for the layer below, and I found a lovely variegated yellowy/green floss which fitted perfectly with the mottled space dyed fabric. I mixed this thread up further by using two strands but swapping their ends so that the colours didn't match all the way along .
For the blue layer I eventually hit upon the simple and tried and testing method of working a running stitch across it, which I have done in blue, and then a vertical whip stitch randomly throughout the layer to give more texture and break it up a bit - which actually works really well with the jagged nature of the print itself. I've been a bit playful with the blue thread and again this is using two strands, but I've used a single strand of two colours at once because I couldn't decide on which one I liked best. I've kept this colour mix for the french knots edging this layer so you can see the combination a little clearer here.


No watery Stitchscape is complete without a touch of sparkle and although I didn't want to massively stitch waves or ripples into these layers, the bullion knot rushes were a little awkward just plopped on top of the water and needed something to hep blend them in. I've combined a single strand of a metallic sparkly ice blue, with a single strand of the blue from the deeper water layer, and worked a one twist french knot wherever I fancied at the bottom of the reeds and also at the bottom of the lace edge where it was just a raw finish.


I'm quite in love with this geometric fabric. The number of colours in it are amazing, although now I've gone over it I've taken out quite a few colours to tone it down slightly with the lily pads. I love that the triangles are worked in different directions because they really catch the light differently and almost appear to undulate across the landscape.
I could have done the blue and white triangles in a satin stitch as well but I didn't want to particularly highlight them so have instead tried to tone them in a little bit with a single strand of seed stitch. At first it was just going to fill these areas but that looked a bit odd so then I tried taking them over some areas of the satin stitch to help blend them. It was going to be an all over seed stitch but I liked the contrast between the clean edges and the burred ones so it ended up being a sort of patchy affair which has great texture.
The pink from the lilies I've brought up onto these hills with little clusters of two strand, one twist french knots in the blue and white areas only. It has really prettified this section and I love it even more!


So, the stitch round up for this hoop is; running stitch, straight stitch, back stitch, back split stitch, fly stitch, satin stitch, detached chain stitch, bullion knots, french knots, seed stitch, whip stitch (vertical & horizontal), fly stitch and couching....I think that's it?


Wednesday 20 May 2020

Stitchscape Kit Update


I was adding my new Bluebell Garden kits to my website and suddenly realised how many kits I've designed now!! Amazing to think that in the last three years I've designed thirteen different Stitchscape kits!! I thought it would be a good time to go over a quick potted history of my kits (mainly so that I can look back and remember as this blog is often used as a diary to find out what I was doing in previous years, and a way of remembering how far my little kitchen table business has grown).

No longer available/sold out kits:

 Summer Sweet Stitchscape Kit :: my first ever kit! Now completely sold out having been running since August 2017. Sadly I wasn't able to find any more of the lovely floral fabric I'd used at the bottom, and the supplier wasn't able to help me as they'd only bought it in as a fat quarter. Since then I've learnt not to use fat quarters in my kits as it turns out people really like them and I have to make lots of them!

 Summer Sweet II Stitchscape Kit :: the second version of the above which was released as a special edition in March of this year. I'm currently looking into sourcing some new fabrics so that I can create a longer running Summer Sweet III but that's on a back burner for the moment as I have several other kit projects which are higher up in the queue.

Orange Glow Sunset Stitchscape Kit ::one of two designs that were created in partnership with the-stitchery in Lewes, and my lovely friend Saira who owns the business. This has now been re-worked and re-launched as one of my best sellers, Fire Flower. (You can still buy my Stitchscape kits through her shop as she is one of my fabulous stockists! Plus her lovely premises is stuffed to the gills with gorgeous things - although currently it's not open due to the COVID-19 shut downs, she's still online and designs her own kits for all sorts of different creative things so well worth a look!)

Spring Ladybugs Stitchscape Kit :: the second design for the-stitchery which took longer to sell through than the sunset piece but uses a really sweet ladybird polycotton fabric. At this very moment I am awaiting a delivery of fabrics so that I can re-work this kit in time for the summer holidays. (That's the plan anyway.)

My currently available kits are:

 #inthehoop Spring Stitchscape Kit :: which suddenly came into its own at the beginning of this year and flew out of the shop! Pretty, dainty and ladylike with a fun jute trimming.

Christmas Hoop Stitchscape Kit :: which is now discontinued with the fabric selection currently available. A new version is ready and waiting to be released later on in the year, but for now the first edition is down to its last 5 kits. 

The Naked Stitchscape Kit :: a kit that is always evolving and changing with new fabric collections and 'bits 'n bobs' included. I've just updated the booklet for this one and swapped a couple of bits around. There is also a PDF downloadable version of this in my shop if you have a stash to hand already. The download includes extra stitches and images to the physical booklet. 

Stitchscape Pebbles Kit :: also a kit that keeps changing, usually in line with the Naked kits as they tend to be done together. Choose your favourite fabric selection and either follow the diagrams in the booklet or design the pebbles yourself! There is also a PDF downloadable version of this kit as it again uses up small scraps that you are likely to have at home. 

Button Mountain Felt Stitchscape Kit :: one for the small stitchers in your life this kit uses three stitches and is made with felt and buttons. It's an easy one to start them off on a creative journey and has lots of diagrams and pictures to follow. 

Woollydale Stitchscape Kit :: is my all time, best selling kit! Slightly more challenging with lots of french knots to create woolly sheep, this is definitely worth it and it doesn't matter if you aren't neat with your knots - your sheep aren't entering any competitions for being well groomed!

Fire Flower Stitchscape Kit :: this is the re-worked version of Orange Glow sunset and uses the same template pieces and a couple of the same fabrics but different stitches. It's a hot little number that's really quick to stitch up!

Bluebell Garden Stitchscape Kit :: is my newest kit and the most complex (although I still wouldn't say it was hard, just slightly more challenging). There are two options with a different trimming for you to choose from and focuses much more on you adding your own input, whilst still being a fully templated kit. 

Felt Flower Garden Hoop Stitchscape Kit :: is a downloadable version only and slightly different to a full Stitchscape kit. This is again aimed at small stitchers and uses small scraps of felt and buttons to create a lovely little flower scene. Great for a weekend project and has templates to use if you have a printer at home. 

Future kit ideas:

So, future kits then! Currently in the pipeline is the new ladybird kit once I've sourced all of the fabrics and trimmings for this. I've got the polycotton ladybird fabric, the blue sky, a lovely Makower linea green print and a green polka dot and I'm just waiting on two floral fabric options to arrive in the post for me to choose from. Then I need to find some trimmings to accompany it all and stitch it all up!! The plan is to re-use the templates from the original Spring Ladybug kit so hopefully this won't take too long to put together, I will just need to re-write the kit booklet to reflect the new techniques. 
I've also designed and sourced everything for the next little Christmas decoration hoop, this just needs writing up properly into a kit booklet and everything cut up and put together - that might be something I can get The Mother working on actually whilst we are still in lockdown......
Summer Sweet III is causing me a bit of a headache as I can't find the fabrics that I want so I shall mull that one over until I find ones that I fall in love with - I do have one bolt of an unused green batik fabric that could be a potential but I'm not sure on the colour with the summery floral I already have remaining from Summer Sweet II. 

Then there are all of the other suggestions that come flying in from various places - The Mother has now suggested a beach hut kit which would also include using bondaweb (to add another skill to your tool belt) to attach the huts themselves. It's a good idea, I shall ponder on it. 

Have you been working on any Stitchscape kits? I'd love to see what you've been up to!! Please do share on my social medias, you can find me on Instagram @power.beth, or on Facebook at Dotty Textiles. If you are on Facebook, why not also join the Dotty Textiles Stitchscape Group and share your work with the other 'scapers? It's a great environment full of inspiration and encouragement. 


Bluebell Garden Kit Ta-Dah


Today is an exciting day as I have just listed my new Bluebell Garden Stitchscape kit in Etsy! You might remember my posting about the first option of the Bluebell kit a couple of weeks ago and at some point between then and now (the days are all blurring into one in lockdown and I'm struggling to keep track of the weeks) I finished the second option.
I'm not sure if I explained it in the last post but the reason for there being two options is that I was pondering over which trimming to add to this kit, and photographed my musings for Instagram and Facebook. I had an immediate response to this with lots of people adding in their opinions - which was a complete 50/50 split over whether to use the navy guipure lace, or the turquoise jute tape.
It intrigued me to see what the difference actually would be and I decided to make one of each, keeping everything but the trimming the same.


Interestingly the opinion has shifted slightly now I've finished both, with the jute tape being the clear winner between the two. I personally prefer the boldness of the navy lace and so to please everyone, I've made both an option.
I love using this tape though, it's great to work with and fun for beginners to use as you can pull it out and stretch it, many people think that it's actually all stitch work and are amazed when you explain that it's a pre-made trimming! The colour for me, in comparison to the lace, is a bit washed out, although I can see the side of those who love it as it does make the Bluebells stand out more. I really enjoy contrasts in light and dark and, the darker Bluebells at the back which stand so proudly against this tape, recede into shadow in the lace version. I'd be interested to hear your thoughts on this though, which one do you prefer?


I've tried to keep everything exactly the same, but doing two versions does also highlight the fact that every hoop in these kits is going to be different. Somehow in this second version I've managed to move the trees slightly so I had more room for Bluebells on the right hand side of the front tree, and because the Bluebells themselves are based off the pattern of the blue batik - where this differs in each cut strip, the flowers will be in different positions. The branches have also slightly been affected by my moving the trees slightly and the patterns in the other batiks mean that each person will see a slightly different feature.


So it's all now done!! This is the longest kit booklet I've ever written, it has a dedicated diagrams page to help explain certain ways of stitching that I've done so hopefully that makes sense. I've managed to make it so that the book itself is the same for each version (lots of use of the word 'trimming') but it has a different front cover, and one of the two pull out template pages is different for each as I've put the helpful diagrams for attaching each type of trim on there.


The Mother very kindly put together all 50 thread cards (I've made 25 of each type to start and I'll see which one goes first so I can make each type independently) and I ended up counting 40 of each coloured bead into little bags by hand whilst watching old episodes of Time Team! My original plan had been to weigh out what 40 beads was and then just weigh every bag rather than count but my scales ran out of battery just when I needed it. I suppose it's lucky we're still on lockdown and I have time to do things like that!


So, they're both ready to go. The kits themselves don't include the hoop (15cm/6" required) for two reasons; firstly, it doesn't fit into my packaging and, secondly, many people have hoops at home or prefer a different type of hoop.
Thanks to it randomly being a super popular product in my shop after I posted it to help out in the initial lockdown, I do now stock this particular hoop size in my Etsy shop as well so you can buy both at the same time. (Having checked today though they have just sold out but I do have more on order due early next week at the latest.)


I've spent a long time mulling over the pricing for these kits so I hope you'll agree that I've come to a fair price. Figuring out the costs for these things is a nightmare and actually quite scary as I do get some rather scathing comments about the kit not being worth the price I've charged. If you're interested, I'll pop a list of all of the physical items that I have paid for to make one kit down at the bottom. On top of these items I've also had to factor in the time it's taken me to stitch the two examples, to write and design the booklet and templates themselves, the time cutting everything up and compiling it, The Mother's work cutting threads and assembling the thread cards, my time counting out the beads and the electricity used to watch Time Team and boil the kettle for several cups of coffee throughout!
I'll also have to spend more time on each kit as you order it with the packaging (tissue paper, sellotape, logo sticker, compliment slip, padded envelope, address label) and the postage, which is now all typed up, printed and taped onto the envelope at home to reduce contact at the Post Office. Once it's posted I have go through my proof of postage receipts and send a dispatch note to everyone which can also take a while as my notes vary depending on whether it's a UK or International order, and whether there are any special extras required.
These are the major behind-the-scenes things that are often overlooked and not considered and it makes my heart sink into my toes when I get an email saying what a customer has purchased isn't worth the money they've paid. Thankfully it's not often!

If you would like to have a go at creating your very own Bluebell Garden then click on this link here and it'll take you to my shop!! And as always, I love seeing what you guys make from my kits so please do send in your photos of before, during and after! You can tag me on Instagram @power.beth, or follow Dotty Textiles on Facebook - maybe even join the Dotty Textiles Stitchscape Group so that you can join our community of 'scapers for encouragement, advice and lots of appreciation.

List of things included in the kit (including photographed packaging):
Calico Square (24cm approx)
Fabric Pieces x7 (Including special Batik fabrics, various sized strips)
Jute Trim or Guipure Lace (21/20cm)
Beads (2 colours, approx 40 of each)
Cellophane sleeve for beads (+ staple)
Anchor Stranded Threads x 10 colours = 24.6 metres in total
Anchor Tapestry Yarn x 2 colours = 6 metres in total
Thread Card + Printed sticker label
Printed Booklet (16 pages as counted by the printing company used)
2 Page Template Pull Out
Cellophane sleeve to hold everything


Wednesday 13 May 2020

Farmyard Pebbles


I was recently asked to create some pebbles with either a chicken or a cow theme which gave me a great opportunity to get out my little collection of Lewis & Irene " Small Things At The Farm" fabrics. The "Small Things" collections also include sea themes, motor vehicles, pets, country creatures, crafts.... but my favourite is the farmyard as it includes sheep (not the Woollydale sheep), pigs, horses, cows and chickens. The latter two being my most favourite.


Due to the size of the pebbles it turns out I can fit a cow and a half on a large pebble, and a single cow on the little size. Not a lot needs to be done to these little pocket pebbles as I don't want to over-do the animals and simply go around them or enhance them with a single strand of embroidery thread, just to bring them out a bit more from the background.
Most of the work has gone into the top layers which are more hedgerow themed and I've worked french knot tapers, bullion knots, fly stitch leaves and lazy daisies (detached chain stitch flowers) into a little tangle of flora.


I think I prefer the pebble bottom with the seed stitch adding more of a texture, but the top half with the daisies on. Maybe I’ll do another hoop full and mix things up- I was thinking of making the tops different colours as well, it was all very natural looking this time round.


The chickens have been done in much the same way, although they've had less put into the top because of their small size. These pebbles are all about character and I love the two hen pebbles which almost look like they are chatting away to each other!


A tiny one strand, one twist french knot has been worked on every spot in the fabric and a single strand of thread works around the animals, matching the colours underneath. The French knots are barely visible but they add lovely texture if you run your fingers over it.


 This little cow pebble has already been reserved but I will be listing the others in my Etsy shop this week. I have been asked for more ladybird pebbles too so will have to start a hoop full with those, plus maybe some robins? I’m feeling little creature pebbles at the moment.