Monday, 7 April 2025

Monday Club Butterflies


Toddler F and I have had a little change to our weekly routine recently which has lead to some quite exciting things. Dad is working his way up to retirement and has taken every Monday off until he retires to use up his annual leave, which means he's wanting to do something fun on his days off. 
Our previous Monday routine involved myself and Toddler F staying at home for the morning, then catching a lunchtime bus to the parents for a bit until I had to go to Rainbows and they looked after Toddler F. They also look after my nephew on Monday (who is 6 months younger than my one so they are a bit of a double trouble act) so it was an afternoon of playing for the two boys.

Since Dad has had these extra days, we started a Monday club and Toddler F and I have been catching an earlier bus, getting picked up at the bus station, squeezing into their car and going somewhere fun for the morning. This particular week we went to the Sussex Butterfly Gardens at Middleton Common Farm, which was stuffed with the most amazing butterflies!


The boys weren't that sure about butterflies landing on them, but they were very good and stood still until the butterfly flew away, and also (mostly) looked where they were going so as not to tread on a butterfly sitting on the floor. (No butterflies were harmed during their visit.) It is very very hot in that polytunnel though so we did have to leave when the boys got too sweaty. Once you've bought your ticket you can go in and out though so that wasn't a problem. 


Reece, Toddle F and I did come here fairly recently with a different nephew as part of a challenge badge he was working on. It was a weekend and they had an extra bug holding activity as well as some crafts - I held a leaf insect and the biggest type of stick insect in the world! Very prickly, like holding a long conker. The boys all chickened out of course. 


Sneaky moth!


The boys were fascinated by the little drinking stations with the sugar water. A butterfly lady came round and refilled the bottle caps whilst the boys trailed after her, nattering away about butterflies and discussing the fish in the pond. I did ask if the fish ever ate the butterflies and apparently they do nibble the odd one if they can. Someone does regularly go round and rescue any butterflies that have accidentally gone for a dip.  


My favourites are the ones which have brown wings underneath but when they fly they are electric blue on the top side of their wings. I didn't manage to get a photograph of those though unfortunately. 

I'll see if I can share any other Monday club adventures with you over the coming weeks. Quite a few of the previous trips out have been to garden centres, we're slowly working our way around garden centre cafes and testing their cakes. The cakes at the butterfly farm are equally lovely by the way. 
 

February Lovers Lane Stitchscape Swap


What a sweet little collection this is - all based around the Lovers Lane theme. Lots of different lovers are represented here, with Welsh love spoons, sky love messages, love birds, love hearts, bowers and arches, golden lit pathways and the constellations of Andromeda and Perseus - the lovers. 


I thought that there would be more pink in these cards actually, but there is probably more green than pink which, if you thinking in an art critic kind of way, would symbolise new growth and beginnings, Mother Nature, loving the natural world and all that kind of stuff. 

The prompts given by me included country lanes, signposts, heart flowers, silhouetted figures, lovebirds, hearts, love knots, entwined branches, and I think we've pretty much covered all of those bases. Spoons and constellations weren't on there though so that's excellent thinking outside the box!


The spoon itself has been beautifully crossed stitched with lovely shading and french knot flowers and tiny heart buttons. 


These constellations are rather lovely, what a fab idea! I've had to Google Andromeda and Perseus as I'm not that clued up on their story. Mr Google says that;

  • Andromeda's mother, Queen Cassiopeia, angered the sea god Poseidon by boasting that her daughter was more beautiful than the Nereids, Poseidon's sea nymphs. As punishment, Poseidon sent a sea monster, Cetus, to ravage the coasts of Ethiopia, where Andromeda's parents, King Cepheus and Queen Cassiopeia, ruled. An oracle advised that the only way to appease the gods was to sacrifice Andromeda to Cetus. King Cepheus, unwilling to sacrifice his kingdom, chained Andromeda to a rock on the shore, hoping to appease the gods by offering her to the monster. 
  • Perseus, flying over the area, saw Andromeda and fell in love with her. He asked her parents for her hand in marriage if he could save her, and they agreed. Perseus, armed with Medusa's head (which could turn anyone to stone), confronted Cetus and turned the monster to stone, saving Andromeda. Perseus then claimed Andromeda as his wife, fulfilling his promise. 
  • Perseus and Andromeda had a son named Perses, who became the ancestor of the Persians. After their deaths, both Perseus and Andromeda were placed among the constellations in the sky. 
Amazing to fit that whole story into one card! The rest of them are all really lovely too - check them out...


The card above sadly got caught up in the post and didn't arrive until after I'd swapped the others out so it didn't get a chance to be included in the group photo. Luckily this is the reason why I make extra cards so I could do a straight swap and Sharon didn't miss out just because the post was slow. And I get to keep two cards this month!! It's a win win situation. 


Several people said that they weren't particularly inspired by this theme and found it quite hard - this year seems to be a year for slightly harder themes, but I think everyone did fantastically well! What a fun group of little artworks. 

Saturday, 5 April 2025

FQ Pack Challenge Hoop


Every now and then I try to give myself a little challenge. Usually it's completing a hoop that's been hanging around from a workshop as no one wanted to take on the colour range I'd suggested within it, but this time it was to only use fabrics from one fat quarter that I picked up in a supermarket. 

A car nap session (for Toddler F, not for me) seemed like a good time to start this and I grabbed some essentials whilst Reece waited in the car, then settled down to see what I could make from the fabrics in the bundle. 


It was quite a spring-y floral fresh sort of a collection of prints but there was a difference in the types of pattern used. The creamy/yellow background ditsy print I thought stood out a bit as there is no other use of that background colour anywhere in the pack - it didn't quite look like it fitted in properly. 
I liked the stripes and the yellow flowers though. 


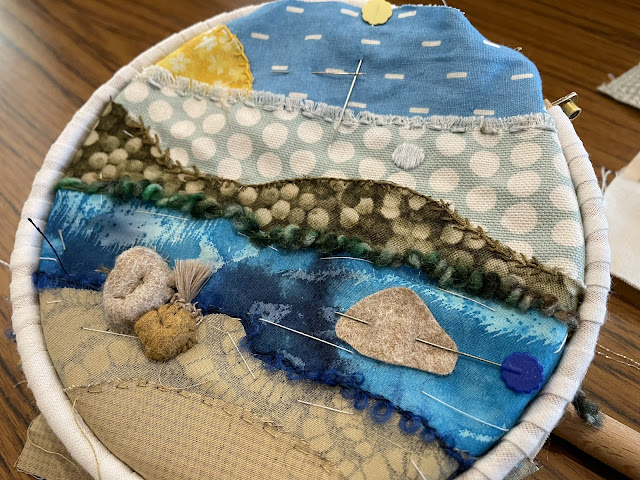
I played around with how I was going to layer them a little bit, then cut them up, tacked them down and popped them back into the hoop to give a window into this little world. One of the fabrics I didn't end up using, mostly because I didn't think it would fit in the 10cm hoop - too many fabrics for one small space. If I'd used a bigger hoop then I would have tried harder to get all five fat quarter fabrics in. 


I filmed some of the process and you can find that on my Instagram/Facebook pages, but I basically got most of the bottom layer covered in seed stitch and started a few areas of the top fabric before the Toddler woke up so that wasn't bad going. 


It made for a very nice bus project for the week. There wasn't a lot to it really, the chunky trimming I've used is the webbing that was tying the fabrics together, kind of rolled and then couched down. The bottom layer I have covered in seed stitches to blend into the fabric, added some little detached chain stitches into the yellow flower motifs and filled in the stems and leaves with straight stitches. A little blue bead was added in to the flower centres because I happened to have that colour in my bag at the time. 
Extra french knots were added between the flowers to break up the white space and bring some of the colours from the top layer down to balance it out. 


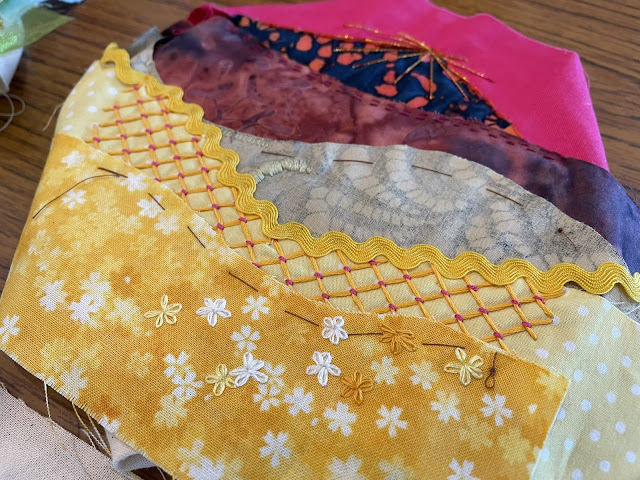
The daisy fabric was edged with a baby cream ric rac that I also had in my bag, and I've gone over the diagonals of the trimming in two different colours, working one way in green and the other way in yellow for a little extra pizazz! 


The stripe fabric has a single strand row of back stitch along each stripe and I've then also blurred the fabric edges a bit more by making rows of french knot tapers started from the top of the bottom fabric, working up over the stripes to break them up. Fly stitches have been added to be the green foliage accompanying these tapers. 
I've used a creamy yellow for the flowers, which match the warm yellow of the fabric above (the one I mentioned that sort of stuck out as an oddity). I think it has helped to blend that fabric back in to the landscape so it's worked really well. 


I've worked simple rows of running stitch on the yellow layer, and edged with french knots. 

The tree layer above has several different stitches going on. I've matched the colours in the print (sort of) and then worked detached chain stitches, fly stitches, straight stitches and stem stitches where the pattern called for it. It has been edged with white bullion knots and finished with tiny tiny little cross stitch kisses at the top. 


All in all, an excellent challenge. The only irritating part is that the fabrics have quite an open weave so you can see any patterns underneath but I suppose that it helps to blend them together even more in a way. 

The stitch run down for this little piece is; bullion knots, straight stitch, stem stitch, fly stitch, detached chain stitch, couching, french knots, running stitch, back stitch, seed stitch and beading. 

Felt Workshop Hoops


I'm hopefully going to be starting some workshops in Brighton at a new gallery/workshop space that is opening up. It's called Pretty Neat Gallery and they are starting completely from scratch so things are taking a little longer than originally planned. I was meant to be doing some children's felt workshops in April but the gallery is now not going to be able to open until May so they have been postponed for now. I will let you know when they are back on again - it will hopefully be in line with the school holidays so that you can plan to do something fun with your young stitchers. 


We are planning two workshops, one for slightly younger children to make a felt flower garden like this example hoop here that I whipped up one afternoon. It has since come in handy for a Brownie workshop which is good. They are really simple hoops, just using buttons to stitch on felt circles, a couple of stitches in the felt leaves and down the stems to hold them in place. It's only two or three stitches in total and a great place to start learning how to hand stitch - and to sew on a button!


I found this fantastic jumbo felt ric rac with one of my suppliers which is absolutely ideal for this workshop! It's a little bit fun, easy to stitch down, and it only came in green so I bought three rolls of it. 
 

There's obviously a lot of blank space around the flowers and it's easily customisable. I've a blog post coming up at some point which is about the Brownie workshop that I've since held and they have some brilliant examples of how this design can totally change. Depending on their skill level you can add all sorts of things to the hoop, change up different stitches (I've used fly stitch and detached chain stitch in this example but the print outs everyone gets for the workshop only have running stitch and straight stitch to play with.) and adapt buttons into other creatures. 
You could have four buttons (two bigger, two smaller) to make butterflies, a row of wiggly little buttons to be a caterpillar, a red button could become a butterfly.... You could even use a button as a sun and stitch rays around it. My little extra button has become a bee by stitching over the holes rather than just through them, creating stripes. I tried to also put a french knot eye and a stinger on my bee but I don't think they've worked all that well. The Brownies were suitably impressed which is fine. 


I think it's really cute, what do you think? We can make this in two hours, it's fully customisable, teaches practical skills like sewing on a button and stitches you can use to repair to do simple stitching. It also promotes dexterity, patience, perseverance, design skills, colour play and just creativity in general. All packed into the one hoop! 


At this age we ideally need an adult with each child so that class is going to be pitched as a pairs workshop with an adult and child to do together. It works really well and we've had some brilliant feedback from parents - even those not particularly creative. It's never too late to learn to sew on a button either - I'm happy to teach grown ups and little stitchers how to do that, no embarrassment or questions asked. 

For the slightly older kids, who are likely to be able to thread needles by themselves, we've got some funky houses to make. Again it's using predominantly felt on a calico background, but there are more stitches involved and the design is a bit more up to them. I've got two house examples that I've made, and I'm creating templates to go with them if anyone wants to use them - I may also actually create a downloadable PDF for my Etsy shop to help anyone looking for things to do over the holidays. 


This is my first design, which I've called the Tulip house as the roof shape kind of reminds me of an upside down tulip flower. It's really simple with that lovely felt ric rac as a hedge behind the house, a couple of simple stitched felt leaves and a slightly more complicated felt tree. I've stitched back stitch to give texture to the tree and I did use long straight stitches to make the trunk but that could easily be felt as well. 

I've tried to show different ways of using the button holes to create different looks and have some fun with those, and I've given them little window boxes full of flowers made from french knots and detached chain stitches. 


For this hoop I have used fly stitch, back stitch, french knots, detached chain stitch, running stitch, straight stitch and blanket stitch. 


I've also made a Mushroom house! I don't know why - I was trying to make a house that looked a little less girly, but I'm not sure I've achieved less girliness with this one? I really love it though, especially with it's quirky front door. 
My intention is to perhaps have templates for these two house shapes, but to encourage those in the workshop to make their own and be creative with the type and style of house. 


The stitches I've used in this one are; back stitch, fly stitch, blanket stitch, seed stitch, french knots, straight stitch and running stitch. 
I've also tried to stitch on the buttons in different ways to show the different effects. 


So, if you think this is something that you and your young stitcher may be interested in, keep your eyes peeled for dates!