Sunday, 12 March 2023

February Snowdrop Carpet ATCs


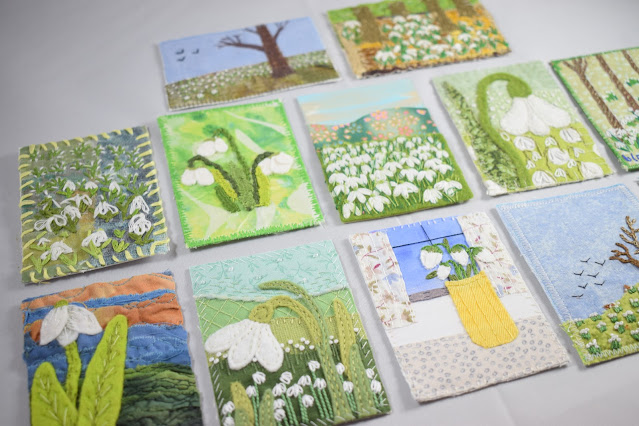
Yay! It's finally fully finished! We waited for a couple of slightly later cards to come in and then there was an additional hiccup with one of them arriving but finally I had all of the Snowdrop Carpet ATCs from February in and able to swap out. I was only able to take the photos late last night so I had to use my photo booth which is why the photos are so bright, I could have done with knocking down the exposure a little but I'm afraid I was quite tired and on a tight time limit so I didn't notice until the photos were uploaded today. Hopefully it's not so bright you won't be able to appreciate the stunning work that has gone on here. I feel like I've been waiting for ages to finally share this full collection with you. 


This is actually the biggest swap yet I believe and we had about three new members joining us as well which was a lovely surprise. Every new member brings their own style and expertise which I think adds so much to these cards when viewed as a collection. They work together but are so individual when viewed up close. 
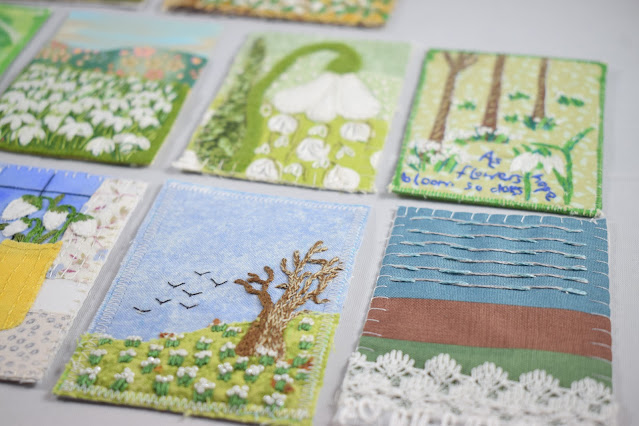
I like the different interpretations too - some of the cards are actually very similar. Suzi and I have gone for near identical representations, and there are two cards with trees and sky and Snowdrops from a distance, and several that feature lots of Snowdrops disappearing back into the card in a triangular composition. Even so, how they have been executed, and the choice of materials used varies so greatly in each card. 
I also really enjoy Abi's card with the Snowdrops in a jug on a pretty window ledge; it's almost as if there's a story of the occupant of the house walking through a Snowdrop Carpet and being unable to resist plucking a few to bring home as a reminder - there's a story there which takes the theme just that one step further. Rather than us being the ones to see the carpet, they saw it first!


There are a lot of detached chain stitches in these cards, some filled, others not. I like the text embroidered into Sophie's card and the abstract nature of using layers of lace to portray the idea of Snowdrops in Coral's card. 
There are some lovely backgrounds as well, which are often unappreciated because you are looking at the main motif but there looks to be lots of hand dyeing or painting which make the whole piece really striking. For example the stand out backgrounds for me are Jenni's darker, moodier piece with what looks like hand dyed strips of calico fabric? The raw edges are a nice texture here too. I also like Jacquie's green card with her picot stitch leaves and perhaps a resist dyed chiffon or similar? It can be tricky trying to work out how these beauties have been created!


They've all got a lovely depth to them, especially the woodland-esque ones. You could almost walk straight into them like something out of Mary Poppins. 
Snowdrop Carpet is a charming theme (do they have Snowdrops in other countries or are they more of a British plant I wonder?) and I really feel that the Snowdrops have been done justice here with these representations. Do you have a favourite Snowdrop card or portrayal from these cards?
As always, I have updated the dedicated ATC page on my website which has the themes that have been completed and the themes that are yet to come. There are full individual photos of all of these cards if you click on the calendar image to bring them up, and below there are some super close up images of the cards for you to enjoy as well. 


Backgrounds for Butterflies


I've been working on creating little gardens for my newly stitched butterflies to live in. The theme is actually Butterfly House but I figure the polytunnel environments you can visit and walk through are so pretty with their lovely plants and brightly coloured butterflies flying all around you, the cards needed to be quite bright and garden-like. It's not at all a realistic impression of butterflies, or where they'd live but I'm taking a lot of artistic license with these. 


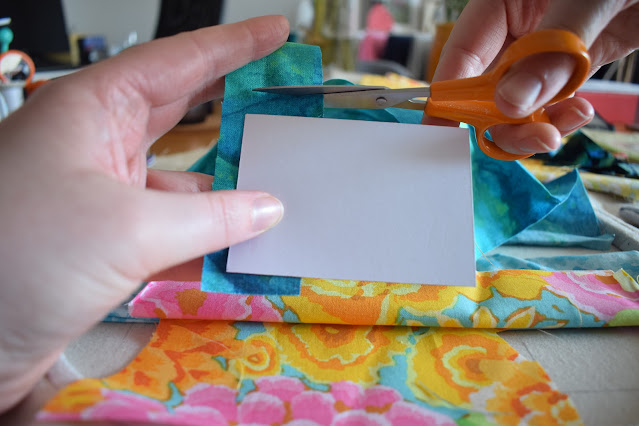
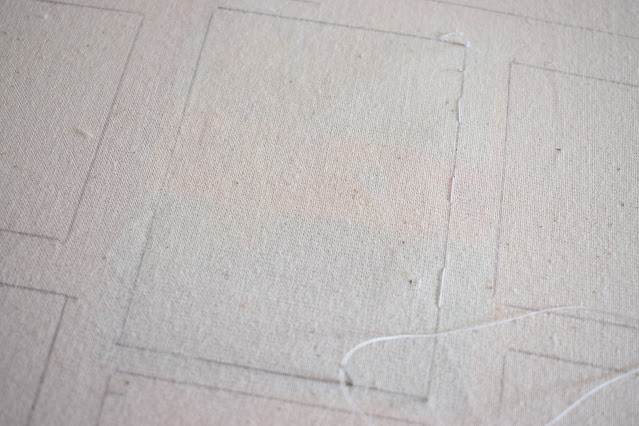
As the last ATC hoop has just been completely cut up with two month's worth of cards in, I am starting an entirely new hoop. This is my biggest hoop and it will fit 8 cards in at a time so I draw around one of the card backs to give myself an outline to work in. 
My method is to pull out any fabric from my stash that I think would work (within reason - I have a large stash!) and set them all out on the table. This time I had to match them to the butterflies I'd already created so I was comparing them with each other and also with my winged friends. 


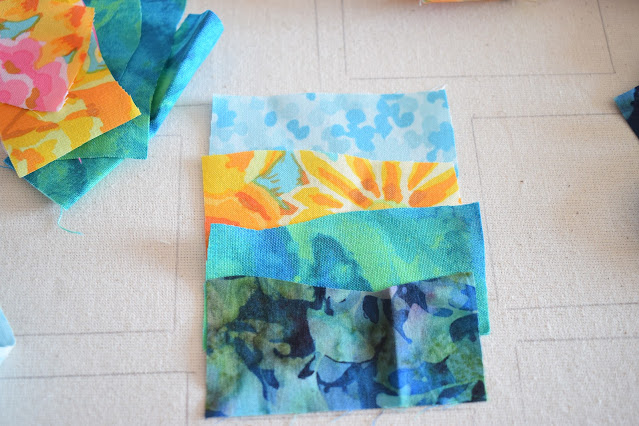
I was thinking initially that green would be quite nice to make the colours pop, or different shades of blue.... then I came across a pack of Kaffe Fassett print squares with yellow and pink in which really made the turquoise blues pop! The fabrics are layered out and rolled up first before any cutting happens so that I can make sure I like the order that they are in. 


The fabrics are all wiggle cut unless I want a specific shape. I kind of divide the overall length of the card in four and then just set-to with a pair of scissors, meandering them in a wiggly line along the fabric making lazy little hills and dips. Once I have a long line then I'll hold up the card back to it and just snip off a section, making sure there is some overlap. This also guarantees that each background will be a different shape (as well as potentially a different pattern) so it makes it all the more exciting, and each card unique. 


I could fit two butterflies in each card I think but as I've only made four, I'll restrict them to one per card and fill any spaces with something else. Less is often more rather than cramming in masses to a tiny space. The background colours work really nicely with both sets of wings though I think so I'm really pleased with that. 


The butterflies did look a little lost in the cards, floating through mid-air so I also drew up a little template for a leaf to add in for the butterfly to perch on. I think I'll have some fun with these though and stitch each leaf in a different position/direction on each card. 


Once all of my fabrics are cut, I layer them up on the front, hold them in place with one hand and stitch along the drawn outline on the back. If you stitch one of the longest edges first then you will trap all of the fabrics and it's just a case of keeping them smooth and flat with your fingers. To start it's a bit fiddly but you get used to the flipping back and forth, and I will also use the edge of my dining table to help me balance and support the hoop. Once these stitches are in place you can always see where the edges of your card are so it's worth doing. 

Hopefully I'll be able to keep you updated on what my layers start to look like as I begin to stitch my textures on! I have no plans at the moment so I will just sit back and see where my needle takes me. 

Friday, 10 March 2023

Layered Butterflies


I am trying to keep a month ahead of the Stitchscape swap this year to help me not get stressed about deadlines and to allow additional time to create more. Some days I don't touch this hoop at all, and even on occasion for a couple of weeks so being ahead of myself really helps out. 
I think as a still fairly new mum, I often find myself saying 'help the future Beth out by doing a little job now', as one of the biggest things I've learnt is to be organised as much as possible and get whatever I can done early (or the day before) so that I'm not panicking and forgetting essentials later on when something else pops up. It's a new mantra that I have on a rolling cycle in my brain on a daily basis. 


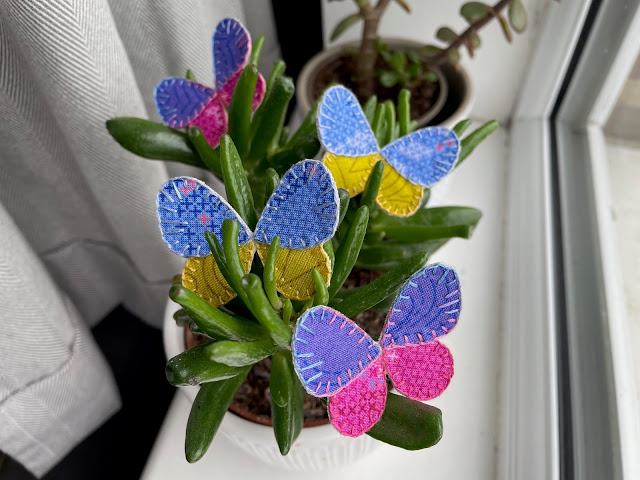
So the theme for April this year is Butterfly House and I'm intrigued to see how the others interpret this. I wanted to try something slightly new for me, a kind of hatchet version of stumpwork, and I still have no idea how this is going to turn out but I wanted the butterflies to be three-dimensional and pop out of the card (but be flat enough to post in a normal letter envelope). 
On the day I started I had also sorted through a load of magazines I was going to recycle and came across this page in the National Trust magazine so I ripped it out thinking that it would make an interesting texture for the back of my butterflies. I should think that there are several of you reading this who would have had a better idea than me on how to make these little creatures, but in the end I went with creating a fabric sandwich, trapping a layer of calico as well as the magazine page into my hoop. It wasn't particularly easy but I didn't rip the paper so that was a good start!


As with the Blackbirds in my Morning Chorus cards I played around with a couple of different types of butterfly to create a template, trying to find a pleasingly balanced butterfly shape that was easy to represent in fabric. I have actually backed these fabrics with iron-on vilene to help hold the edges so there are technically four layers  going into these; the paper, calico, vilene and the pretty fabrics themselves. 
The wing fabrics were picked up from the Ardingly quilt show in a scrap bag and I thought they went really nicely together. It would have been too easy to do all four in the same colour so it is more fun to do two of each!

After tacking (with one long stitch per wing to avoid poking too many holes in the paper), I stitched the bottom wings down first using blanket stitch, trying to be as neat and as regular as I could. I quickly discovered that if I pulled the thread too hard, or if it knotted whilst pulling through, the paper at the back would tear so I had to be quite sensitive in my stitching. I had to limit the times I poked the needle through trying to find the right place for the next stitch too as the paper wouldn't recover like the fabric does and I'd end up with a really battered looking butterfly underwing.
Something I don't usually consider is knotting my thread - if you look at the back of all of my Stitchscapes I always knot my thread because it's safer and no one sees it once you've finished the piece but, in this case, because they are fluttering freely from the surface of the card, I can't have ugly knots everywhere! I still knotted the thread but I've hidden them all underneath the top wings, then also discreetly knotted on the back when I'd finished a section and carried the threads through elsewhere to cut it. 


I haven't added too much detail to these butterflies because I am slightly worried about the paper on the back. It would definitely be a technique to work on if I wanted to use it again - I wonder whether you can add vilene to a magazine page to help support it and stop the tearing? Or would the heat required just damage the ink and the paper? Does anyone know?


Of course, the stitching turned out to be the easy part - I then had to cut them out and free them from the hoop!! I don't think I actually breathed a full breath the entire way around the first butterfly I was so intent on not cutting through any of my embroidery threads. There was definitely some sticking-out-tongue-in-concentration action happening.
Happily, they all cut out with no mishaps and are surprisingly strong considering the two sides are attached by not very much fabric at the centre. The calico is completely hidden and the paper at the back looks quite nice actually so I think it was worth it. I think the paper also gives support and shape to the wings - if they had just been made with the fabrics they would be flopping around all over the place. 


These are only the first part of the cards for this theme though - I still have the actual cards to make with the backgrounds and stitching to do before I can think about attaching my little flutteries. My plan is to not stitch through them as such but trap them underneath an embroidered body but we'll see how that goes when I'm ready for them. 


Thursday, 9 March 2023

Morning Chorus ATCs


I love these little cards. The Blackbirds in each one have such character and personality, I am absolutely thrilled with out they came out! The theme of Morning Chorus, for me, is waking up early in the morning to hear all of the birds chattering away to each other in the garden. Growing up in the countryside with quite a lot of trees and gardens around us, there were lots of garden birds to watch and listen to, and my Dad is quite keen on spotting birds and can recognise their calls so that has sort of been passed on to me. Having now moved out to my own place, I am trying really hard to encourage birds to my tiny outdoor space (a fire escape balcony outside our kitchen window) with several bird feeders, and plants all along the top of the railings. I have also planted a little creeping Jasmine plant in the hopes that if I can provide more cover and shelter with foliage, I might attract even more insects and birds and just wildlife in general to the otherwise barren space. 


At the parent's house there are several pairs of Blackbirds who will come right up (or even inside during the summer!) to the back door to ask for grapes, and then beat them on the patio outside to break the grape apart. They are hilarious to watch, and seem to have some kind of pact with the cat who doesn't bother chasing them. It's probably not worth it with the hassle that the Mrs Blackbirds' give him, peeping and shouting at him whenever he dares turn a whisker in their direction. 
I was beyond thrilled when one of the first birds to my feeders was a Blackbird! He also joins in the morning chorus here, sitting in a tree at the other end of the carpark at the back of our house. You can hear him and many others all singing away. 


I actually spent a little bit of time researching photographs of Blackbirds online to see what sort of composition I wanted. I tested a couple of ideas out on paper first and settled on this one as I liked how big I could get the bird so that he would really stand out. 
The fabrics have been chosen for their muted shades of green, grey, blue and purple, with that one splash of orangey/peach to show the sun rising. That particular fabric also has marbled lines in a gold metallic ink over it so it's really like tendrils of sunlight starting to creep through the sky. 


The top fabric is a sort of blocky batik fabric so it has different shades in it also and for this I've just added a couple of lines of running stitch at the bottom in a single strand to add some interest. The sunlight fabric I've edged in blanket stitch using two strands so it is slightly chunkier and more of a definite line. Fly stitches have been added over the top of these two fabrics to represent flying birds silhouetted against the sky. 


In the fabric below I've gone around any shape in the pattern with a single strand of back stitch and, in areas where there were big sections of a block shape I've kind of filled that in more with some rows of running stitch, as well as doing the same where needed at the top of the layer to help hold everything down. Bullion knots have been added along the edge of the fabric to hide the rough edge. 
The very bottom layer has had all green sections filled with two strand seed stitches, and any purple sections randomly filled with french knots. The same french knots run across the top of the fabric layer in either green or purple and this is really random across the set. One card has no purple at all, one card has nearly no green and two of them are better mixes. It was just complete pot luck on the colours. 


The tree stump my little friends are perched on has been cut from felt, with a little extra detail on the stump itself in a lighter grey felt. A larger branch has also been cut and I've stitched a jaunty twig with leaves in a filled detached chain stitch. (The chain stitch worked first and then two straight stitches added through the centre to block the colour.) I've used back stitches around the edges of these shapes, filled in with straight stitches at different lengths, and some french knots for texture. I didn't go too wild with this because really it's meant to be a silhouette of the tree so you wouldn't see too many details or colour variations anyway. 


My Blackbirds themselves are pleasingly simple. I cut a template out for the body and cut out my four shapes one at a time when I was ready for them to reduce the risk of them fraying (I could also have backed the fabric with bondaweb but I don't often do that unless I really need to). They have been blanket stitched down onto the fabric; legs have been added with embroidery, all straight stitches just filling in an initial embroidered outline and then adding little toes, with the wing detail also stitched on in grey using a whipped back stitch. 
I had also made a template for the beak, which has been cut out from felt and stitched down straight through the middle only. I eyeball cut (get it?) the orange ring for the eyes, stitched a circle around the inside of the shape to leave a bit extra, and filled in the circle with satin stitch. White thread has been added over the top with a couple of tiny stitches worked at an angle from the satin stitch so that they sit proud on top (if you tried to stitch the white in the same direction as the black thread you risk it being absorbed underneath the black stitches). 


It's amazing how, even though I used templates and actually sketched an outline to follow beforehand, these birds all look slightly different! I think a lot of it is in the eyes and the positioning of the little white speck which makes them look so alive and lifelike. But also some of their postures are different from each other so are more crouched or upright, and the backgrounds have also given a different look depending on how thick each layer has been cut. It's been so much fun to make these!


So, to end, the stitches used are; fly stitch, running stitch, blanket stitch, satin stitch, back stitch, straight stitch, whipped back stitch, french knots, bullion knots, detached chain stitch and seed stitch.