

I am often getting myself bogged down in multiple projects at once and these last few weeks have been no exception! If you follow my social media you'll have recently seen the stack of new Stitchscape hoops I put together a couple of weeks ago and then, halfway through embroidering the first one, I decided to start a hoop of Stitchscape Pebbles as well!
I can't remember why I decided that I had to make pebbles there and then...it has been a while and they are good fun to make. I was making quite a few this time last year but my Etsy shop had mostly sold out so these ones have gone straight into the shop to hopefully find new homes.

If you haven't seen how I make the pebbles before, multiple ones are worked in a hoop at once to save time and fabric. All of my scraps and offcuts from kit creating and hoop making get saved in a bag and every now and then I'll go through and try new combinations in a pebble. The pebble template gets drawn out on the back of the hoop with both the cut line and the safe stitching lines (which looks like two eggs drawn inside each other), then there's a bit of flipping backwards and forwards between front and back to layer up the fabrics and make sure the outer lines are covered.
These fabrics get tacked down to hold them in place and the fun embroidery work can begin!!

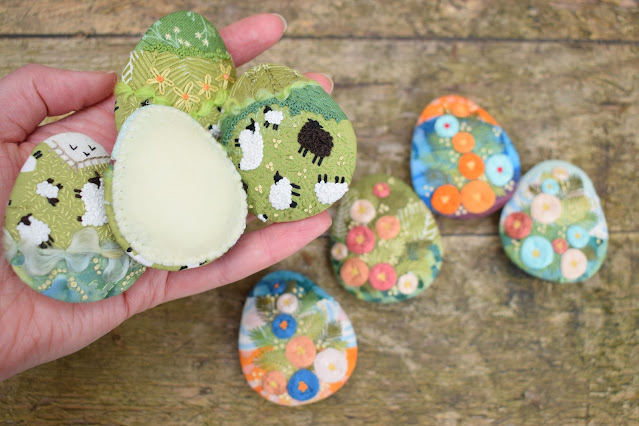
These ones are quite good examples of the different ways I approach pebbles. You can either work with the fabrics that are there, much like in an actual Stitchscape; so the sheep, for example, are embroidered with a healthy dose of french knots covering the pattern below. Or, you can kind of ignore the fabrics underneath and go wild with flowers and fun stitches. My current favourite floral ones (in case you haven't guessed) use woven wheel flowers and fly stitch leaves. The flowers work up quite quickly and look so vibrant against the green leaves.


You can see how it looks on the back in these photos, all of the stitches stay in the inner shape (the safety zone) but the fabrics on the other side of the hoop are covering the size of the outer shape.
A lot of people have said that these are very egg-shaped (great for Easter?) but that wasn't intentional, it's just the shape that worked best when I first started designing and making these. You could use them for Easter eggs I guess though.


When making these up running stitch is worked just inside the outer line and, before the stitches are pulled up, toy stuffing and cereal card the same size as the safety zone are laid in the centre of the egg. The running stitches are pulled up tight and I like to check that the embroidery on the front is nicely in the centre then I secure the pulled thread. Felt, also cut to the same size as the safety zone and card, is then laid over the back and whip stitched with the same thread as before, covering those running stitches and all of the loose fabric edges. More stuffing is added before I finish stitching all of the way around.


I actually came up with a new technique this time around, which I can't believe I never thought of before! It's quite tricky to get the stuffing under the card and pull up the thread all in one go when padding the front (embroidered) side and I've often felt that I didn't put enough stuffing in but once you've pulled the thread you can't add any more. But(!) this time around I cut a little circle out of the cardboard before I added it to the pebble, with a little bit of stuffing underneath it to start things off. Once the edges have been drawn up and secured, I can then continue adding more stuffing through the hole in the card, making sure that all of the edges are nice and padded! I cannot believe I didn't think of it before! What a numpty, such an easy solution.


I love making these, and they are a great way of using up your small favourite scraps of fabric you can't bear to throw away. I tend to only use two or three fabric pieces depending on the size of the pebble but it really doesn't matter how many strips you use.

These pebbles are also all available in my Etsy shop if you don't fancy stitching your own. Every one is unique and I really love the colour combinations this time around. You cannot go wrong with a bunch of woven wheel flowers!


They can be slightly fiddly to put together and not everyone likes the turning backwards and forwards to see whether you're covering the outer lines enough, but I think they're worth it. If you are interested in making your own I do have Stitchscape Pebble Embroidery Kits in my Etsy Shop where you can choose the selection of fabrics that interests you and everything you need apart from the card and sewing tools is included. You can obviously add anything you like from your stash - beads, ribbons...whatever you fancy! If you already have a mega stash but are interested in seeing how they are made and just need the templates and some ideas, there is also a digital download version that will pop straight into your email inbox!


No comments:
Post a Comment