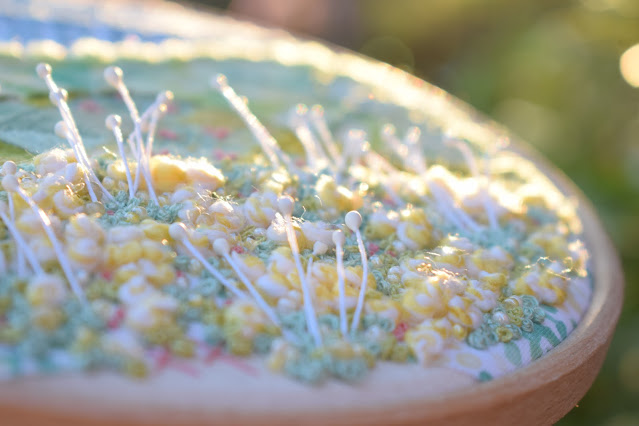
For me, this Stitchscape represents exactly the hedgerows that are currently blooming wildly around my town. I'm in East Sussex, England and everything feels a bit late this year as it's taken months to stop raining and be frosty in the mornings. In comparison to last year, where it was so mild and warm early on, it's only really now that you can feel able to leave tender plants out overnight, and many trees or bushes still haven't really got a full canopy yet.
The hedgerows though have gone completely bonkers and everywhere is looking fairly lush and green because of that rain. Driving to anywhere via the countryside takes you past green verges stuffed full with Buttercups, tall white Daisies, pink Aquilegias, red Poppies, orange Californian Poppies and all sorts of other beautiful flowers all dancing together.

This is one of the hoops that I put together in a big tower of hoops and, actually, there's only one more left now I think about it so I shall have to put together another stack!
The colours in this piece are just gorgeous and go together so well. That lovely batik with the yellows and mixed greens works perfectly with the more rigid triangular patterned green and blue fabric below. The combination of soft prints and geometrics creates a really nice contrast I think.
I took these photos in my garden the other evening when it was the fabulous golden twilight hour and everything is tinged with a rose gold. I may have got a little carried away with taking lots of photos of this piece!
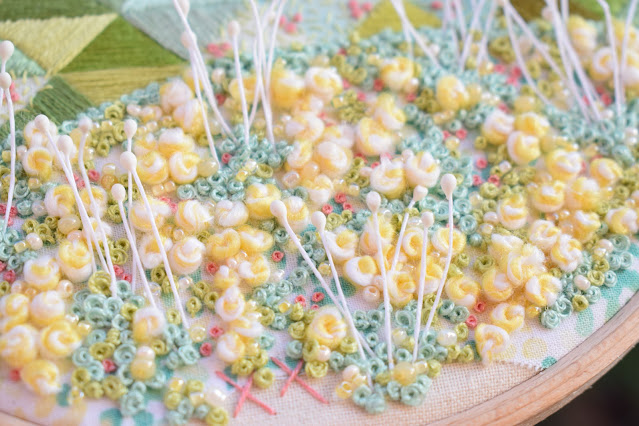
Anyway, starting at the bottom, I firstly started by stitching the big chunky french knots using a length of King Cole Caribbean Calypso Double Knit acrylic yarn. This yarn is really lovely, it's actually variegated throughout the ball and has a streak of white running through the whole thing with the variegation happening in the coloured half (yellow, green, blue) but it just so happened that the outside end was yellow which was perfect for me!
What wasn't so perfect was trying to get the chunky needle with the yarn through these layers of fabric and trying to get the needle through any area which had the batik fabric underneath it was nigh on impossible as the cotton cloth for batik is so tightly woven. I definitely ended up with a blister on my thumb and had to take a break on making these knots for a little while so I sort of did half of the layer before going on to add extra textures and then coming back to finish the rest of these knots.
If you have a similar problem with trying to pull through a thick needle through tighter fabric, one tip is to pull as much of the needle through as you can and then rotate the eye of the needle in a circle where it meets the fabric to help open up the weave for you (it works better than just wiggling backwards and forwards). Something else you can try, if it is hurting your hands, is to grip the needle with a pair of long nose pliers, again as low to the fabric as possible to avoid bending the needle. You can still do the rotation thing whilst holding the needle with the pliers.
Once the big french knots were in, I added the stamens in little clumps. These are just craft stamens often used to create ribbon flowers, or to add to iced flowers in cake decorating, and they come in a variety of sizes and colours. I couldn't tell you how long I have had these ones for! The stamens are folded in half and stitched down at the bottom - I usually do one stitch over the fold and then an extra stitch on each 'stem' to help hold them in place, especially good if I want one at an angle or to be straighter.
To hide the folds and to help make it appear the stamens are fully rooted, I have added further french knots using normal stranded cotton (two strands, four twists?) in two different colours that match colours further up in the fabric layers, and some smaller french knots (two strands, two twists) in pink which matches knots I made in the above layer.
To give it a bit of a sparkle I also threw in some tiny yellow seed beads for good measure!
On the geometric triangle fabric I have basically repeated a technique I used before because I loved it so much. I first used this fabric on my Waterlily Stitchscape and did the same as I've done here, covering the triangles with satin stitch in a similar colour and varying the direction of the stitch to make it a bit more interesting. A few colours I have left bare, the blues and white, as I didn't want to add too much of a blue to these hills, but I've covered these areas with a single strand seed stitch in green, and prettified it with some tiny pink french knots.
Overall there are a helluvah lot of french knots in this piece!! The top layer is just stitched down with little french knots following some barely visible sprayed spots underneath (bullion knots to the top), the layer underneath is a break from knots with some rough satin stitches over the splodges- again changing the direction of the stitches to create some interest, but the batik layer has more french knots scattered between the shapes that have been outlined with a single strand back stitch.
I actually didn't add the french knots on the batik layer until I started working on the triangle layer as the knots are mostly made up with leftover colours from that layer. Nothing is wasted!!
I've got two couched edges which show you what a difference it makes using different yarns. The batik fabric edging is a single strand of a tapestry acrylic yarn, and the triangle fabric edging is a full six strands of embroidery floss.
So there we have it! The full stitch round down for this piece is fairly short and sweet; straight stitch, bullion knots, french knots, satin stitch, seed stitch, couching, beading and back stitch. Done and done!


No comments:
Post a Comment