


I'm not sure how I feel about this one I must admit - when I look back at the original fabrics together it seems a lovely combination but now I've added the stitches I'm not so sure. I think it's because I haven't colour balanced it as well as I'd like; the background purples of the two floral layers are a fairly good match but the turquoise is very bold and is only in the middle, with a lot of emphasis on the pink at the bottom. Maybe I should have turned some of the pink flowers into more of a turquoise to bring the colour down? Who knows!

It is a finished piece so I won't be doing any more to it, I've had that ta-dah(!) ping in my head that says it's time to stop. Does anyone else get that? Sometimes I worry that I will over-do a piece but actually there's always a point where my head tells me to stop and not add any more; if I don't get that then I keep going and adding different things or changing something around.

I spent a lot of time on the two floral layers but the others are all fairly simple as per my usual way. The top pale blue fabric is covered with two strand seed stitch topped with whipped back stitch and little crosses. The gorgeous green batik fabric didn't need much doing to it, as I wanted to keep that lovely mottled colour and the random striping, so I just worked a single strand of running stitch in rows along the top edge and bottom edge until they met at an awkward angle. It's so much more interesting if you work from both edges at once inwards rather than just go up from the bottom as you create little swirls and areas of broken line that draw the eye far more than just line after line of neat long rows.
This fabric edge was finished with several strands of embroidery floss in the same colour, stripped apart and then put back together so that they are loose and not twisted, couched on with a single strand of the same colour again so that it all blends nicely. I didn't pull the couched thread tight and left it deliberately loose so you get that nice bobble effect.

The polka dot fabric is a paste printed dot so you can feel and see texture in the white spots with the paste. Because the dots are so large I wanted to make more of a feature of them so worked straight stitches on each diagonal line between each dot, estimating where the centre was to try and keep my lines straight, then worked tiny back stitches around each spot (no mean feat when you are bouncing through pot holes on a bus!). I'm not sure if you can tell but there are actually two shades of green in this layer, the straight lines are one colour and the back stitch is another colour. Maybe you can tell slightly more in the french knots at the top of the fabric as I've done random chunks of each colour - just about I think, one is slightly more zesty?

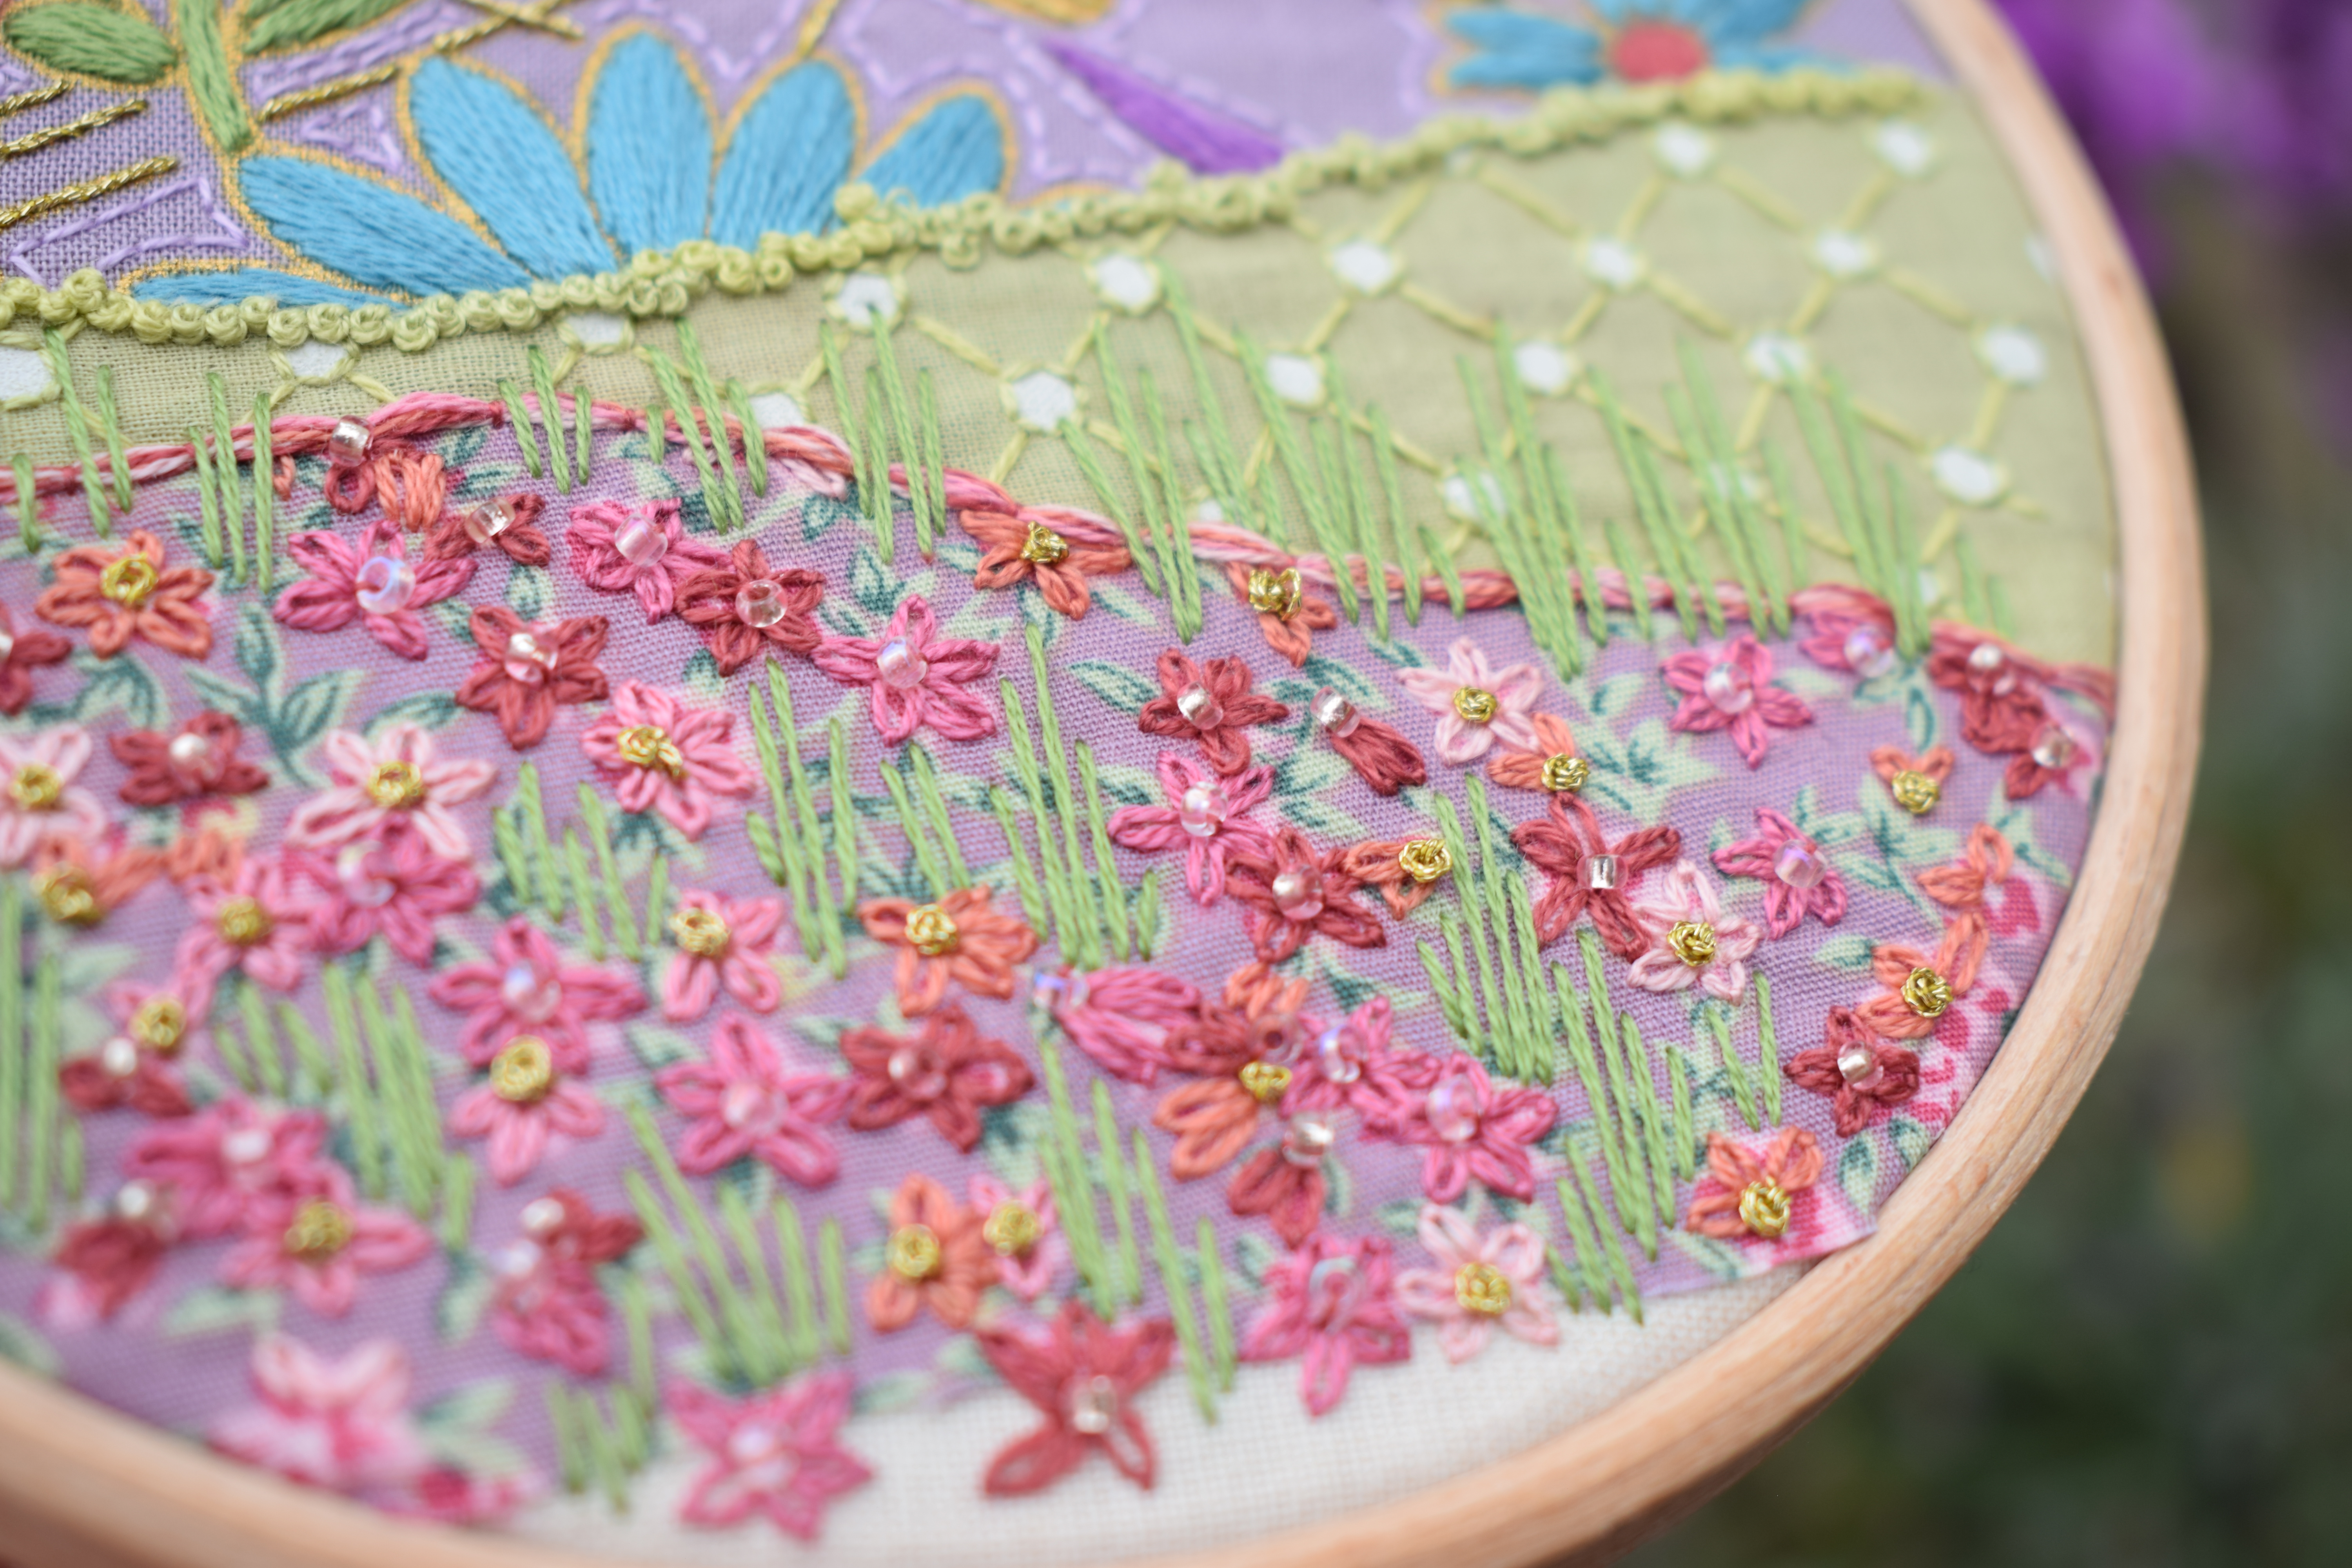
The top floral fabric, with the larger print and gold paste, is one I picked up at a Knitting & Stitching show from a Japanese fabric stand. They are slightly more expensive but oh, so beautiful with those gold lines! I've used them several times before (I have quite a collection) and you can see different ones in my 'All That Glitters' Stitchscape, 'Gold Meadow Peaks' Stitchscape, 'Gold Rush' Stitchscape - you get the idea? - and a lovely blue #inthehoop piece, which inspired the technique I've used here, as well as plenty of others.

Rather than try and add in gold on every single golden line, I have stitched in between the gold paste lines as best I can, filling in each section with as close of a colour match as I could and leaving the gold to shine out between the stitches. I wanted my satin stitches to be fairly neat for this so I separated out all of the strands of thread before I started stitching so that they didn't get tangled together so much.
For the straight lines that create a lattice design in the bigger pattern repeat I have added some DMC metallic gold stranded thread to bring those out and add an extra sparkle. These have been done with whipped back stitch to create a lovely solid line with no joins! Metallic thread is such a bugger to work with though, constantly splitting and unwinding from itself with the different types of fibre used to make this thread. When it's finished it's beautiful and definitely worth the perseverance!

I wasn't entirely convinced that this layer was finished once I'd added the satin stitches and gold thread though because the right hand side is fairly empty of pattern and there were some bobbly bits of fabric that I wanted to improve on. Initially I just worked a two strand running stitch at the top of the layer to help prevent fraying when I added the bullion knots to the edge, but I then went back around and added a single strand of back stitch around the shapes, not every shape but just to add a little something extra and I think it looks quite nice.


The bottom fabric layer is my favourite though. I have used four different pinks to build up depth of colour in my Daisy field, roughly following the flower prints in the fabric below. The print itself was often a little vague so I've used a bit of imagination to translate them into lazy daisies.
I did want to add a bit of sparkle in this layer to match the one above so I started adding some pink beads to the centre of the flowers which just looked horrendous! All plastic and tacky and a very bad idea. These beads swiftly came out again and I replaced them in the mid pink flowers only with a much nicer clear, pink tinted beach which is just slightly iridescent and catches the light but doesn't shout about its opinions! The rest of the flower centres were filled with gold metallic french knots to match and catch the light in a different way which looks gorgeous.

The top of this fabric has been edged with more couched embroidery threads but this time it's a combination of the different pinks used below, lightly twisted together - such a nice technique to use if you want to speedily edge something and haven't got a fancy yarn to do it with.

I was going to leave it there but I hadn't had that ta-dah(!) moment and pondered over what to do. In the end I decided that I needed to add more of the green and blend the bottom layer with the polka dot a bit more as the edge was quite stark. Long straight stitches in clumps looked really nice along the edge but left the flowers a bit empty so I started adding them in larger gaps between the daisies which has just finished it off beautifully!
I like the fact that I haven't tried to fill in the printed leaves which are slightly darker and more forest green so instead it has left them as leaves and stems and has built up a great flowerbed texture with different colours and shapes in it. That's one of the beauties of using pre-printed fabrics, you can go over as much or as little as you like. The colours and shapes are already there you are just enhancing it and adding texture!


The stitch run down for this piece is as follows; detached chain stitch (lazy daisy stitch), french knots, straight stitch, couching, beading, back stitch, satin stitch, running stitch, whipped back stitch, bullion knots and seed stitch.
It would be interesting to hear if you would do anything differently if you were stitching this Stitchscape. Would you have used different stitches or different colours? Added something else in? Let me know!


No comments:
Post a Comment