It never ceases to amaze me how much love a greyscale Stitchscape gets on social media. I pride myself on being fairly good with colour and confident with colour mixing, spending a long time looking for the perfect combination of colours to make a piece sing and yet it's the pieces I embroider that have nearly a complete absence of colour that really seem to appeal to my followers.
I find working with grey, or black and white, quite challenging actually. It becomes more about the balance of light and dark rather than balancing the colours themselves and using the different tones of grey to create interest. Some greys are warmer or colder, slightly more brown or slightly more blue and they don't all go together well so it's just as important to get this selection right.
I think with this one I actually cheated slightly as a couple of years ago I picked up/was given a pack of fat quarters which had been designed to go together so the grey shade was exactly the same.
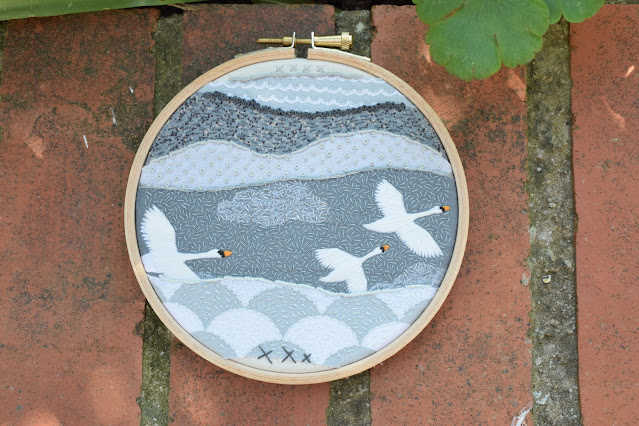
If I recall correctly I used three fabrics from this pack, the bottom layer, the polka dot layer and the top wavy layer so the way they were placed has balanced out the two darker fabrics used where it alternates between light and dark and always back to the same shade of grey.
The most important fabric was the Lewis & Irene Down by the River collection, 'Swans in Flight Grey' fabric, which I have used a couple of times before as a feature fabric in a Stitchscape (see my
Swan Song piece here and a
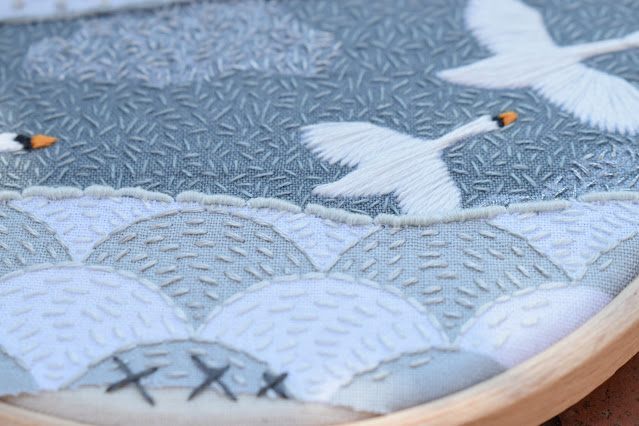
Mini Swan 'Scape here). I like to use the same technique on the Swans which is a straight stitch/satin stitch started at the tips of the wings following that angled line and then working longer and shorter straight stitches closely to each other to turn the curve of the wing until I can just work long stitches up against the body.
The body itself has one long straight stitch down the centre-ish, from head to tail and then more straight/satin stitches to fill in the gaps either side. I'm not always that willing to call this a proper satin stitch technique as it can be fairly messy and I'm not using the proper technique of passing my needle under the fabric each time so as to always start on the same side for every stitch. I like to save my thread and come up next to where I last put my needle down through the fabric where I can.
I have been asked whether I can turn this sort of piece into a Stitchscape kit but unfortunately this is a design from an old collection of Lewis & Irene, 2017 I think(?), so I wouldn't be able to get enough meterage of this print to make enough kits to be worth my while designing it. The swans are also pesky little things and you have to really fussy cut and choose your section so I'd have to give out massive pieces of fabric for you to choose the best placement of the swans.
You can see, if you look at the previous swan blog posts, how much they have been moved around and are never in the same position. Sometimes I also get confused between which way is the correct way, whether the swans are flying upwards or downwards. I guess it doesn't really matter.
Anyway, this has been a great project to work on whilst I'm on the bus as everything was fairly easy and I could do approximately a layer a day or even, for the smaller layers, a layer in a journey! It takes about an hour to get to work on the bus with all the stops and starts and side roads it goes down, which is a decent time to sit and concentrate on a little project. Because this hoop is only 12cm/5", I just stick it in my rucksack with a small tin of threads and away I go!
The bottom layer was finished first and I've used two strands to work back stitch around the tops of each of the fan shapes, grey thread on top of the grey fans and white thread on top of the white fans. I've then filled in these shapes with the matching colour of two strand running stitch, following the upper curve down as much as I could. The layer has been edged with bullion knots in the grey thread colour used below.
Actually, I've just thought this would look really nice if I'd done the opposite colours! Something to think about for next time maybe.
The swan layer has been covered in single strand seed stitches using a matte stranded floss on the dark grey background and then a single strand of metallic stranded floss in the cloud areas to give a little bit more interest. This was actually really nice to do on the commute because this week has been sunny and a new golden sunshine has come through the bus windows to catch in my clouds. The thread itself was a real pain!! Metallics have a nasty habit of splitting and breaking mid stitch as the fibres are tiny little metallic strips combined with a fibrous thread all wound together to give stability, but really they hate each other and try to go their separate ways as quickly as possible.
I've couched more metallic strands to the top of this layer, twisted in with some of the cotton floss as well; it's a nice, easy edging that matches perfectly.
The swans were worked on one Saturday morning whilst I was sat in the car waiting for my other half to have his hair cut (he was desperate for a trim after not being able to have one during the last lockdown but I wasn't allowed to touch a hair on his head to help him out!). As well as the straight/satin stitch worked on the body and wings in white, I've done some rough satin stitches on the black for the head and in orange for the beaks. The orange is the only pop of colour so they really stand out.
I'm not sure if I've made the beaks too big though? The bleed from the print was quite wide so I was trying to catch all of the printed orange under the thread.
Going up, the polka dot fabric has been re-spotted with four or five twist french knots (using two strands) and the trick with covering these with knots is to not bring your needle up in the centre of the dot. You need to bring your needle up on one side, twizzle your knot and then bring the needle down on the opposite side of the dot so that your knot sits exactly in the centre.
The layer above is quite a busy spotted print and I initially toyed with the idea to make tiny one strand, one twist french knots in all of the black spots in this print and then questioned why I would subject myself to such an arduous task (speaking from experience!) and went with a single strand of running stitch instead. I'm glad I did actually because you can still see all of the lovely colours underneath and it has helped to make this piece less 'spotty' overall.
When using running stitch in rows like this I often like to edge from both sides at once, working a line of running stitches following the edge of the below fabric and then also going along the top, raw, edge. As you bring the two lines together it creates interesting little sections where the rows are shorter and meet at angles - it also means that you have nicely edged that top edge ready for a stitched edging to be added, reducing fraying.
The very top layer (which you can see in the next photo up) has also been really simply treated with just a single strand of white thread following the wavy lines in back stitch. Please don't look too closely at this layer, it isn't my neatest work ever! It turns out that these waves aren't all the same size so it affected my rhythm of working four stitches in each dip so some stitches are different sizes and there could be three - five stitches in each 'u' shape.
I've topped this edge with more bullion knots (love a bullion!) and my little kiss stitches.
I also went back down to the bottom and added the loose cross stitches that appear in most of my Stitchscapes in the dark grey from the running stitch layer to bring a bit of dark down.
In total, the stitches used are; back stitch, running stitch, bullion knots, straight stitch, satin stitch, seed stitch, couching and french knots.
I'm interested to hear what you think about the colours here, do you prefer the more colourful Stitchscapes I make, or are you in the greyscale camp? Leave me a comment and let me know!

