Wednesday, 26 May 2021

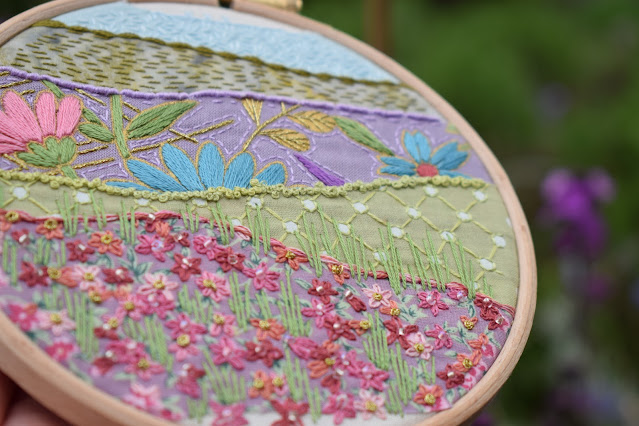
Japanese Daisies Stitchscape


I'm still working my way through a pile of raw Stitchscapes that I started on the 14th March (thank you Instagram, my Dotty Textiles picture diary!). I think I started with six pieces which were all put together at the same time, when I went stash diving on a whim, and I have been working on them on the bus on the way to and from my part time day job. It's always really nice to have a stack of shiny new Stitchscapes waiting for their turn to be embroidered on because it means that if I need a project in a hurry I can just pick whichever one I fancy from the pile and start working straight away! This one is number four and is the last of the 12cm hoops I made up - the last two are 15cm hoops. 

I'm not sure how I feel about this one I must admit - when I look back at the original fabrics together it seems a lovely combination but now I've added the stitches I'm not so sure. I think it's because I haven't colour balanced it as well as I'd like; the background purples of the two floral layers are a fairly good match but the turquoise is very bold and is only in the middle, with a lot of emphasis on the pink at the bottom. Maybe I should have turned some of the pink flowers into more of a turquoise to bring the colour down? Who knows! 

It is a finished piece so I won't be doing any more to it, I've had that ta-dah(!) ping in my head that says it's time to stop. Does anyone else get that? Sometimes I worry that I will over-do a piece but actually there's always a point where my head tells me to stop and not add any more; if I don't get that then I keep going and adding different things or changing something around. 

I spent a lot of time on the two floral layers but the others are all fairly simple as per my usual way. The top pale blue fabric is covered with two strand seed stitch topped with whipped back stitch and little crosses. The gorgeous green batik fabric didn't need much doing to it, as I wanted to keep that lovely mottled colour and the random striping, so I just worked a single strand of running stitch in rows along the top edge and bottom edge until they met at an awkward angle. It's so much more interesting if you work from both edges at once inwards rather than just go up from the bottom as you create little swirls and areas of broken line that draw the eye far more than just line after line of neat long rows. 

This fabric edge was finished with several strands of embroidery floss in the same colour, stripped apart and then put back together so that they are loose and not twisted, couched on with a single strand of the same colour again so that it all blends nicely. I didn't pull the couched thread tight and left it deliberately loose so you get that nice bobble effect. 

The polka dot fabric is a paste printed dot so you can feel and see texture in the white spots with the paste. Because the dots are so large I wanted to make more of a feature of them so worked straight stitches on each diagonal line between each dot, estimating where the centre was to try and keep my lines straight, then worked tiny back stitches around each spot (no mean feat when you are bouncing through pot holes on a bus!). I'm not sure if you can tell but there are actually two shades of green in this layer, the straight lines are one colour and the back stitch is another colour. Maybe you can tell slightly more in the french knots at the top of the fabric as I've done random chunks of each colour - just about I think, one is slightly more zesty?


The top floral fabric, with the larger print and gold paste, is one I picked up at a Knitting & Stitching show from a Japanese fabric stand. They are slightly more expensive but oh, so beautiful with those gold lines! I've used them several times before (I have quite a collection) and you can see different ones in my 'All That Glitters' Stitchscape, 'Gold Meadow Peaks' Stitchscape, 'Gold Rush' Stitchscape - you get the idea? - and a lovely blue #inthehoop piece, which inspired the technique I've used here, as well as plenty of others. 

Rather than try and add in gold on every single golden line, I have stitched in between the gold paste lines as best I can, filling in each section with as close of a colour match as I could and leaving the gold to shine out between the stitches. I wanted my satin stitches to be fairly neat for this so I separated out all of the strands of thread before I started stitching so that they didn't get tangled together so much. 

For the straight lines that create a lattice design in the bigger pattern repeat I have added some DMC metallic gold stranded thread to bring those out and add an extra sparkle. These have been done with whipped back stitch to create a lovely solid line with no joins! Metallic thread is such a bugger to work with though, constantly splitting and unwinding from itself with the different types of fibre used to make this thread. When it's finished it's beautiful and definitely worth the perseverance!

I wasn't entirely convinced that this layer was finished once I'd added the satin stitches and gold thread though because the right hand side is fairly empty of pattern and there were some bobbly bits of fabric that I wanted to improve on. Initially I just worked a two strand running stitch at the top of the layer to help prevent fraying when I added the bullion knots to the edge, but I then went back around and added a single strand of back stitch around the shapes, not every shape but just to add a little something extra and I think it looks quite nice. 


The bottom fabric layer is my favourite though. I have used four different pinks to build up depth of colour in my Daisy field, roughly following the flower prints in the fabric below. The print itself was often a little vague so I've used a bit of imagination to translate them into lazy daisies. 

I did want to add a bit of sparkle in this layer to match the one above so I started adding some pink beads to the centre of the flowers which just looked horrendous! All plastic and tacky and a very bad idea. These beads swiftly came out again and I replaced them in the mid pink flowers only with a much nicer clear, pink tinted beach which is just slightly iridescent and catches the light but doesn't shout about its opinions! The rest of the flower centres were filled with gold metallic french knots to match and catch the light in a different way which looks gorgeous. 

The top of this fabric has been edged with more couched embroidery threads but this time it's a combination of the different pinks used below, lightly twisted together - such a nice technique to use if you want to speedily edge something and haven't got a fancy yarn to do it with. 

I was going to leave it there but I hadn't had that ta-dah(!) moment and pondered over what to do. In the end I decided that I needed to add more of the green and blend the bottom layer with the polka dot a bit more as the edge was quite stark. Long straight stitches in clumps looked really nice along the edge but left the flowers a bit empty so I started adding them in larger gaps between the daisies which has just finished it off beautifully! 

I like the fact that I haven't tried to fill in the printed leaves which are slightly darker and more forest green so instead it has left them as leaves and stems and has built up a great flowerbed texture with different colours and shapes in it. That's one of the beauties of using pre-printed fabrics, you can go over as much or as little as you like. The colours and shapes are already there you are just enhancing it and adding texture!


The stitch run down for this piece is as follows; detached chain stitch (lazy daisy stitch), french knots, straight stitch, couching, beading, back stitch, satin stitch, running stitch, whipped back stitch, bullion knots and seed stitch. 

It would be interesting to hear if you would do anything differently if you were stitching this Stitchscape. Would you have used different stitches or different colours? Added something else in? Let me know!


Tuesday, 18 May 2021

Fox Cubs!


For the past three or four years we've had a lovely Mrs Fox making a den somewhere in the gardens at the bottom of our garden. We don't see her all year round so it's likely somewhere that she returns to only to have her cubs but she likes to sometimes hang out in our garden and we give her our raw meat scraps to nibble on or the leftover cat food Ziggy has turned his nose up to. She's always very grateful and will come right up to the (closed) patio door to fetch it. Depending how much there is she often takes a big mouthful off to give to the babies and then comes back and finishes up the scraps of the scraps for herself.  

Fox cubs are quite noisy so we are lucky that our garden is quite long so they are mostly away from the house with their noises but they are so lovely to sit and watch playing. This year there were at least four cubs but we saw one that looked a bit poorly last week so we aren't sure if he'll make it. Three other cubs all look big and healthy though so that's good. Sadly not everyone can make it in the wild and that's just the way it is - it would be tricky for us to intervene at this point as we don't actually know which garden the den is in. 

Last week Reece and I were just coming back from our Bluebell wood photoshoot and I heard them playing at the bottom of the garden in our vegetable patch. Luckily I had my camera and zoom lens with me from photographing Stitchscapes and Bluebells so I snuck down a bit closer to watch them. Aren't these guys cute? One arrived crashing through the trees with what I originally thought was a red ball but turned out to be a bright red apple it had acquired from somewhere. The bottom photo on this post shows a slightly blurry image of this little fox being playfully chased around by his littermate with the apple, before he buried it in a little hole he dug next to our rhubarb. 


Although they are very sweet looking they can be a bit of a pain. Dad is always moaning that they are digging holes in the garden and I watched them play with clumps of soil in the vegetable patch, picking it up and kicking it round like a cat would with a catnip toy. 

They are good for keeping rats and mice down though. I really like rodents and they don't bother me when living outside but because we like to feed the birds (I'm starting to sound like David Attenborough here) the seed we throw out attracts the mice and rats. Ziggy, our cat, is good for mice but he won't take on a big rat - far too scary - so the foxes sometimes help us out. 


Amazingly, this time last year, the bottom of our garden was a very neglected space with waist high grasses and old fence panels and dumped soil and concrete from other areas of the garden. We are on the edge of a hill so our garden drops away very sharply and has been previously formed into three terraces with a lawn, patio and flowerbeds on the top terrace out from the kitchen, a patio-ed narrow terrace with pots on and then you follow a steep path down to the 'forgotton garden' at the bottom. 

But, during Lockdown 1.0, Dad took back the forgotten garden!! He dug up all of the grass and weeds, bought masses of soil and compost and, using recycled odds and ends he uncovered built up a slightly raised vegetable patch. As lockdowns continued the patch was extended and other areas cleared to make paths and a small area with a chimenea where we could discreetly burn some of the wood that had been laying down there. Whilst toasting marshmallows of course.

Old fence panels and shelves were used to shore up the edges of the vegetable patch, propped up by metal posts of an old swing we'd had as kids.

There's still work to be done down there but some areas have been left as a haven for wildlife to break down naturally, like the fence panels you can see behind the cub in these photos. The bags are keeping the tops of compost bins warm for our worms and there are still a few bits to be gotten rid of. We need a skip really but it's a tricky area to get things in and out of. (Plus Dad's doing all of the work himself.)

For now though, it's a playground for the fox cubs! They love jumping up and down on the piles of wood and chasing each other under the wheelbarrow and onto a hump of soil. They spent ages kicking clumps of dirt off the top of the soil mound and chasing it down, or leaping on another cub who passed underneath. All good hunting practice for them!


What we found really interesting was the different colours. Most fox cubs are born a dark brown colour and then gradually change to the fantastic orange coat you see in adults, but these little chaps are different colours as one is already much more orange than his siblings. An over achiever maybe!


Rockpool Magnets: Part II

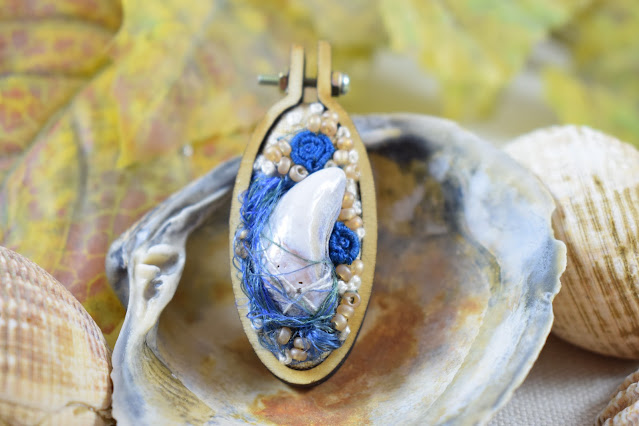
Yay! Welcome to the second blog post about my rockpool magnet pieces! These are so much fun and I have taken literally hundreds of photographs of them which is why I had to split my blog update about them into two parts. If you missed Part I do click here! 

I love doing these photoshoots where my fold up light box comes out, the 'floor' is put down (in this case some neutral cotton fabric), two decorators battery floodlights are put either side of the box, usually raised up on tissue boxes or whatever is available in the kitchen to diffuse the light, and then I can add my faux flowers or leaves and, in this case, some big shells I have lurking in my collection! I probably look a bit weird with my head inside the box for the overhead shots though. 

Although I've gone for a beachy feel for these photos (hopefully), I still added the leaves because a lot of these rockpool magnets have green in them somewhere for the seaweed so it matched nicely, plus it helps to hide the join at the back of the box where the fabric floor turns into the back of the box. 

Whilst stitching the magnets I was very conscious of trying to make them slightly different colours and not have them all the same. I can't say I've recently spent a lot of time staring into rockpools but I don't remember them as being brightly coloured in the UK. You occasionally get some red, green or black seaweed but generally it's just green stuff with sand at the bottom. Please correct me if I'm wrong, and I'd love to see any photos of brightly coloured rockpools if you have them! For my stitched rockpools I've switched it up with some pale blue curly sheep wool (top image), mustard coloured embroidery floss which contrasts nicely with the green jute tape (image above) and different pink french knots with yellow beads for a super pretty vintage-esque rockpool (image below).


I've tried to add a few different techniques and combinations to these as well, and I absolutely love it when the stitches appear to be spilling over the hoop and sticking up like they can't be contained in their little hoop pool. The piece above has lots of loops of embroidery thread which were created by not pulling the thread all the way through before starting the next stitch. The height of the threads is varied and the loops then spill out all over the place, almost like they are moving under the water. 

I've used this same technique with the larger piece below but this time also added some sticks of beads which again flop in different directions and almost brush against you like seaweed wrapping around your finger when you go swimming at the beach. 


I had a comment on Facebook from a lovely lady who said that the size of these is very deceptive. When I was stitching them in the larger hoop she thought they were much larger than they actually are and when she saw them in a photo of them in my hand she realised how tiny they are. The large oval pieces are only 6cm/2.4" at their widest point and the smallest circular piece I made was 2cm/0.8" across so they are very little! And a lot of work for how little they are!

I tried something new on these shells. I've done many Stitchscapes now with real shells in, there's a video on my Youtube channel of how to attach shells to a Stitchscape if you would like to try it yourself (click here to see it), and they always end up with a thread across them - either around them to hold it in place if there are no holes to stitch them down sequin-style, or a few in different directions through the hole. From a distance you can't see these stitches if you match the thread to the shell colour and up close they aren't really a bother because they blend in but, sometimes it's nice not to see those at all so I tried adding extra stitches in green embroidery thread, then wrapping my needle around the stitches and linking in other stitches to create more of a web of green across the shell. This way you can't see the original thin stitch line at all and I love it! Definitely one to try at a later date with my next shell piece. 


For the Limpet shells I filled them with a couple of layers of felt (cut into circles to fit inside the shell) and then topped the felt with lots of french knots. The reason for filling the shell first is to raise the level of the embroidery stitches rather than have them at the same level as the stitches on the outside of the shell. It works a treat and you can layer french knots on top of french knots too if you don't pull very hard when you make them so it kind of takes on a frothy appearance.


I've been so pleased with how these magnets have been received by everyone. As soon as I released the first 9 on Etsy and advertised them, I sold 7 in the two days alone!! So amazing! It also raised my profile on social media a tiny bit because so many people were sharing it around and liking it which I'm really grateful for. It's hard to keep social media going along with everything else, but with less fairs and markets around it's becoming the bigger platform to try and sell wares. 


I really love these rockpool magnets and I hope you do too! I'd definitely like to make some more when I build my shell collection up again. I shall be looking for the smolest - some of these are smaller than my fingernails - and sturdiest of shells in the prettiest of colours!


Saturday, 15 May 2021

Bluebell Season


It's nearing the end of Bluebell season here in the UK, although the woods will still be blue for a little longer. The Mother has just mentioned that the ones in our garden are starting to look a little droopy and sad but they came out a week or two before the woodland ones so we've got maybe two or three more weeks of beautiful walks. Generally it's been a late season because it's been so flippin' cold the last few months!! So many plants are delayed because of the early morning frosts and, even though we've had one or two hot days (in double figures!), the frosts keep coming. 

I was just wondering what time of year it was when I last posted about the Bluebell woods within walking distance from my house and, according to my blog, it was the 16th April so they're nearly a month later! The post itself was a little sad as we were four weeks in to the first COVID lockdown and the world was a very scary place (you can read it here). My shop had gone completely bonkers with sales and we were all confined to our homes other than one bout of outdoor exercise a day. 

This year seems very different; I am actually the only person in the house still waiting to be vaccinated, my gorgeous other half (who moved in at the start of lockdown 1.0) is still here and has officially moved in, we are all (with the exception of Dad who is still working from home) going out to work, I'm back on the bus commute and my shop has slowed right down to pre-COVID sales. 

So, we will see what this year brings! Regardless, the Bluebells will be out doing their thing when they feel like it and this time we went along with some Stitchscape friends of mine. You may recognise them from previous posts, or you may have even made a couple of them!! My lovely Bluebell themed 'scape pals are the Bluebell Blues Stitchscape (stitched in October 2019) and the two Bluebell Garden Stitchscape kits, both the navy version and the lace version. Links to original blog posts about them are highlighted over their name in that last sentence. 


It's so much fun staging little photoshoot areas when the inspiration is directly in front of you. I'm not sure that there were as many Bluebells out though this year, maybe because of the cold weather? I was being very careful not to trample on the bells as I walked in and out of them trying out different places and positions. 


The photos taken earlier on in the day, in our garden were a little bit easier as the flower beds are raised up so I could tweak as much as I liked without squashing anything. I think I will always be inspired by the woodland and actually there are many more woodland seasons I could try to stitch. The wild Garlic has been fairly abundant this year, as have the Celandines and the Wood Anemones so maybe a white and yellow woodland piece?


Do you have any seasons that particularly inspire you? I'd love to know!