Thursday, 26 March 2020
Summer Sweet II Stitchscape Kit
I started to upload the photos of my Summer Sweet II kit onto my blog to share the details of the kit itself, only to realise I never shared the initial photos of the finished Stitchscape!!!
This Stitchscape is a re-design of my first Summer Sweet kit, which was actually the very first kit I ever designed, and uses all of the same templates and a lot of the same fabrics as before. The main reason for my needing to re-design this kit is because the floral fabric I initially used I couldn't get hold of anymore so I had to find a substitute.
It was also an opportunity to work out any little bits of the kit that I had received comments about or suggestions on improvement. Unfortunately this will only be a limited run of 20 because I've now discovered that most of the other fabrics are also now unavailable, which isn't a huge surprise as I first started doing this three years ago in 2017, so I will have to start collecting other fabrics and will redesign it all again! Summer Sweet III anyone?
I have changed a couple of little things from the previous design (see the first Summer Sweet blog post here), the sun is now filled with seed stitches rather than little satin stitches and I've made the cross stitches bigger for the blue square fabric behind the sun as that was a comment I'd previously received where they were too small. Everything else about the top layers stays the same, although I have added additional diagrams in the kit booklet to help explain what I mean in certain areas.
The big change is the bottom floral fabric as I couldn't find a more similar one to the original. I really love the sweet little daisies in this layer and each daisy pattern will be different in every kit. I've also added in a new thread colour so you now get 11 different colours of thread in a combination of DMC and Anchor stranded cottons. Due to a popular demand for trimmings, this layer is edged with a couched strip of 1mm yellow leatherette cord which is blended back in to the landscape by stitching the daisy flowers over it where they fall off the fabric edge and also stitching the green stems for the bullion knot flowers over it in any gaps in the flowers. This arrangement will also stay totally unique as each kit will have different gaps in the daisies.
I really hope that you like my re-worked version of Summer Sweet - I don't think there's any harm in purchasing the second one if you have already stitched up the first, it's almost like you have stitched the same scene but at different times of year when the flowers are different in the field. Perhaps I should try and do a winter version where everything is covered in snow? Winter Sweet doesn't work quite as well as a name though.
So this kit is up and ready to go on Etsy and once they're gone, they're gone - never to be repeated!! As before you get all instructions, fabrics and threads within your kit, but you will need your own 15cm/6" embroidery hoop (or you can now purchase these as a separate product from my Etsy shop in the Embroidery Kit section), sewing cotton to neaten the back and your regular sewing tools. Separate template pages are included if you want to use them or feel free to just dive in with the scissors and make your own version!
As always, I love seeing the finished results so do send in photos of your finished pieces!! Or if you have any questions along the way just drop me a message on any of my social media platforms.
Friday, 20 March 2020
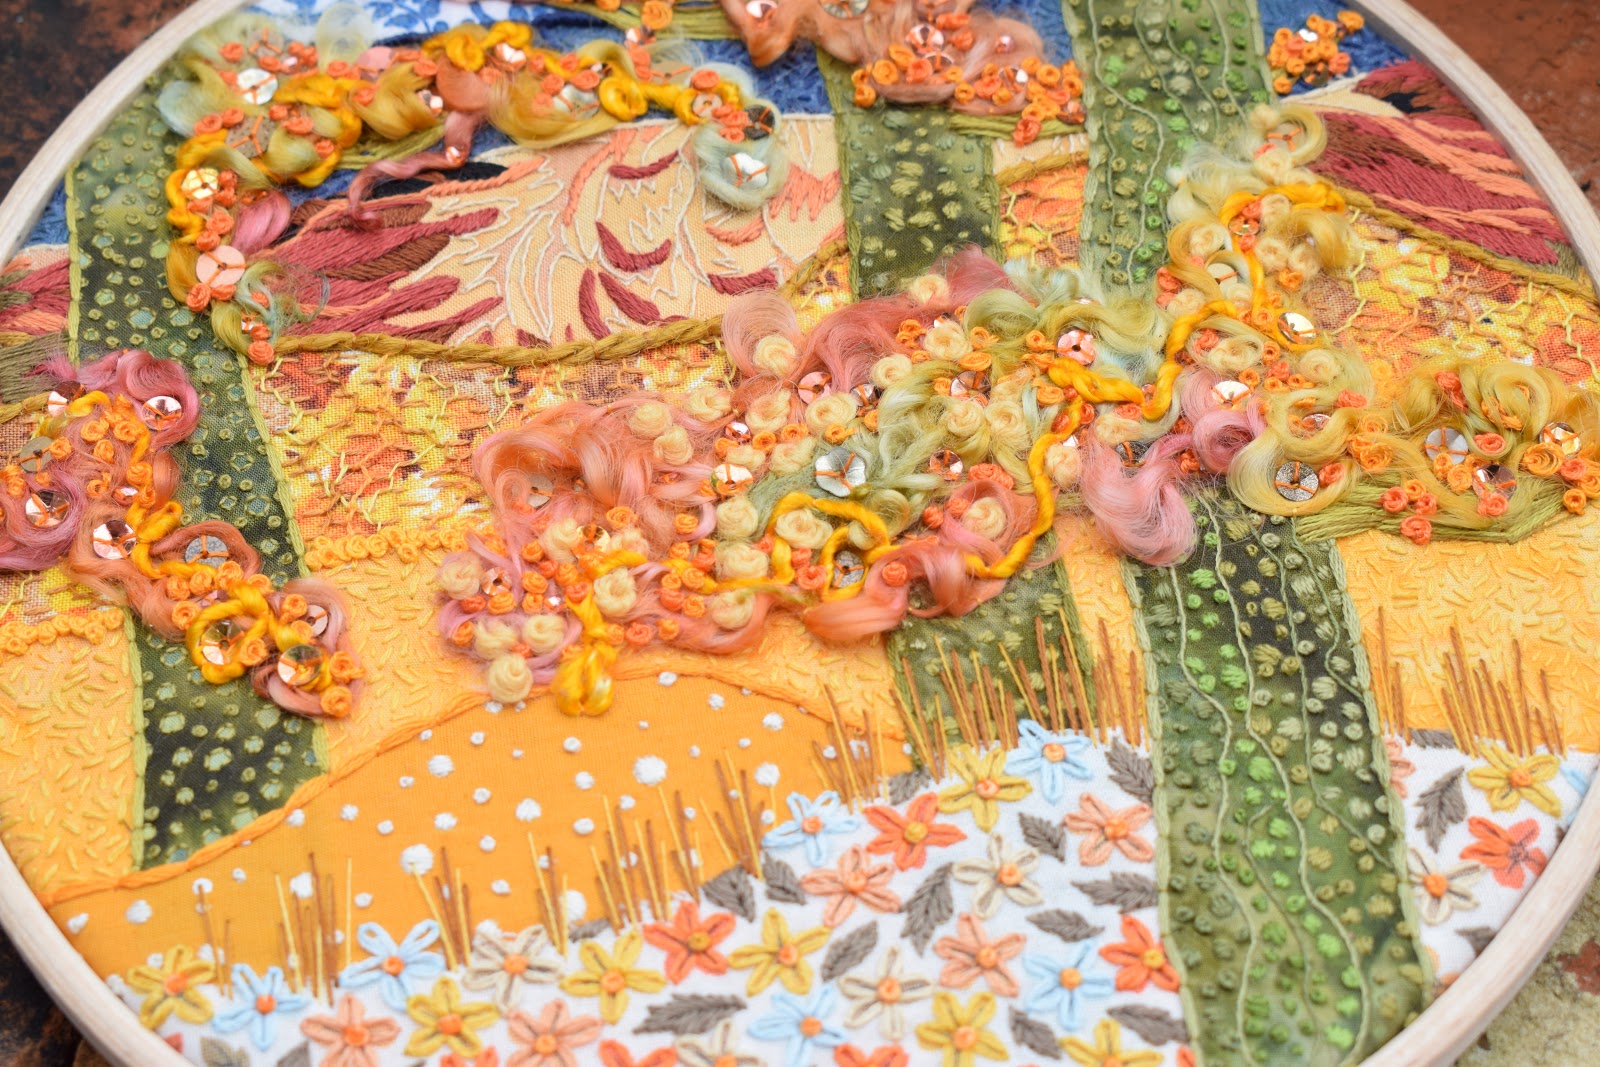
Autumn Madness Stitchscape
Hello everyone! I hope you are keeping well, whether you are at home self-isolating, or still out and about. It's a very worrying and uncertain time and I do feel slightly lucky that I have a job that can easily be done from home as it is most of the time anyway - plus the huge sense of mindfulness and calm that I feel when I'm sewing is second to none. Immersing myself in the stitched landscape and methodically working through a layer of seed stitch is a godsend when it seems like the whole world has gone totally bonkers with shoppers fighting over the last bag of flour from the apocalyptically stripped supermarket shelves!
I have just finished this brazenly fiery and flamboyant Stitchscape, which has a little bit more mixed media stitched in than I usually stretch to. The vision in my head was quite clear and there were a few tense moments when I thought I had ruined everything by including the dyed yarn as initially it didn't look like much, and definitely didn't look like the image in my head.
I don't know whether you have been lucky enough to see an English woodland when it has its full Autumn garb on? You can't tell which is floor and which is tree branch as everywhere there are leaves in multiple shades of orange, yellow, gold, brown, red, crimson, ochre, mustard and everything in-between. It's a total bogglement for the eyes (yes I did just make that word up) and I think this piece does give that sense of optical illusion as the colours and textures merge and blend from the background to the foreground. Or maybe I'm overthinking it?
The lame title I've given this piece for the purposes of the blog post is totally rubbish so if you have any suggestions I'd be interested to hear them!
As always, I've started on the background layers first and, in the case of Stitchscapes with trees, I always work the horizontal layers first then do the trees afterward which seems to help reduce any bubbles being left in the background fabrics. The top blue layers have been worked really simply using a single strand of back stitch to edge the pattern on the uppermost fabric and then a seed stitch on the darker blue fabric. I did try something a bit more fun for the seed stitch (not that you can really see much of it now) by using two strands of one colour but leaving gaps which were then filled with a single strand of a different shade. I have done the same thing on the seed stitch in the yellow layer actually but the yellows are quite similar so it's not as obvious.
I had originally intended on all of the more autumnal fabrics to be considered as leaves but, actually, the top autumn fabric - which is a Kaffe Fassett design - now reminds me more of a russet tinged hillside or mountain. As with lots of Kaffe fabrics his designs are enormous and I believe this one is actually a massive Delphinium flower or similar and what is shown is only a tiny zoomed in part of the flower head. Some parts of it I have covered with thread, the same colour as underneath, in a sort of rough satin stitch but then I have left areas of more open stitching by following the lines of pattern with whipped back stitch and I love the contrast of the two types of stitch together like that. The layer has been topped really simply by couching on a few strands of embroidery floss that I've actually stitched through at certain points so it's only edging the areas where the satin stitch hasn't gone over the fabric edge.
The next fabric layer down is actually a print of lots of autumnal leaves so the colours are perfect!! I didn't want to try and pick out any individual leaf so instead I have blurred the pattern by working running stitch rows along it, and coming back down in three different colours of single strand embroidery thread, working a perpendicular whip stitch.
The bottom orangey layers have again been quite simply worked- quite in contrast to the top half - with either satin stitch/french knots over the dots on the pattern for the little humpy orange bit, and then for the very bottom layer with the flowers, each flower on the fabric has been gone over with detached chain stitch topped with a french knot middle in a couple of colours and the brown leaves worked in a really rough assortment of gathered straight stitches. A row of straight stitch stalks blurs these two fabrics together and helps to fix down any rough edges.
The trees took quite a long time to do and I started with the tree on the left hand side, going around each of the larger circular fabric marks with a single strand of back stitch, or filling in the really small holes with a french knot.
The middle tree was then worked slightly differently, this time filling in the spots with a some rough satin stitches in a couple of colours and the third tree was a combination of all of these techniques - the back stitch, satin stitch and french knots - and using lots of different shades of green as I found a treasure trove of nearly finished thread cards in my embroidery box that needed using up. I also added some lines of whipped back stitch working up this final tree to try and make it seem closer to you with more details being added in.
Underneath all of the mad sections of wool there are actually satin stitch branches! You can't actually see all of them any more as I went a little bit bananas, but they appear every now and then and it really helps to build up your trees so you know where the leaves need to go. I wanted to leave a gap in the centre to kind of hint at the leaves parting ways slightly to reveal a clearing showing my Kaffe Fassett mountain.
The wool itself was just couched down in sections over the branches and was part of a pack of rainbow dyed wool that I picked up years and years ago at a craft fair somewhere. I actually went rooting through my boxes in the attic trying to find a selection of fancy yarns and bits and bobs and I found all sorts of things, including the yarn.
My initial reaction, once the wool was on, was that I hated it and it wasn't 'orange' enough, so I started adding other bits to it like the yellow Stylecraft DK acrylic yarn french knots on the central clump (still too pale and yellow), followed by the 100% silk twisted roving yarn (the right colour and depth but too linear in the way it's been stitched?) and the different shades of orange, four strand embroidery floss french knots (starting to look more orangey and autumnal), finally topping it off with assorted steampunk bronze/copper sequins.
On their own these things wouldn't work I don't think but, actually, combined together, it makes a mad autumnal look that works really well and makes your fingers itch to touch it. The sequins also make the piece glint like sunshine is coming through - although we haven't got any sunshine at the moment for me to demonstrate that properly.
I have started leaving my Stitchscape in their hoops for display purposes. This is because a: my studio is full and I don't have room to frame anything else, b: other Stitchscapes are just hanging around on mounted squares of card and don't look very good outside of a box frame, and c: it makes a really impactful photo and is much more flat pack for storage!
The hoop for this piece is a 20cm circular hoop, although I actually stitched most of it in a 20cm square hoop so there are a fair amount of stitches that have been pulled to the back of this piece which is slightly wasteful - I shall remember that for next time.
If you want to mount your own work in this way, all you need to do is set the hoop so that all fabrics are trapped between the two rings and pulled taut across the hoop with no bubbles on the front. Trim the fabric around the edge, a couple of inches from the hoop and then take a long length of strong sewing cotton and securely knot it about a centimetre from the fabric edge. (I like to work a couple of rows of running stitch around my Stitchscapes, with the first circle round only going through the calico.) Work an even running stitch all of the way around the circle until you are back at your initial knot and pull the thread so that it gathers up the fabric towards the centre, knot this securely.
(My second circle round is worked closer to the wooden hoop so that I can trap the other fabrics into it.) Make another round of even running stitch, passing your needle through both the calico and the fabrics, trapping any trimmings you might have used in your stitches - again, once you are back at the beginning pull the thread and knot securely.
I will then trim back my cotton fabrics (not the calico) so that it makes a neater circle.
I do really enjoy the back of this Stitchscape, which is almost more bonkers than the front with the threads that have been carried over and knots created! I say it in all of my classes, but if you are embroidering your own Stitchscape, don't get bogged down in what the back looks like. You are unlikely to have the embroidery police coming round to inspect it so just enjoy the process and don't worry about the back.
Monday, 17 February 2020
Gold Meadow Peaks Stitchscape
I haven't done much embroidery lately, there was a long break over Christmas as I was so exhausted by the time I'd finished my last seasonal craft fair. There was a lot of work that had to go into creating enough stock and keeping everything going in the online shop and I felt almost like I couldn't look at another Stitchscape and couldn't sleep without feeling guilty at something I should have done or hadn't had enough time to get to.
But slowly the urge to stitch has come back to me, helped greatly by having to make up samples and examples for the workshops I've got booked up for this year. Being made to play with my fabric stash (no great hardship) and come up with new ideas has fuelled the stitching bug again and this morning I finished off this 20cm embroidery, started as an example piece to demonstrate with at the Ardingly Quilt Show this year.
Funnily enough, the batik fabrics in this piece were bought at last year's show by The Mother, to give to me for my birthday, as part of a big bundle pack stuffed with the most delicious green themed batik fabrics! I'd been looking at it ever since opening the wrapping but hadn't had time to do anything with it. There are more lovely pieces to use which no doubt I will be dipping into again soon!
There wasn't a huge inspiration behind this piece as it was a last minute, late evening, thought flash that I hadn't got any prepared pieces to demonstrate with on the following day. I ended up with two hoops ready to go - this green hills one (an easy layout to use), and an autumnal trees piece which I haven't started stitching yet.
What's nice about following your fingers rather than your head with these pieces, and having literally no inspiration, is that whatever it turns out like is a fantastic surprise. There's no pre-meditated vision to follow and try to re-create so there is no pressure and you can have tons of fun along the way. I've been taking this one into work with me during the week and working on it whilst on the bus.
I started by working the hills, following the lines of the strongest batik reliefs in the lowest mountain and either edging them with stem stitch or filling them with satin stitch. The fabric edge is a couched embroidery floss folded in half.
The middle hill is my absolute favourite as it has so many colours within that one piece that reminds me of sunshine and cloud shadows and summer holidays walking along the dales. There weren't so many definitive lines in this fabric piece so the centre has been filled with rows of running stitch and then a perpendicular whip stitch worked vertically across the top (one of my go to techniques for mountains/hills/fields). The more obvious lines at the sides has been worked with whip stitch over back stitch to create a solid line, using a single strand of thread to keep it delicate. This fabric layer has been edged with bullion knots.
The tallest peak has also had a couple of stitch techniques applied to it. Initially the leaf batik shapes were edged with back stitch and then roughly worked around with french knots to fill in the larger gaps between these shapes and to give it a more rocky or bush-filled appearance which is also enhanced with the continuation of french knots to edge the fabric layer.
The fabrics behind the peaks have been worked very simply, seed stitch and french knot edging (green/grey spot fabric), back stitch following the printed lines and couched embroidery thread to the top (grey stripe) and long straight stitches roughly following the texture lines in the, almost plain, natural print, edged with bullion knots.
There's so much going on in the foreground that the top of the piece really needed to have less to balance it out and create some airy breathing space.
The bottom layer has it all going on. It's a fabric that I've used several times before, in the Gold Rush and All The Glitters Stitchscapes to name two, and I love how it goes that extra mile to add sunshine and texture and just a bit of glitz into my 'Scapes. It's a Japanese print fabric with the gold print design really lifting the green colours underneath, perfect for adding metallic golden threads to.
I started by working back stitch in a single strand of the metallic floss (terribly temperamental stuff to work with!) following the printed lines - and running stitch where the print lent itself.
I really like the section of the print photographed above, where little patches of plant life were already 'drawn' onto the fabric. I've lifted these out of the print by adding a rather zesty green over the gold with straight stitches, and underlined them with a slightly darker green stem stitch.
The fancy trimming reminds me of a stone fence and, although rather chunky, lends itself well to this piece, breaking up the layers and adding a place of focus to the piece. I've tried to embed this back in by putting my bullion knot reed flowers over the top and it does sit much better now. The bullions themselves have been worked in two different shades of the lime green to make it slightly more interesting.
Of course, the most noticeable parts of this Stitchscape are the really cute floral sequins which glint different colours depending on the angle, sometimes green or yellow or blue. They have been secured down with a bead at their centre, and surrounded by golden beads that are placed over gold spots in the printed design. Combined with the metallic thread its a magical , sparkling layer!
I've decided to frame this one in the hoop, the largest piece I've done this with so far! Very chuffed with how this has turned out.
The stitch run down for this piece is as follows; back stitch, running stitch, straight stitch, couching, beading, bullion knots, french knots, whip stitch (over running and back stitches), fly stitch, satin stitch, stem stitch and seed stitch. Most of these are the very basics of embroidery stitching but depending on the use of colour, and weight of line, can be made to look absolutely amazing and super effective! You don't need to use the most complicated stitches to create something beautiful.
Dale Chihuly At Kew Gardens
It's been a while since I last posted on here, blogging has taken a bit of a back seat amongst everything else that has to happen in running a business and life ticks along at a scarily brisk pace.
I've also changed how I take photos; having upgraded to a iPhone most of my images are now phone snaps, immediately uploaded to Instagram or Facebook without needing my big camera to be lugged around with me. Blogging is the newspaper of the online community.
Occasionally I do remember to get the camera out and on a visit to Kew Gardens last year to see the Dale Chihuly exhibition I knew I wanted to get some macro zooms and higher quality images of his amazing glassworks!
My absolute favourite glass house at Kew is the waterlily house. Although it may also be the smallest, the waterlilies are stunning and come in a variety of shapes and colours, casting their reflections onto the mirror-like water below. Chihuly's glass piece in this pool was just as incredible and breathtaking, mirroring the reflections but in dish plate proportions!
In the centre of the garden, there were glass pieces everywhere and I'm sure we didn't get to see them all but it was fascinating to see the way they would occasionally appear to be naturally growing in the shrubberies and then be an outstanding, one-off mad ball of spikes behind a hedge! Although it was an overcast day, the glass was almost lit from within, glowing with exuberance and depth of colour.
It was definitely one of my favourite exhibitions of all time. I've long been a fan of Chihuly's work and have memories of researching him during art class at secondary school over ten years ago and trying to create my own 'glasswork' art using thick wedges of PVA glue and acetate. A privilege to see so much of his work in one place and at one of my favourite places!!
Labels:
Day Trips,
Designers,
Flowers,
Photography,
Plants,
The Outdoors
Subscribe to:
Posts (Atom)